The role of automation tools like Make.com

Recap
The foundation for any automation is connecting with one platform to get data from it, and then sharing that data with another platform to get the desired data.
In the last lesson, we understood how we can connect with platforms like Google Sheets using their APIs. This is step 1 of building any automation.
In this lesson, we will understand how to share the data we fetch from one platform with another platform. This is step 2 of building any automation.
Why share data across platforms?
Task automation often involves multiple tools.
For example:
- A new customer fills out a Google Form, and you want their data to be automatically added to your CRM.
- Sales data from Shopify needs to be sent to Google Sheets for analysis.
- A new support ticket in Zendesk should be logged as a task in Trello.
To achieve these examples, we need to move data efficiently between multiple platforms.
Methods of Sharing Data Between Platforms
If both platforms offer APIs, we can retrieve data from one platform and send it to another.
The process usually involves:
- Fetching data from Platform A using an API request.
- Formatting the data as required by Platform B.
- Sending the formatted data to Platform B’s API.
The above process can be achieved using:
- Writing code
- Using an automation tool like Make.com
Writing code for designing automations
Coding can help you build any automation exactly as needed.
This is powerful because you'll always have full control over:
- Logic
- APIs
- Data handling
- Data privacy and security
Another big advantage is, building automations using code is cheaper long-term.
For example, you have to pay money to use an automation tool like Make.com. But with code, you don't have to.
Strong list of advantages. Cool, right?
But that's not the full story, though.
There are some stronger downsides (depending on who you are).
Here is an untested code for building Instagram Follower Count Tracker automation:
const { google } = require('googleapis');
const axios = require('axios');

// Google Sheets API setup
const SPREADSHEET_ID = 'YOUR_SPREADSHEET_ID'; // Replace with your Google Sheet ID
const SHEET_NAME = 'Sheet1'; // Replace with your sheet name
const GOOGLE_CREDENTIALS = require('./credentials.json'); // Path to your Google API credentials
const SCOPES = ['https://www.googleapis.com/auth/spreadsheets'];

// Instagram API setup (replace with your access token or third-party service)
const INSTAGRAM_ACCESS_TOKEN = 'YOUR_INSTAGRAM_ACCESS_TOKEN';

// Authenticate with Google Sheets API
const auth = new google.auth.GoogleAuth({
  credentials: GOOGLE_CREDENTIALS,
  scopes: SCOPES,
});

// Function to fetch usernames from Google Sheets
async function fetchUsernames() {
  const sheets = google.sheets({ version: 'v4', auth });
  const response = await sheets.spreadsheets.values.get({
    spreadsheetId: SPREADSHEET_ID,
    range: `${SHEET_NAME}!A2:A`, // Assuming usernames are in column A starting from row 2
  });
  return response.data.values.flat();
}

// Function to get Instagram follower count (using Instagram Graph API)
async function getInstagramFollowerCount(username) {
  try {
    const url = `https://graph.instagram.com/${username}?fields=followers_count&access_token=${INSTAGRAM_ACCESS_TOKEN}`;
    const response = await axios.get(url);
    return response.data.followers_count;
  } catch (error) {
    console.error(`Error fetching follower count for ${username}:`, error.message);
    return null;
  }
}

// Function to update Google Sheet with follower counts
async function updateSheetWithFollowerCounts(usernames, followerCounts) {
  const sheets = google.sheets({ version: 'v4', auth });
  const values = followerCounts.map((count) => [count]); // Convert to 2D array for Google Sheets
  await sheets.spreadsheets.values.update({
    spreadsheetId: SPREADSHEET_ID,
    range: `${SHEET_NAME}!B2:B`, // Assuming follower counts should be updated in column B
    valueInputOption: 'RAW',
    resource: { values },
  });
  console.log('Google Sheet updated successfully!');
}

// Main function to automate the process
async function main() {
  try {
    // Step 1: Fetch usernames from Google Sheet
    const usernames = await fetchUsernames();
    console.log('Fetched usernames:', usernames);

    // Step 2: Retrieve Instagram follower counts
    const followerCounts = [];
    for (const username of usernames) {
      const count = await getInstagramFollowerCount(username);
      followerCounts.push(count);
      console.log(`Follower count for ${username}:`, count);
    }

    // Step 3: Update Google Sheet with follower counts
    await updateSheetWithFollowerCounts(usernames, followerCounts);
  } catch (error) {
    console.error('Error in main function:', error.message);
  }
}

// Run the automation
main();
Wow! Did you see how long the code is?
The thing is, designing automations with code requires strong programming knowledge (Python, JavaScript, etc.).
Sure, It can be cheaper long-term (no platform fees), but requires developer time to write, test, and debug scripts.
Not to mention, it also requires ongoing maintenance and hosting.
“Yeah Bro, I don’t know coding and I don’t want to build automations by writing code.”
Haha, I can relate to you!
But don't worry.
You don't have to write code to build automations.
This is where automation tools like Make.com, N8N, and Zapier and their pre-built connectors come in.
In other words, instead of writing complex JavaScript code, you can use an automation tool's pre-built connectors and their modules to set up the same automation in a few clicks.
Using an automation tool like Make.com
If you want to design automations without coding, tools like Make.com, Zapier, and n8n simplify the process by providing:
1) Pre-built connectors (Apps) for common platforms
2) Modules (actions) of pre-built connectors

3) Drag and Drop UI for connecting different apps for sharing data between each other
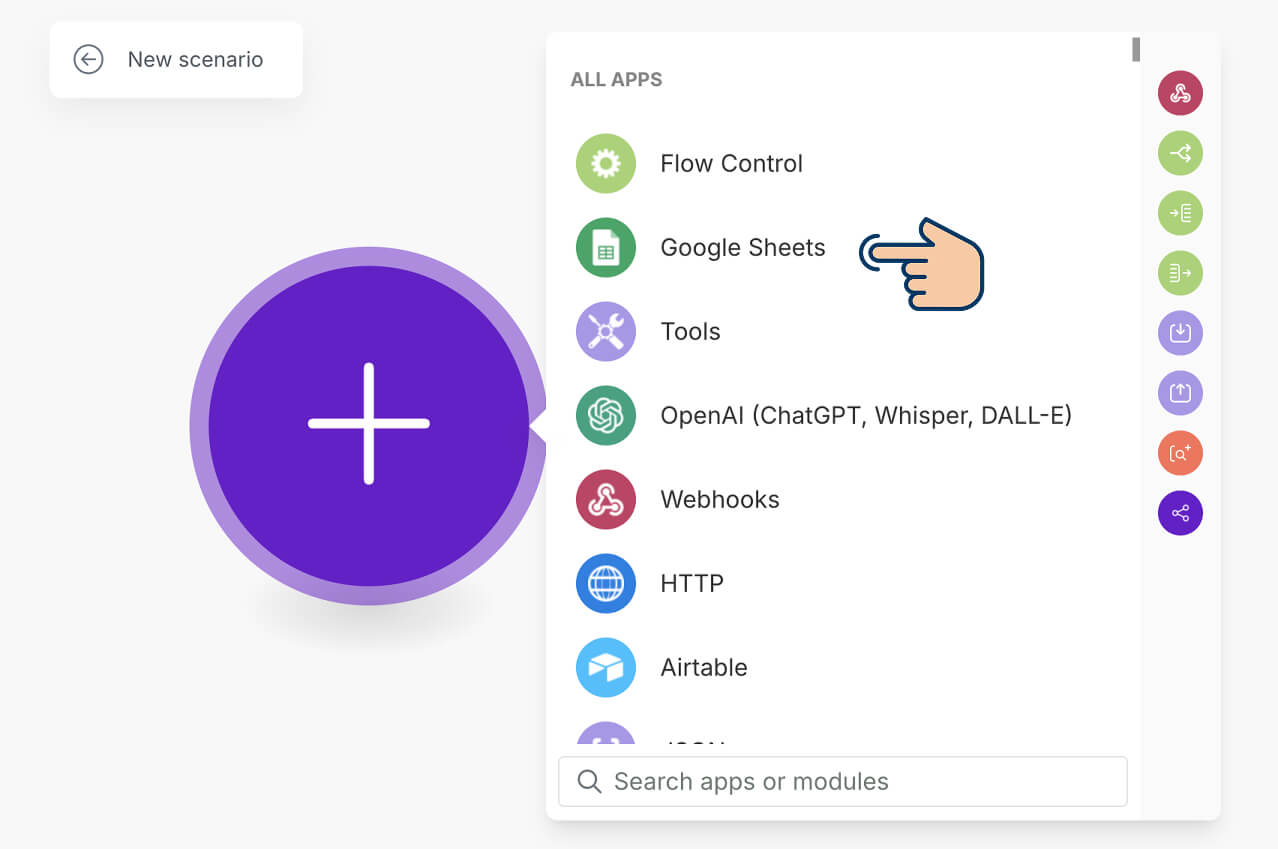
Pre-built connectors (Apps) for common platforms
Each pre-built connector (app) in an automation tool is designed to handle a specific platform, such as Google Sheets, Instagram, Airtable, Gmail, etc.
In other words, each pre-built connector is battled-tested to help you work in a reliable way with a specific platform.
Also, each pre-built connector makes it really easy to set up API authentication and data handling.
This is better shown than explained.
Here is the process if you're going with coding approach:
- Five sub-steps for setting up a Google Cloud Project and Creating OAuth 2.0
- Another five sub-steps for setting up credentials for OAuth 2.0 flow
- Requesting authorization from the user
- Using the access token to add a row to Google Sheets
And some code similar to this:
const CLIENT_ID = 'YOUR_CLIENT_ID';  // Replace with your Client ID
const API_KEY = 'YOUR_API_KEY';  // Replace with your API Key
const SCOPES = 'https://www.googleapis.com/auth/spreadsheets';

let tokenClient;
let accessToken = null;

// Load Google API Client
function loadGoogleAPI() {
    gapi.load('client', initializeClient);
}

// Initialize Google API Client
function initializeClient() {
    gapi.client.init({
        apiKey: API_KEY,
        clientId: CLIENT_ID,
        discoveryDocs: ["https://sheets.googleapis.com/$discovery/rest?version=v4"],
        scope: SCOPES,
    }).then(() => {
        tokenClient = google.accounts.oauth2.initTokenClient({
            client_id: CLIENT_ID,
            scope: SCOPES,
            callback: (tokenResponse) => {
                accessToken = tokenResponse.access_token;
                console.log("Authenticated Successfully!");
            }
        });
    });
}

// Trigger OAuth Authentication
function authenticate() {
    if (!accessToken) {
        tokenClient.requestAccessToken();
    } else {
        console.log("Already authenticated.");
    }
}

// Add a Row to Google Sheets
async function addRowToSheet() {
    if (!accessToken) {
        console.error("Authenticate first!");
        return;
    }

    const spreadsheetId = 'YOUR_SPREADSHEET_ID';  // Replace with your Google Sheet ID
    const range = 'Sheet1!A1:D1';  // Adjust based on your sheet structure

    const url = `https://sheets.googleapis.com/v4/spreadsheets/${spreadsheetId}/values/${range}:append?valueInputOption=RAW`;

    const newRow = {
        values: [["John Doe", "johndoe@example.com", "New York", "Customer"]],
    };

    try {
        const response = await fetch(url, {
            method: "POST",
            headers: {
                "Content-Type": "application/json",
                "Authorization": `Bearer ${accessToken}`,
            },
            body: JSON.stringify(newRow),
        });

        const result = await response.json();
        console.log("Row added successfully:", result);
    } catch (error) {
        console.error("Error adding row:", error);
    }
}

// Load the API
loadGoogleAPI();
Ufff… big process with 20 steps and a large chuck of code, ain't it?
But you don't have to through all this when using pre-built connectors of an automation tool.
For example, If you're connecting with Google Sheets API using the “Google Sheets” app of Make.com, you can achieve the same within a few steps and clicks.
Let's see how to connect and use the Google Sheets API inside Make.com using its pre-built “Google Sheets” App.
Inside make.com, a pre-built connector is called as an “app”.
So, from here on words, I will use the words “pre-built connector” and “app” interchangeably.
Introducing modules of an App
If an app represents the platform, modules inside an app represent individual actions we perform using the platform.
For example, when you're working on a spreadsheet using the Google Sheets platform, you'll end up performing specific actions on it such as:
- Adding a row
- Updating a row
- Deleting a row
- Bulk adding rows
- The list goes on and on
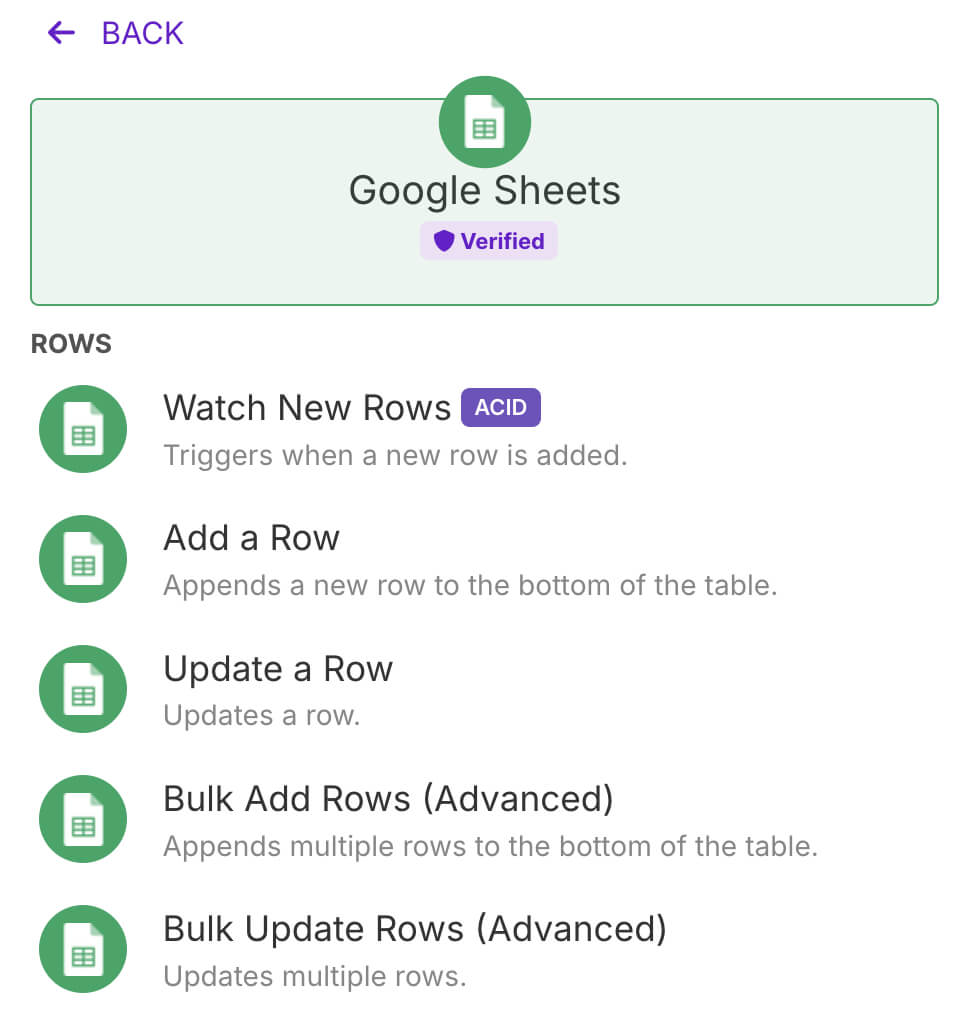
So the apps of automation tools contain modules to achieve actions like above.
For example, here is the list of modules (actions) supported by Make.com's Google Sheets App.
I am saying all this because, when building an automation, you have to use modules of an App. You can never add an app directly.
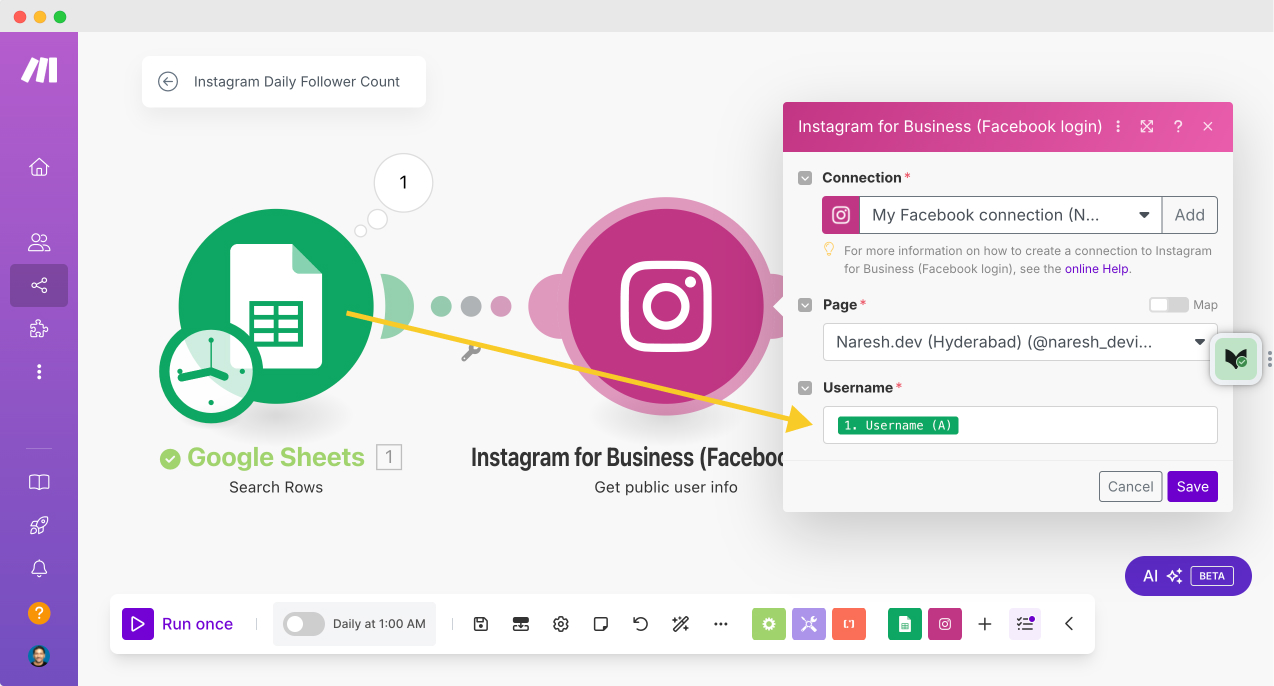
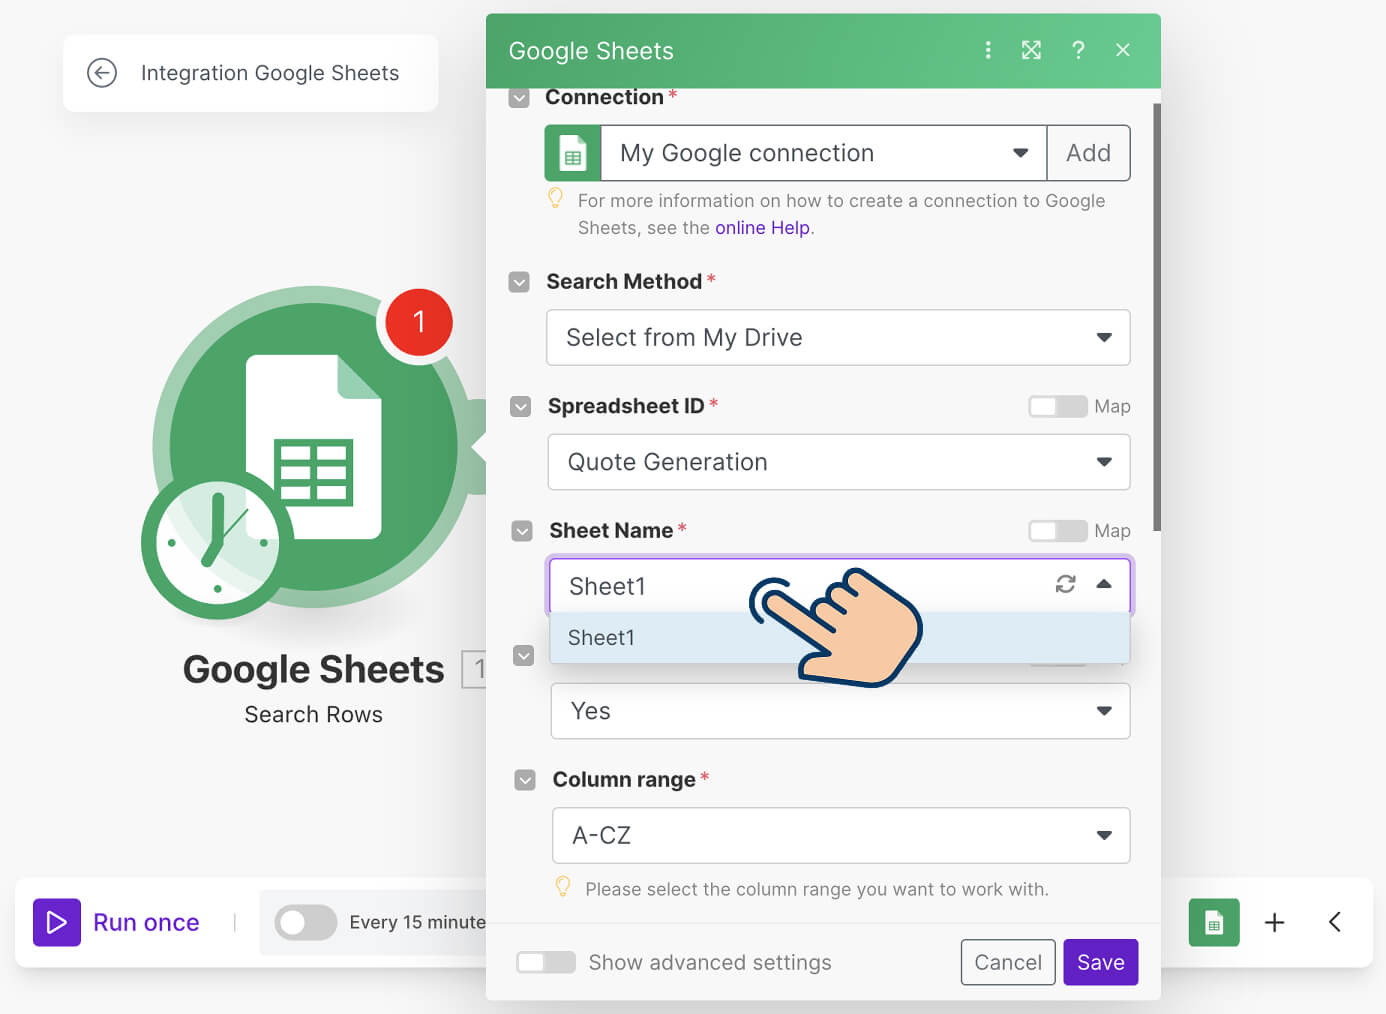
So, to connect with Google Sheets API and get the data of a spreadsheet:
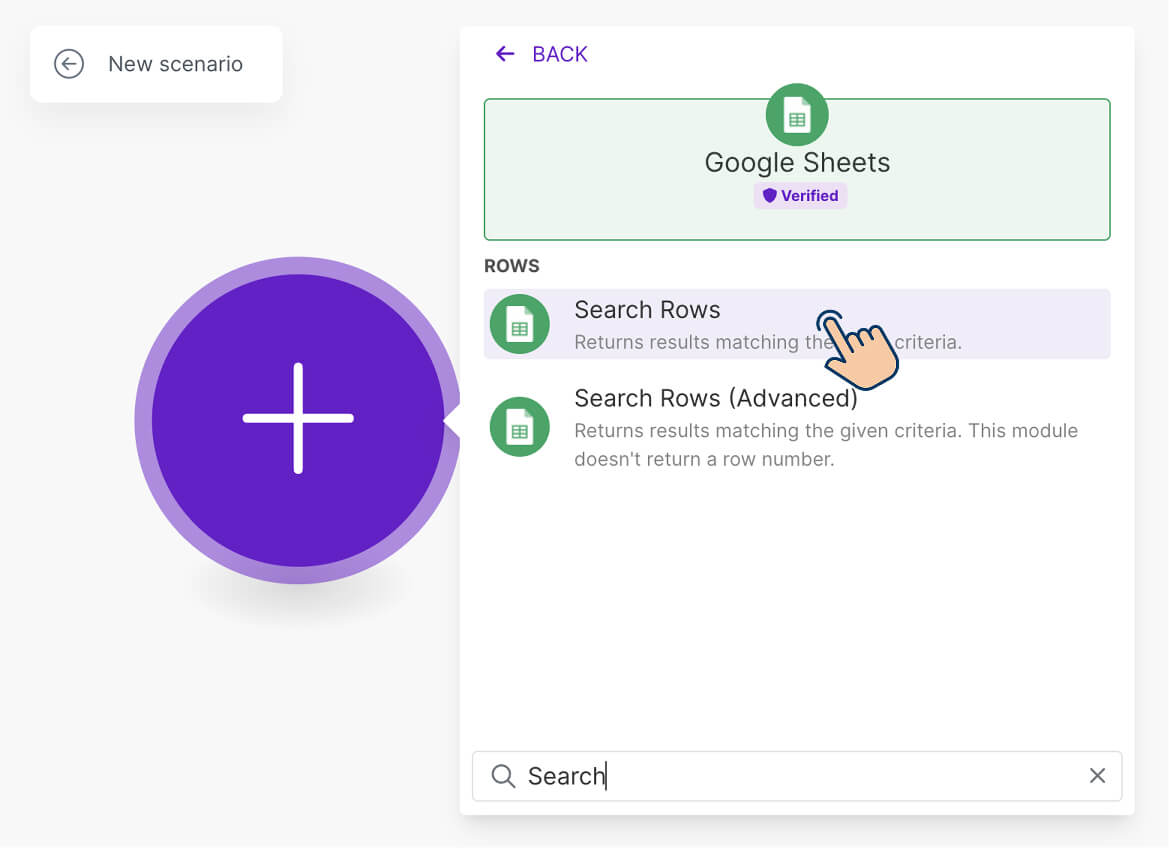
Step 1: Add Google Sheet's “Search rows” module to the automation screen.
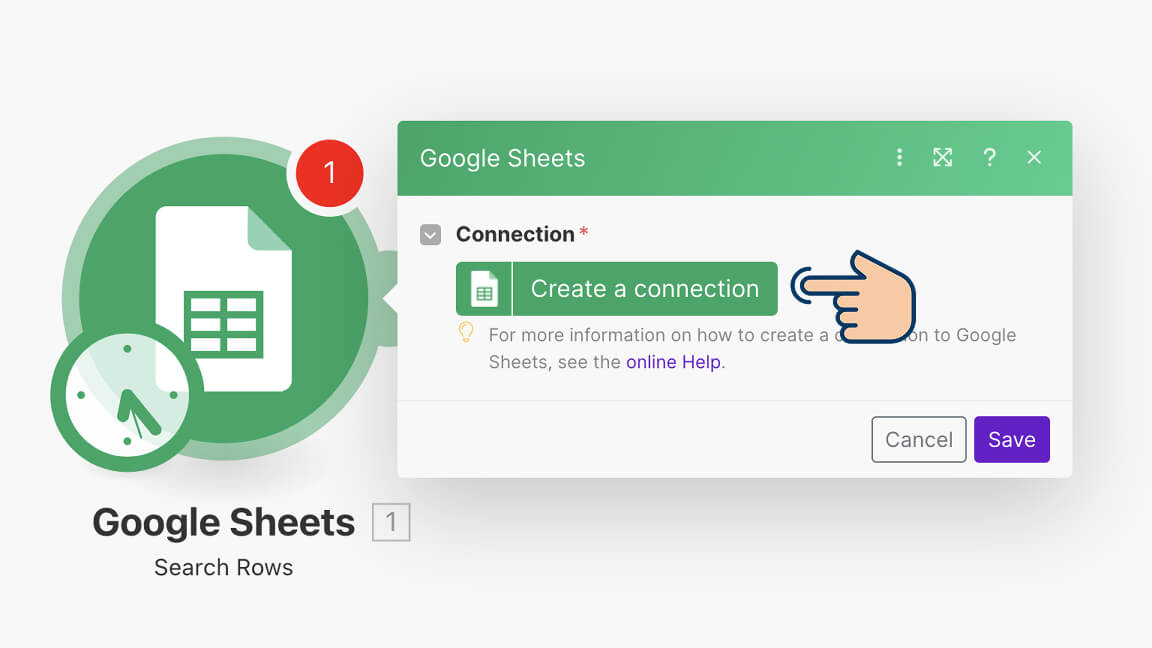
Step 2: Click on the “Create connection” button:
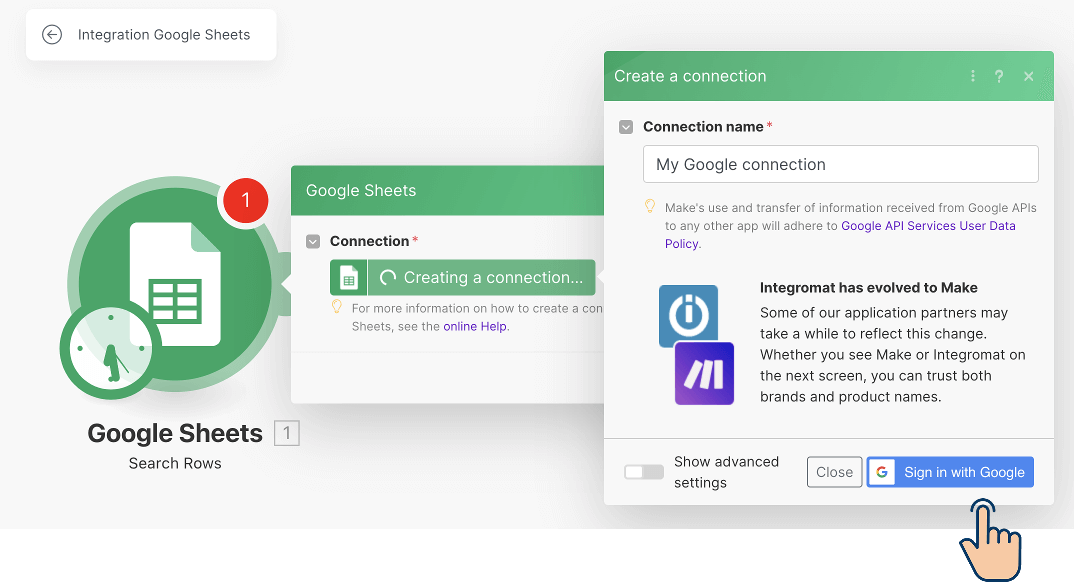
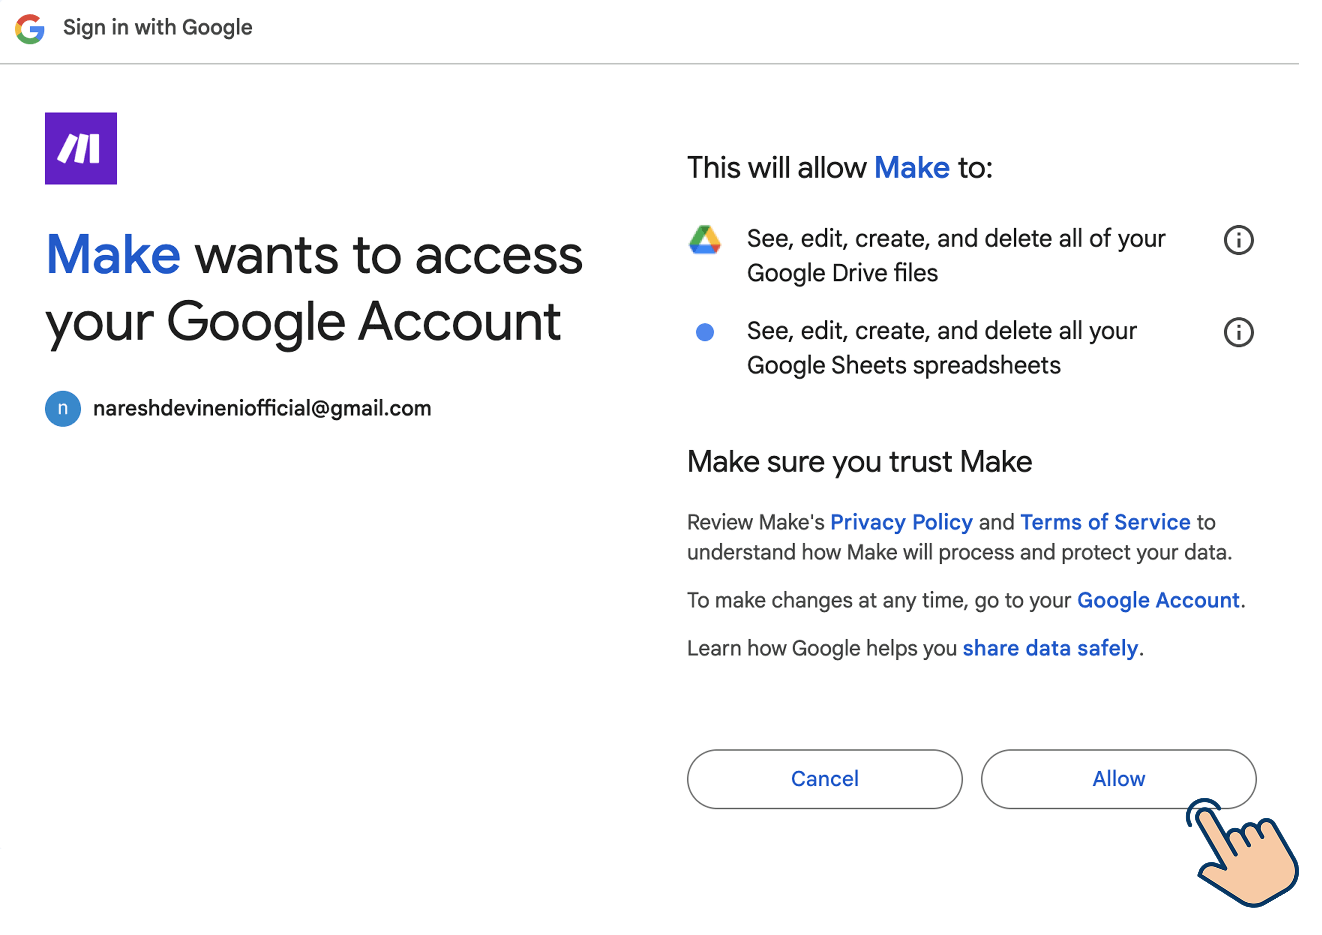
Step 3: you have to sign in to your Google account
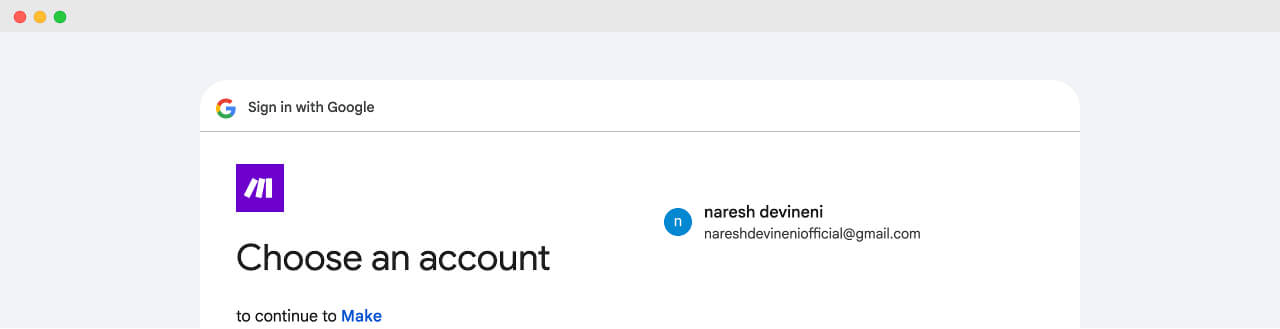
Step 4: Share your name, email address, etc. with Make.com.

Step 5: Authorise make.com to see, edit, create, and delete your Google Sheets and Google Drive account on your behalf
Step 6: Access and get data of a particular spreadsheet
Easy, isn't it?
You didn't have to generate credentials or write code.
All you have to do is go through some clicks (less than 10 clicks).
That's how powerful and easy to use pre-built apps and their modules.
Currently, make.com has pre-built over 2000+ apps for common platforms:
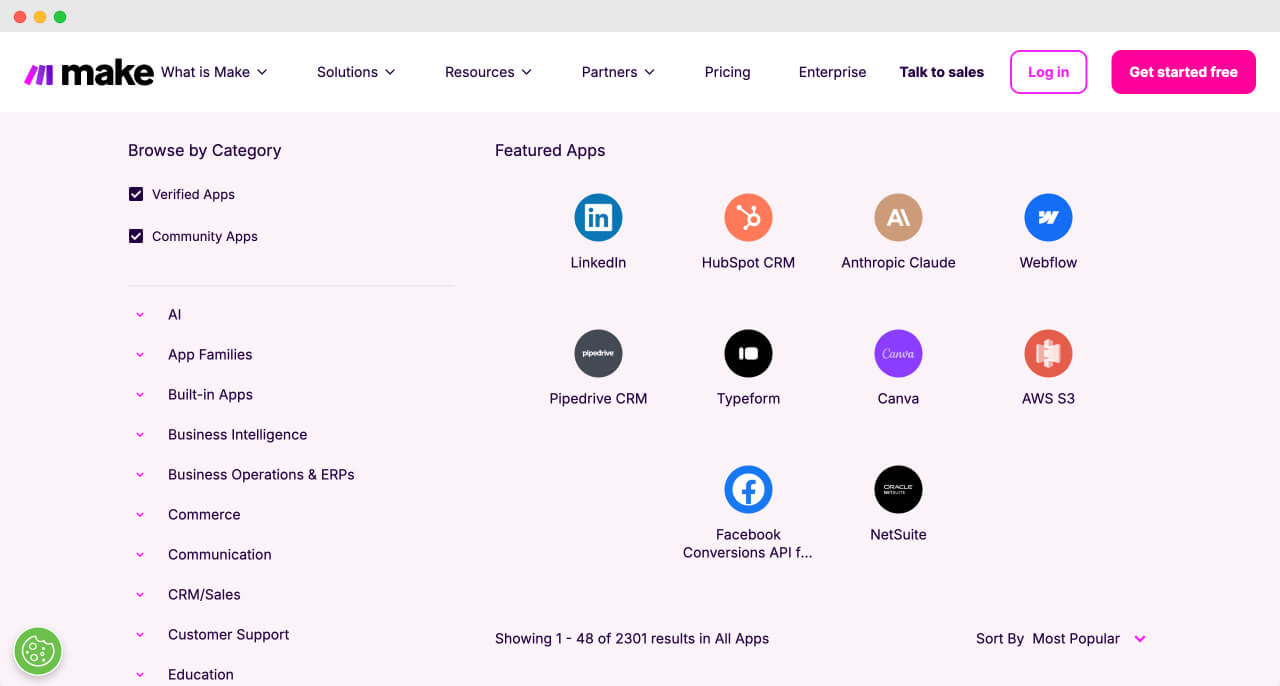
This means, you can create reliable automations involving 2000+ platforms.
Just to summarize, here are the advantages of using automation tool apps over coding:
1. Ease of Use
- No need to write API requests or manage authentication.
- Simple drag-and-drop interface to build automations.
2. Saves Time
- Reduces development effort by providing ready-to-use actions (modules).
- Automations can be set up in minutes instead of hours or days.
3. Error Handling & Reliability
- Built-in error handling ensures stable automations.
- Apps are tested and maintained by the automation tool, reducing the risk of breaking changes.
4. No Need for Coding
- Ideal for non-technical users or business teams.
- Advanced users can still use custom API calls if needed, but pre-built apps simplify most tasks.
5. Scalability & Maintenance
- Easily modify and extend automations.
- Updates to the apps are handled by the automation tool. This ensures continuous compatibility with external platforms.
The conclusion
You now have enough knowledge to start building automations using Make.com and in the next lesson, we will do just that.