The core components of an API-based HTTP request

Now that you understand how websites, URLs, and APIs work, let's go a level deeper and see what makes up an HTTP request.
As I mentioned in the last lesson, every HTTP request consists of six parts:
- The API endpoint– Where the request is sent
- The Method – What action you want to perform (GET, POST, etc.)
- Query Parameters – Optional data added to the API endpoint
- Headers – Optional metadata about the request
- Request Body – The data you send along with the request. It is used for POST, PUT, and PATCH Methods because we send data with them, and it is not used with the GET method because GET requests are meant to retrieve and not send data.
- Response body – The response data you receive from the API.
Using some of these parts is optional, and it depends on the type of API request and the service itself.
Let me elaborate by going through each one.
1. What is an API endpoint?
During the last lesson, we have established the fact that an API of a service must be accessed using its API endpoint.
An API endpoint is the specific URL where you send your request.
And a service can provide different API endpoints for accessing different parts of the service.
Let's take X (formerly Twitter) API as an example.
X provides separate endpoints for different resources:
- Tweets – Create, search, or delete them
- Users – Search, follow, or mute them
For example, for managing the tweets, the base endpoint is:
https://api.twitter.com/2/tweetsTo fetch a specific tweet, you add the tweet ID:
https://api.twitter.com/2/tweets/{id}Here, {id} is a placeholder you replace with an actual tweet ID.
But, for managing users, the X API provides a different endpoint:
https://api.twitter.com/2/usersAnd again, to fetch a specific user, you must provide the ID of the user:
https://api.twitter.com/2/users/{id}Here, {id} is a placeholder you replace with an actual user ID.
You get the idea, right?
“Got it! But how do you find these API endpoints?”.
Great question and I have an easy answer.
How to find API endpoints of a particular service
Every service that offers an API publishes documentation explaining how to use it.
Let’s say you want to use the Twitter (X) API. Just Google:
X apiAnd then look for a result from the official website that mentions “API.”
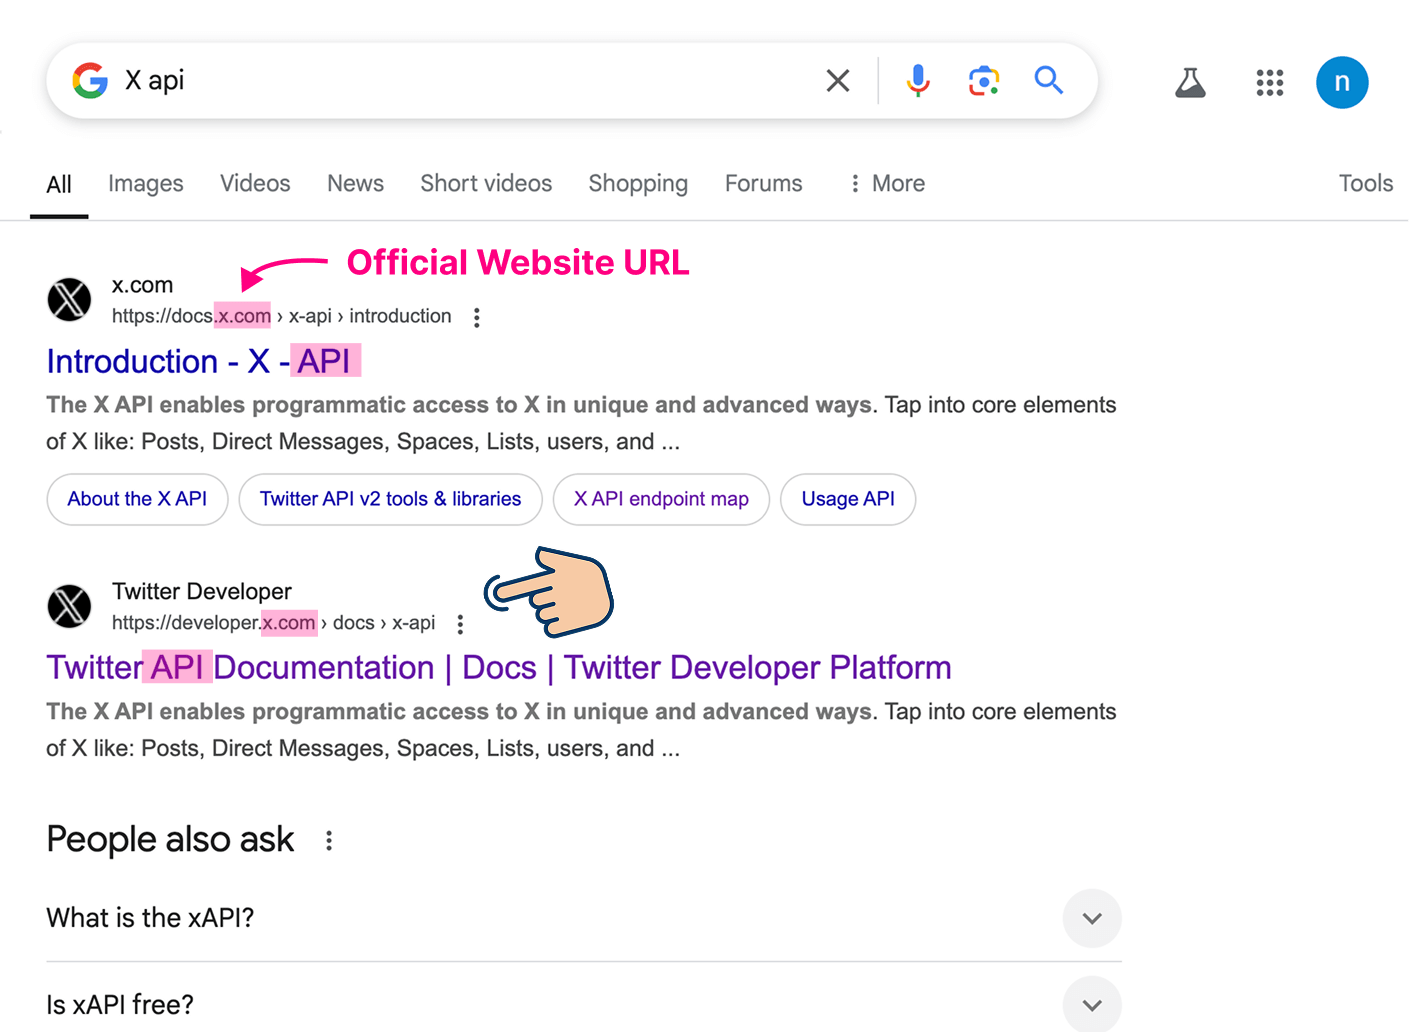
Once inside, you’ll find example endpoints:
How different APIs present API Endpoints
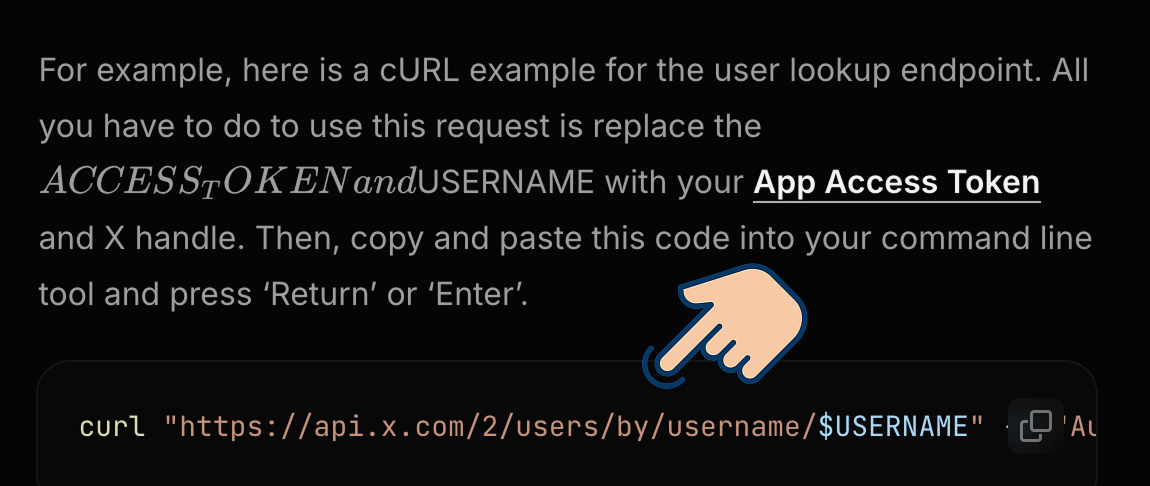
Some documentations provide the API endpoints by using them with a curl command.
Sometimes, they provide the endpoint as part of a Full API request.
“curl?”
The curl command is available inside a Command Line Tool (CLI) like:
- Terminal on macOS and Linux
- Command Prompt on Windows
You can make API requests using these CLI tools too. Not just automation tools like Make.com or programming languages like JavaScript.
It is common to access APIs using the CLI tools.
Having said that, some documentations make it easy to find the endpoints without any assumptions that you use curl command to access their API.
The Documentation of Google APIs is the best example for this.
They provide endpoints in the form of plain URLs.
Most API docs are not beginner-friendly.
They are easy to access, but difficult to read.
For example:
- X API docs are overly technical, assuming you’re a developer.
- Google APIs sometimes leave out important context.
Calling an API endpoint directly is not enough.
But still, reading the docs (or at least skimming them) is necessary to figure out what’s required.
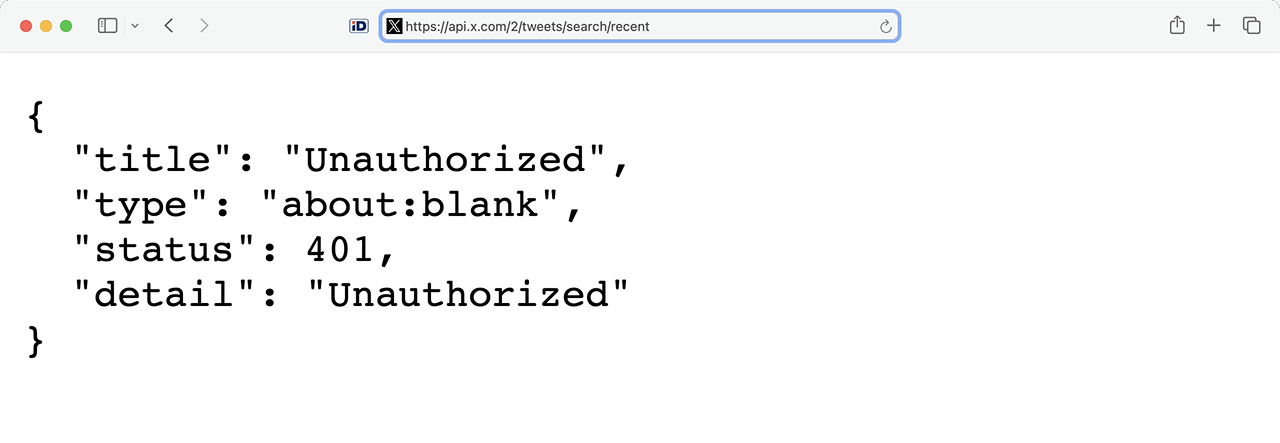
If you simply try to open an API endpoint in your browser, you’ll often get an “Unauthorized” error.
Why?
“Because many APIs require us to authenticate first by providing an API key or OAuth token. Correct na bro?”
Haha. Awesome. Correct, Yeah!
A lot goes into calling an API endpoint:
Also, you need to specify:
- What kind of action you're performing
- What data you're sending or retrieving
- Optional parameters or settings
This is where the rest of the HTTP request parts come in.
2. HTTP Methods – Telling the API what you want to do
When you call an API, you’re asking it to perform an action.
For that, you use HTTP methods.
Here is the list of most common methods:
- GET the details of an account, post, user, etc.
- POST a Google review, blog post, Instagram reel, LinkedIn article, etc.
- DELETE a post, profile picture, comment, review, etc.
- PATCH — Partially update a blog post, about text on LinkedIn, etc.
- PUT — Replace a piece of information completely instead of partially updating it.
Let’s start with the most common one: GET.
How to use the GET Method
Use the GET method when you want to fetch data from a particular service.
We have been doing this since the beginning of the course.
For example, we have fetched a lot of data from Google Sheets service.
The Google Sheets app was using the GET method internally. It is just that we didn't know until now.
Just to be on the same page, we should use the GET method for:
- Fetch rows from a Google Sheet
- Get a list of jobs from LinkedIn
- Search tweets using X’s API
You get the idea, right?
Also, when using GET, we often need to include a query.
After all, we have to specify what exactly we want to retrieve, right?
Search Engines are the best example of this.
When you search for “best orthopedic doctor kukatpally”:

Google uses a GET request to fetch relevant results for your query.
“Got it! But where does this query go when making the GET request?”
Great question.
Where Does the Query Go in a GET Request?
There are two common ways:
1)As part of the URL path:
For example, on X (Twitter), if we like to fetch details of a user using its API, we need to provide the user ID (query) as part of the API endpoint URL:
https://api.twitter.com/2/users/{id}Here, {id} is a placeholder we replace with a query (user ID).
2) As a query parameter — Extra data in the URL
Query parameters are optional values that can added to an HTTP request to customize the request.
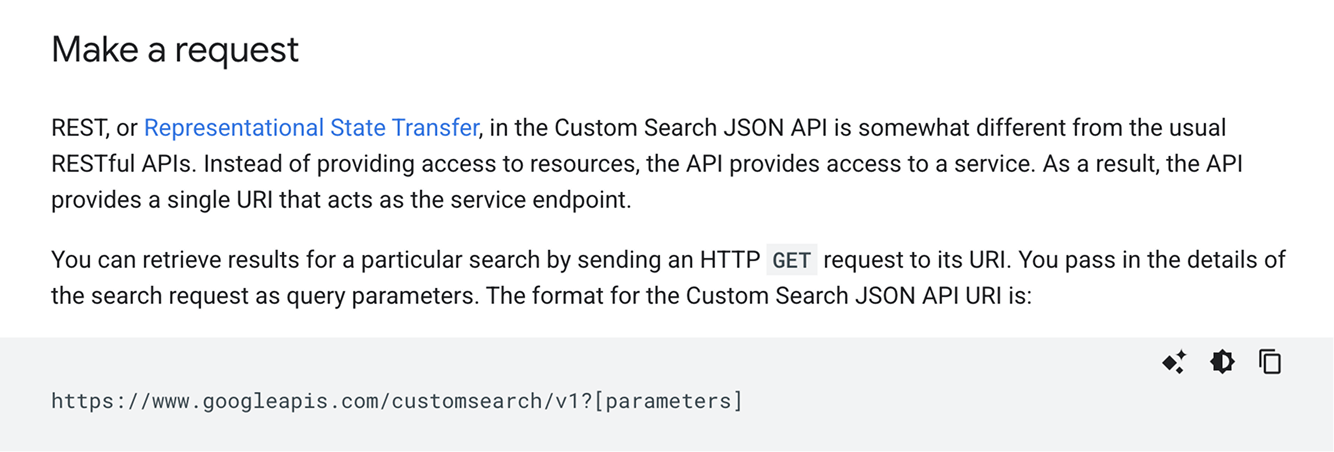
As you already know, an HTTP request starts with a URL (API Endpoint):
https://www.googleapis.com/customsearch/v1And if you want to add a query parameter(s) to an HTTP request, you must add a question mark at the end of the URL (?) and then add one or more query parameters after the question mark (?):
https://www.googleapis.com/customsearch/v1?[parameters]A query parameter is nothing but a key-value pair in the format key=value.
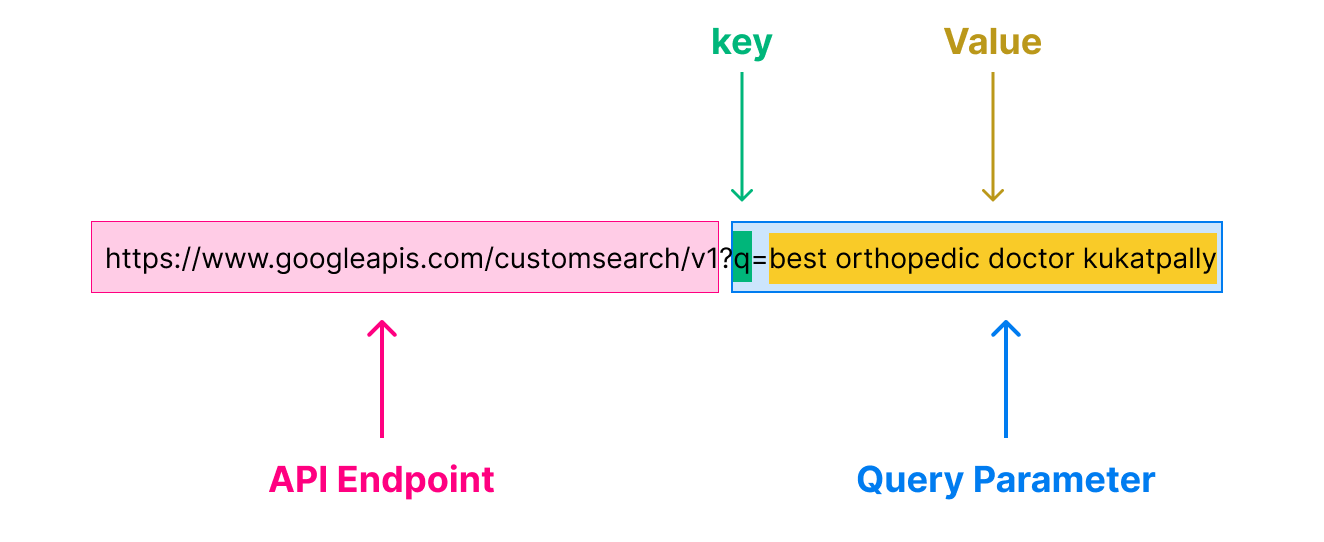
For example, when using the Google Search Results API, it is mandatory for us to use a parameter with q as the key, and a keyword as the value.
https://www.googleapis.com/customsearch/v1?q=best orthopedic doctor kukatpallyHere, q=best orthopedic doctor kukatpally is the query parameter.
Another example, when using the PageSpeed Insights API, we add a url parameter to analyze a specific website:
https://pagespeedonline.googleapis.com/pagespeed/v5/runPagespeed?url=https://example.comHere, url=https://example.com is a query parameter that tells the API which site to analyze.
And, If you have multiple parameters, they're separated by ampersands (&).
https://www.googleapis.com/customsearch/v1?key1=value1&key2=value2&key3=value3For example, The Google Search Results API forces you to provide two query parameters to make a successful request:
q —the actual query keywordkey —API key to authenticate the request
The URL structure would look something like:
https://www.googleapis.com/customsearch/v1?q=best orthopedic doctor kukatpally&key=AIzaSyD-abc123XYZ456fakeAPIkey789_example Similarly, some APIs would ask you to provide a dozen or more query parameters.
At the end of the day, The more context we send in the API request, the better the response we get from the service.
Also, providing an API key as a query parameter is standard for all the APIs provided by Google, such as:
- Google Business Performance API
- YouTube API
- Google Search Positions API
- Google Places API
But unlike Google APIs, some API services don't want you to provide the API key as a query parameter.
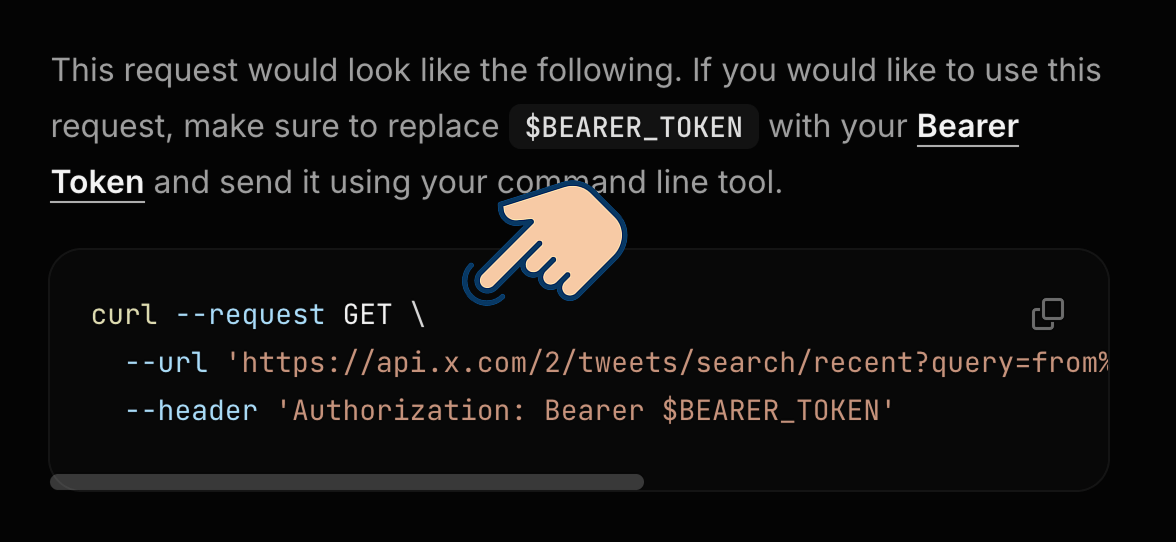
Instead, they want you to use another core component of an API request called Headers for providing the API key or the bearer token related to the OAuth authentication.
Introducing HTTP headers
Just like query parameters, you can use HTTP headers to provide extra information about the API request.
To be more precise, Headers are used to send additional metadata about the request, such as, credentials or content type.
Standardized HTTP headers include:
- Authorization – Used to provide an API key or access token
- Content-Type – Specifies the format of the request body (e.g., JSON, XML)
- User-Agent – Identifies the software making the request
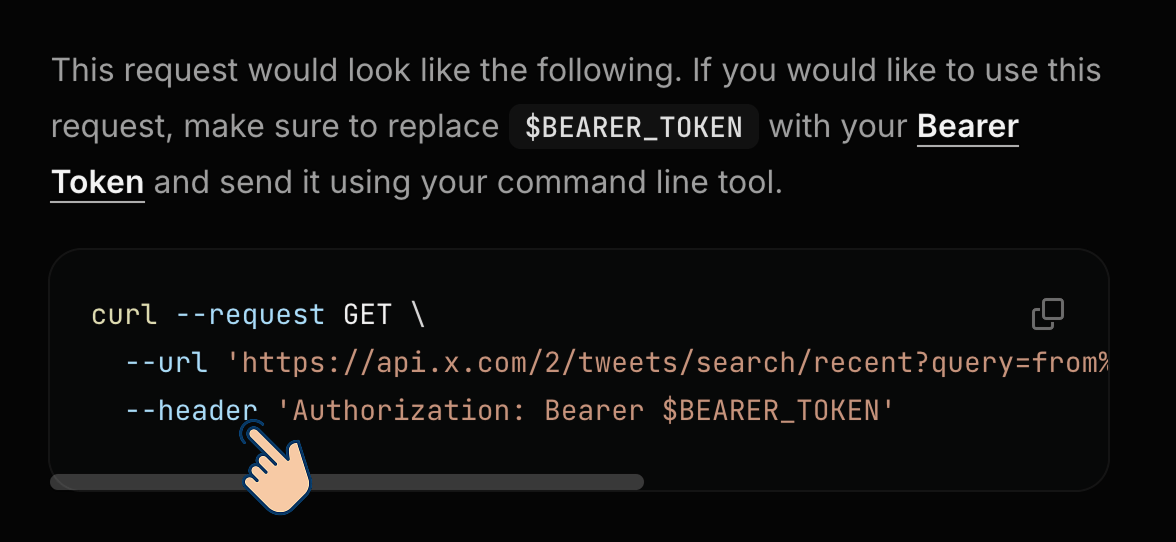
For example, when accessing the X (Twitter) API, we might send an Authorization header like this:
Authorization: Bearer YOUR_ACCESS_TOKENThis tells X (Twitter) that we are authorized to access the data.
The standardized headers of an HTTP request are recognized by all API service providers.
Some APIs require custom headers too.
For example, RapidAPI is an API marketplace where you can find a lot of useful unofficial APIs for Facebook, Instagram, etc.
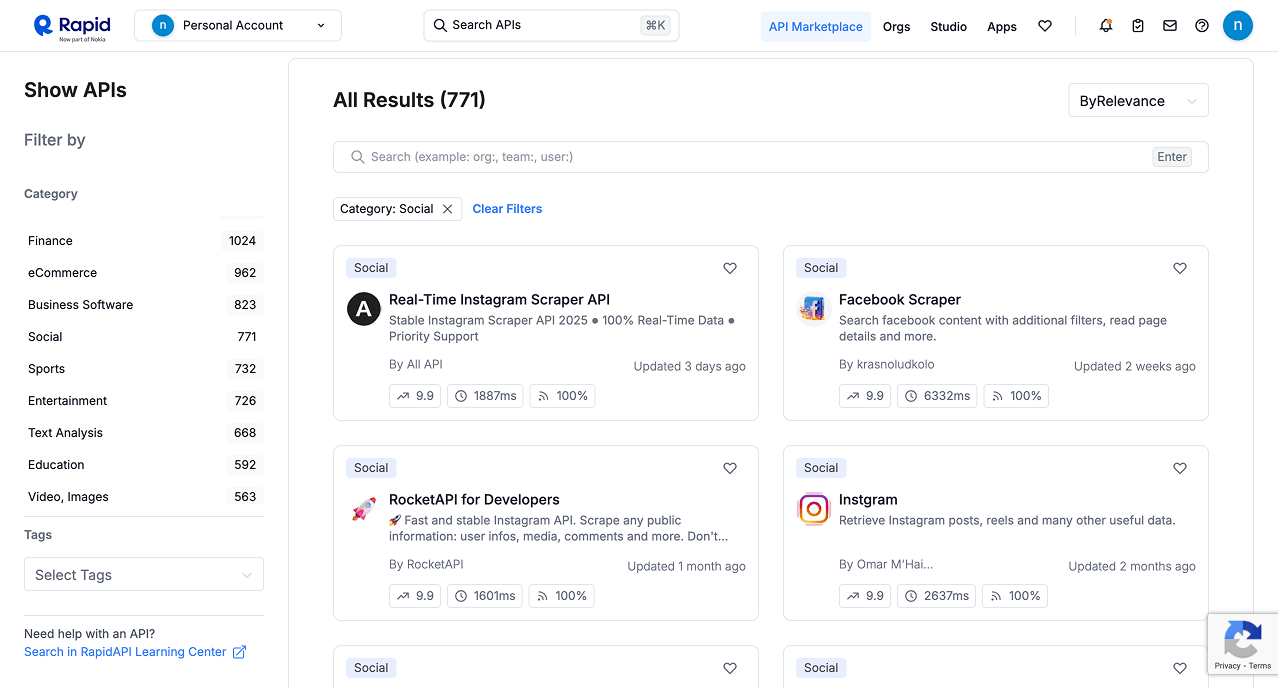
I use it extensively for my needs.
And every time you want to use the API provided by RapidAPI, you must send at least two headers as part of the HTTP request:
- x-rapidapi-host
- x-rapidapi-key
x-rapidapi-host: [API host]
x-rapidapi-key: [Your API key]
If you don’t include these, your request will be rejected.
This will become clear when we build the LinkedIn Scraper automation using the RapidAPI.
"Hey! Sorry for interrupting you but how do you access the fetched data?"
Oops, Sorry. I forgot to talk about the response from the API.
Response Body
Every time you send an HTTP request, the API responds with two important things:
- Status Code – tells you whether the request worked or failed.
- Response Body – the actual data or message from the API.
HTTP Status Codes – Know if your request worked
Here are some of the most common status codes:
- 200 OK – Everything went well.
- 201 Created – New data was successfully added (common with POST).
- 204 No Content – The request was successful, but there’s nothing to show (often after DELETE).
- 400 Bad Request – Something is wrong with your request. Check your syntax.
- 401 Unauthorized – You didn’t provide valid credentials (e.g., missing/invalid API key).
- 403 Forbidden – You’re not allowed to access this resource.
- 404 Not Found – The endpoint doesn’t exist, or the resource isn’t there.
- 500 Internal Server Error – Something broke on the API’s end.
Pro tip: Always check the status code before using the response body. If you get a 4xx or 5xx, something went wrong, and you may need to fix it before continuing.
The response body changes depending on the method used for calling the API.
For example, imagine you made a GET request for fetching users from Instagram.
If the request is successful, you'll receive a status code of 200 OK and the following JSON inside the Response Body:
[
  {
    "id": 1,
    "name": "Alice",
    "email": "alice@example.com"
  },
  {
    "id": 2,
    "name": "Bob",
    "email": "bob@example.com"
  }
]
As you can see, the response contains users fetched from Instagram.
Next, to achieve our goal, we should parse this JSON response and work with individual user's data.
Don't worry, we’ll learn how to handle and parse this JSON in the next lesson.
Does this answer your question?
"Yep!"
Cool.
Anyway, just to recap...
GETrequests are used to fetch data.- Query parameters go in the URL.
- Headers add extra details, including API keys.
- Some services prefer API keys in headers, others in query parameters.
- The data fetched can be accessed from the Response Body.
And we can use query parameters and HTTP headers when using other methods of HTTP such as POST, PUT, PATCH, and DELETE.
But query parameters are usually used with the GET Method.
Next, let's learn about…
How to use the POST method
Use the POST method when you want to send or submit new data to a service.
For example:
- Posting a Google Review
- Publishing a blog post to WordPress
- Uploading a Reel to Instagram
You get the idea, right?
“Yep! But how to provide data when making a POST request? Query parameters again?”
Hahaha. Do you always ask great questions?
3. HTTP Request Body – Where the sensitive data goes
Query parameters are visible in the URL, which means they:
- Appear in browser history
- Get stored in server logs
- Can be seen if someone looks over your shoulder
So, query parameters are fine when you're sending non-sensitive data (like search terms or user IDs).
This also means that query parameters are not suitable for confidential information such as:
- Premium content
- Personal identifiable information
- Payment details
- Medical information
For sensitive or detailed data, we use the “request body”, especially in POST requests.
Take Pinterest, for example
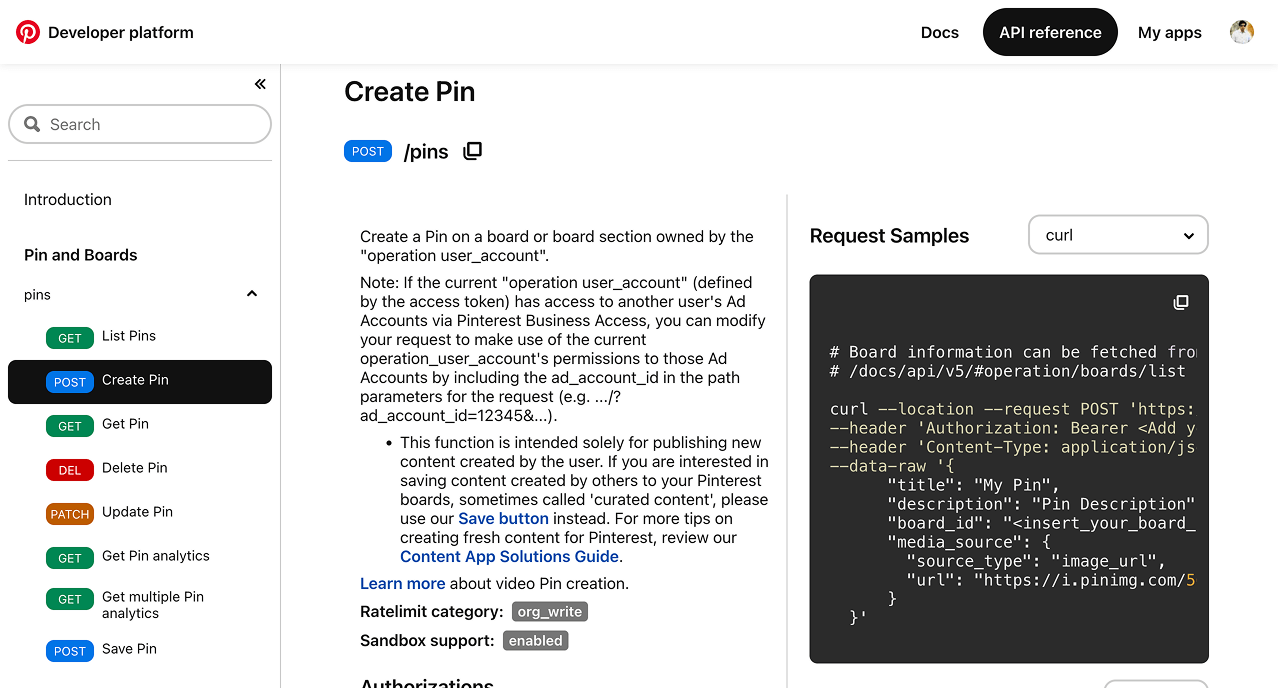
If we want to post a new pin to one of your Pinterest boards, we would send a POST request with this body:
{
      "title": "How to look good everyday",
      "description": "It’s not easy to look good every day, especially when you have so many things to do and are working from home. You know it’s gotten really bad when you need to schedule washing your hair and shaving your legs into a Google calendar.",
      "board_id": "<insert_your_board_id>,
      "media_source": {
        "source_type": "image_url",
        "url": "https://i.pinimg.com/564x/28/75/e9/2875e94f8055227e72d514b837adb271.jpg"
      }
  }
This data is placed in the body of the HTTP request.
And in the headers, you’d also specify:
Content-Type: application/json
Authorization: Bearer YOUR_ACCESS_TOKEN
By sending the above headers, we are telling Pinterest that we are authorized to make this request and the POST body is in JSON format.
Having said that, the content for the “Request Body” can also be provided in the following formats:
- Plain text
- XML
Important: The format of the body (JSON, XML, etc.) depends on the API. Most modern APIs expect JSON for the body.
Long story short: The request body contains the actual data we’re sending to the server.
Terminology clarification: The body of the quest can also be referred to as:
- Request body
- Payload
- Message body
Response body for the POST request
Although we are creating and posting data to a service using the POST request, we will still end up receiving the following details from the API:
- A response - newly created object or nothing if the creation failed.
- An acknowledgement - Status code
- 200 when an object is created and returned
- 201 when an object is created but only its reference is returned (such as an ID or a link)
If the POST request is successful, the response often includes the newly created object with extra details added by the server, such as, an ID, timestamps, or default values.
For example, if your API request resulted in creating a blog post, the response body might look like this:
{
  "id": 456,
  "title": "How to look good everyday",
  "content": "This is the body of the post.",
  "author": "Jane",
  "createdAt": "2025-04-08T13:32:00Z",
  "published": false
}
Even though you only sent the title, content, and author, the API responded with additional fields such as:
id– auto-generated by the servercreatedAt– timestamp of when it was createdpublished– defaulted tofalseby the system
This response body gives confirmation that the data was successfully created and shows exactly what’s stored on the server.
Anyway, next, let's quickly talk about…
How to use the PUT, PATCH, and DELETE methods
The PUT and PATCH Methods are similar to the POST method:
- They send data to a service.
- They put the data inside the “Request Body” instead of Query parameters because the data could include private information.
The PUT method
It is used when you want to replace an existing resource entirely.
Imagine you’re updating a LinkedIn post.
You’d send a PUT request to something like:
https://api.linkedin.com/v2/posts/{postID}And with a request body that includes all the data for the post, not just the part you’re changing:
{
  "Title": "Prompts that are illegal to know :D"
  "text": "Updated version of my post",
  "visibility": "PUBLIC"
}
If you leave out a field, it might get removed.
So PUT is like saying, “Hey, here’s the complete new version and overwrite the old one.”
PATCH – Update just part of it
In contrast, PATCH is used to update only the fields you care about.
You’d send a PATCH request to something like:
https://api.linkedin.com/v2/posts/{postID}And with a smaller request body that leaves out the data that you don't want to change.
{
  "text": "Minor correction"
}
The rest of the post stays unchanged.
This is useful for making small edits without sending everything again.
DELETE – Just remove it
Finally, DELETE is exactly what it sounds like, removing something.
For example, the below API request will delete a tweet:
DELETE https://api.twitter.com/2/tweets/{postID}Also, depending on the API, you might not need to send a body at all.
You just need to use the right endpoint and authentication.
Core Concepts Cheat sheet
| Concept | What It Means |
|---|---|
| API | A way for different software systems to talk to each other — like a menu at a restaurant. |
| HTTP | The protocol most APIs use to send and receive data over the internet. |
| Endpoint | A specific URL that represents a resource (like /users, /posts, etc.). |
| HTTP Method | Tells the API what action you want to take: |
GET | Retrieve data (like reading a tweet). |
POST | Create something new (like publishing a post). |
PUT | Replace an existing item entirely. |
PATCH | Update part of an existing item. |
DELETE | Remove an item. |
| Query Parameters | Extra info added to a URL using ? and & (e.g., ?limit=10&page=2). |
| Request Body | The data you send (usually in JSON) when creating or updating something. |
| Response | What the API sends back — usually JSON — with the result of your request. |
| Status Codes | 3-digit codes that tell you if the request worked (200, 201) or failed (404, 500). |
| Authentication | Proving who you are, often using an API key or access token. |
Ufff…We have come a long way and still a long way to go :D
“Hmmm. But how do we create these manual API requests inside Make.com?”
Simple.
The HTTP module allows us to send HTTP requests and can also process the response for us.
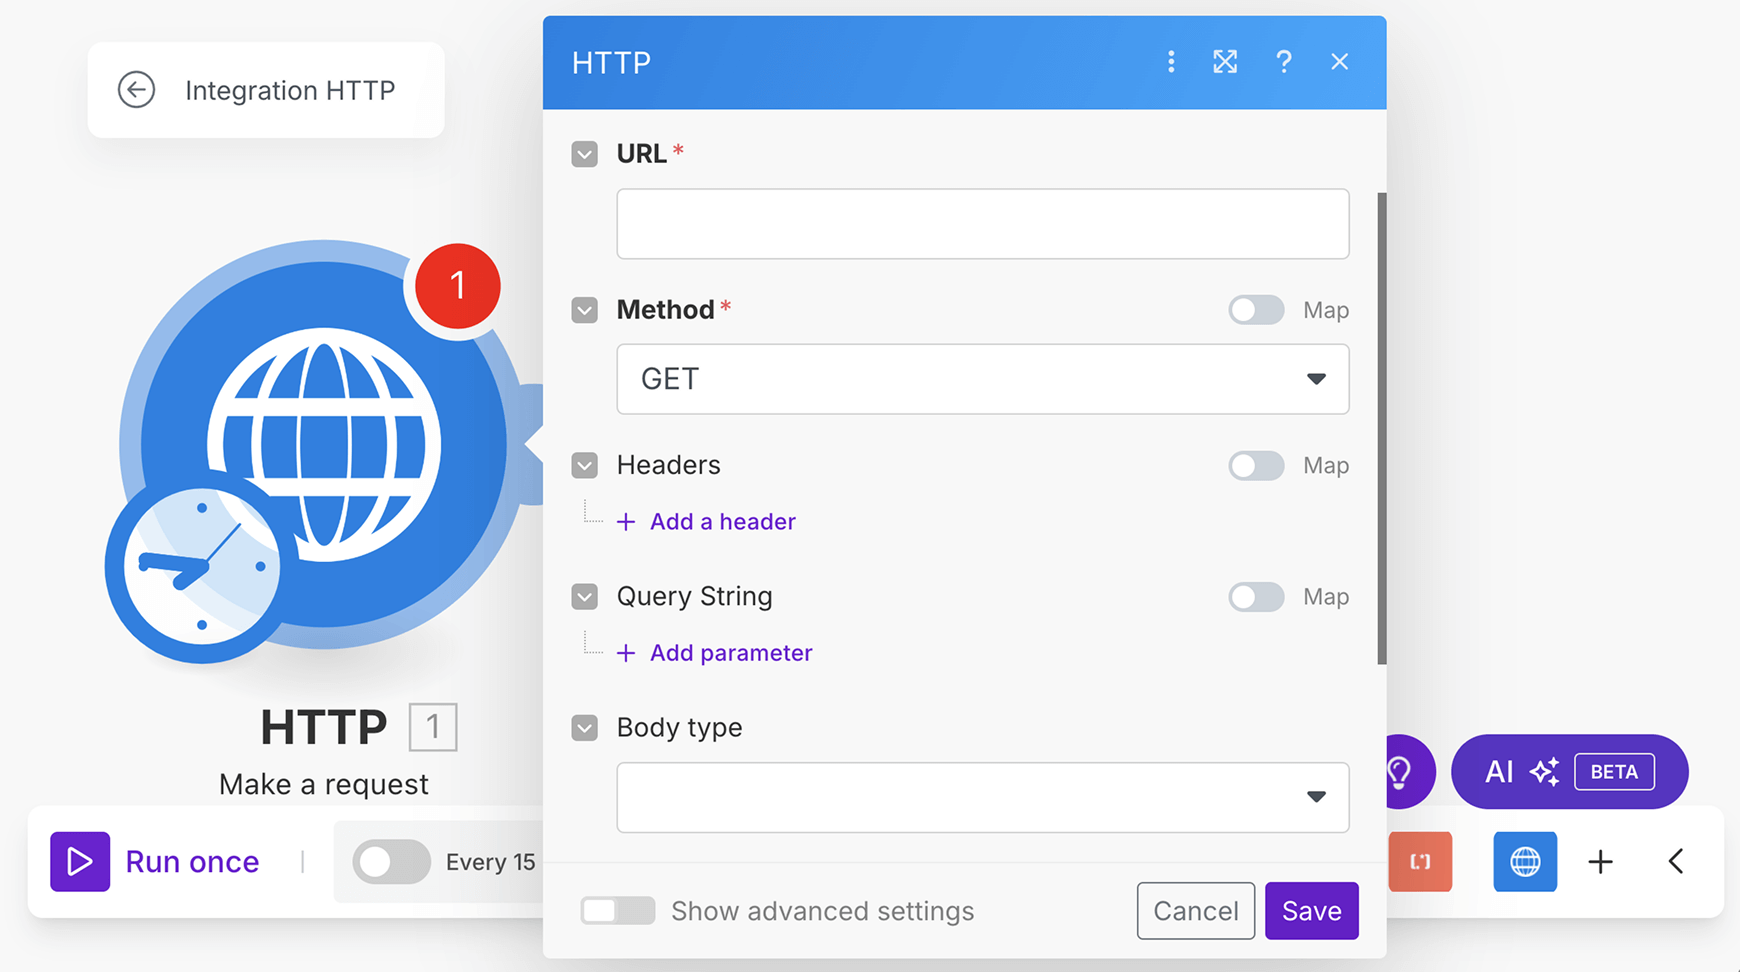
Starting from next lesson, we will put this theory into practice by implementing the following automations with the help of HTTP module:
- Website performance scores automation (Using Official Google API)
- Instagram follower count tracker automation (Using unofficial Instagram API from Rapid API)
But before that, give yourself a quick break because you've been through a lot.
Once you're ready, come to the next lesson. I will be waiting for you.