How to create credentials for Google APIs

Google lets you access all its powerful services by providing an API for each one:
- Places API (Premium)- Provides detailed information about places (e.g., businesses, landmarks).
- Custom Search API — Enables developers to add web search and site search capabilities to their websites or create SEO tools
- PageSpeed Insights API — For accessing website performance metrics
- Business Performance API — For accessing data related to Google My Business.
- YouTube API — Enables apps to access YouTube content (upload videos, manage playlists, retrieve video info).
- Gmail API — Provides RESTful access to Gmail mailboxes, letting apps read, send, and manage emails on behalf of users.
- The list goes on and on
But the problem is, it is not straightforward to generate API credentials for Google Services.
We have to follow a specific process to be able to create API credentials.
The process is usually spanned into six steps:
- Create a Google account
- Access the Google Cloud Platform dashboard
- Select a project
- Enable APIs you want to work with
- Create credentials for an API
- Providing consent to use tools like n8n to manage Google services like Sheets, Google Drive, Gmail, etc., on your behalf.
If you are trying to access a premium API, such as the Places API (Google Maps Platform), you should also add a payment method and verify it as an additional step.
Ufff…long process if you're going through this for the first time.
But you have to start somewhere, right?
And this article is all about that.
Come on, let's generate some API credentials.
Step 1: Create a Google Account
It doesn't matter to what API you are generating credentials for.
It is mandatory for you to have a Google account if you want to generate API credentials for any Google service.
If you have a Gmail account, you also technically have a Google account.
So, if you already have a Gmail account, skip this step.
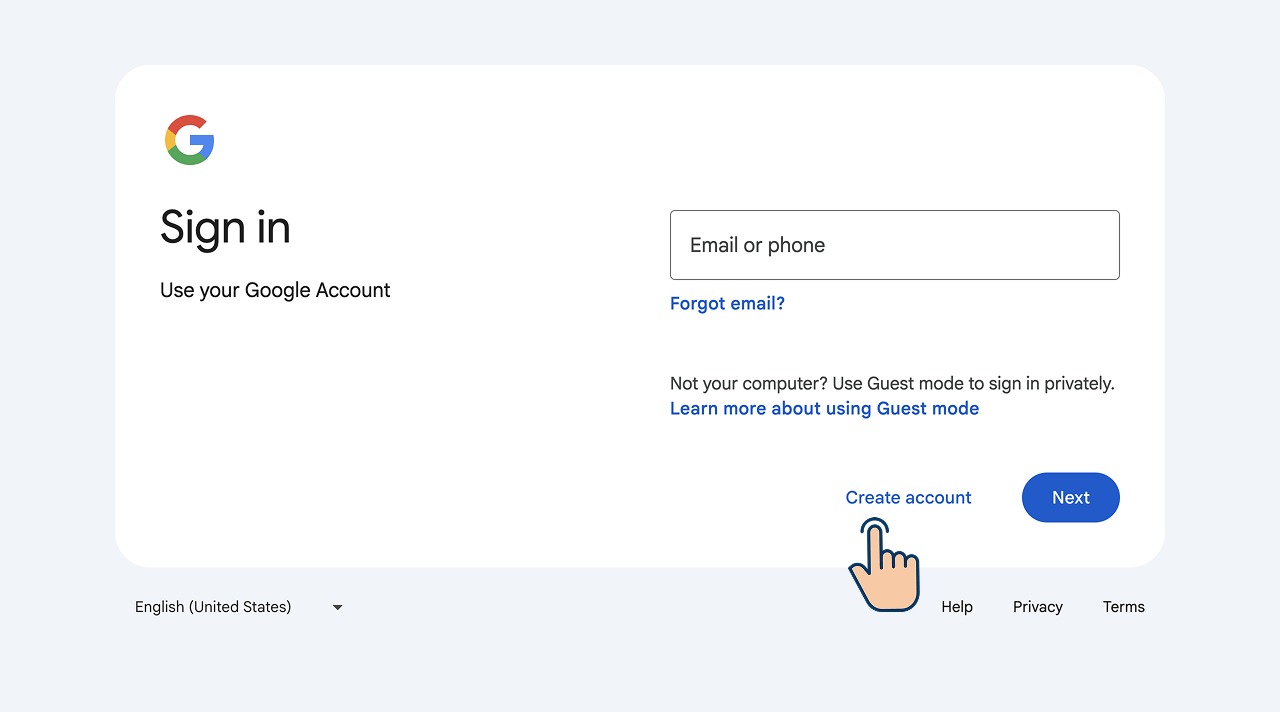
But if you don't have an account, go to:
https://accounts.google.com/And then click on the “Create Account” button to create an account by entering your personal details:
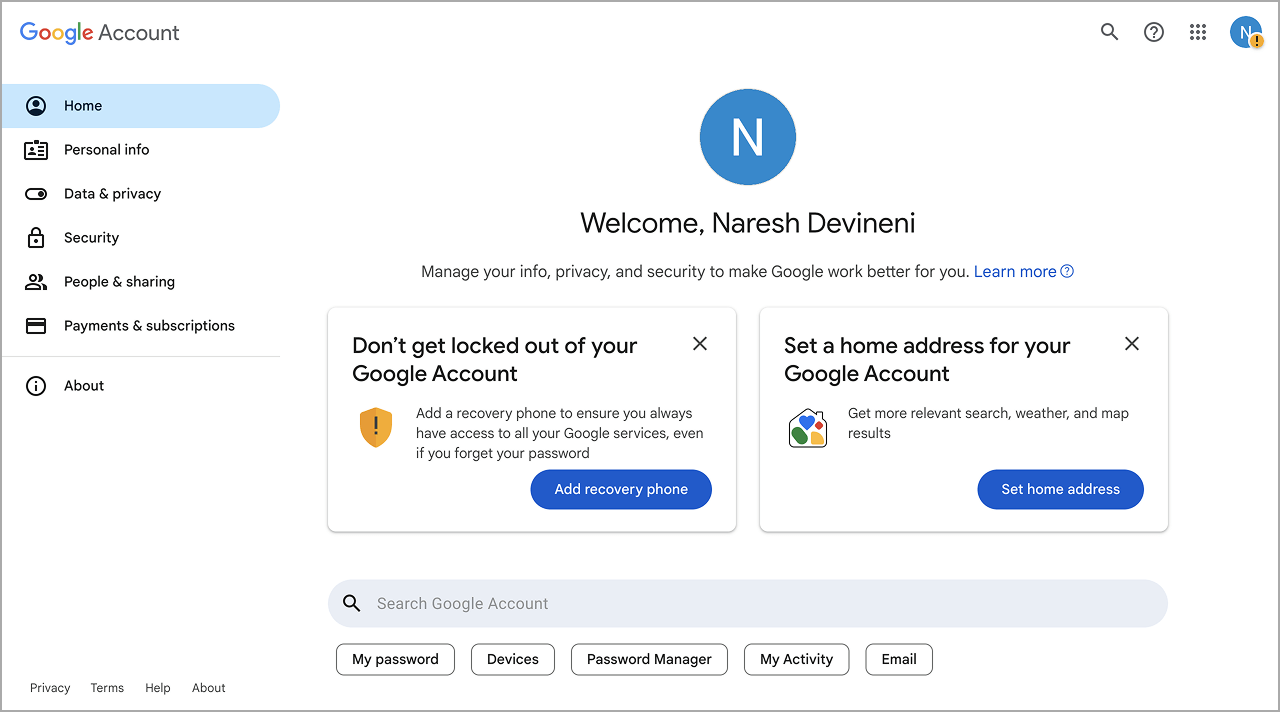
Once you are done, you'll be redirected to the Welcome screen of your Google Account:
When you created your Google account using a particular email, Google has automatically created accounts for you on:
- Gmail
- Google Drive
- Google Cloud Platform — Allows you to create API credentials for all Google services
- The list is big
This means you can access the above services without needing to create a new account.
Anyway, our next step is to access Google Cloud Platform, right?
So…
Step 2: Access the Google Cloud Platform(GCP) dashboard
If you're hearing about GCP for the first time, think of it as a big set of online tools and services offered by Google.
Think of it as a giant toolbox in the internet cloud, where developers and businesses can rent and use different computing resources without needing to own and manage their own physical computers.
And one of the important things you can do with GCP is to create credentials to securely access various Google API services using automation tools like n8n.
Anyway, now that you understand the purpose of GCP, it is time to access it and create a new project inside it.
You can directly access GCP by going to:
https://console.cloud.google.com/Next, if you're accessing the Google Cloud Platform for the first time, you'll be asked to agree to its terms of service:
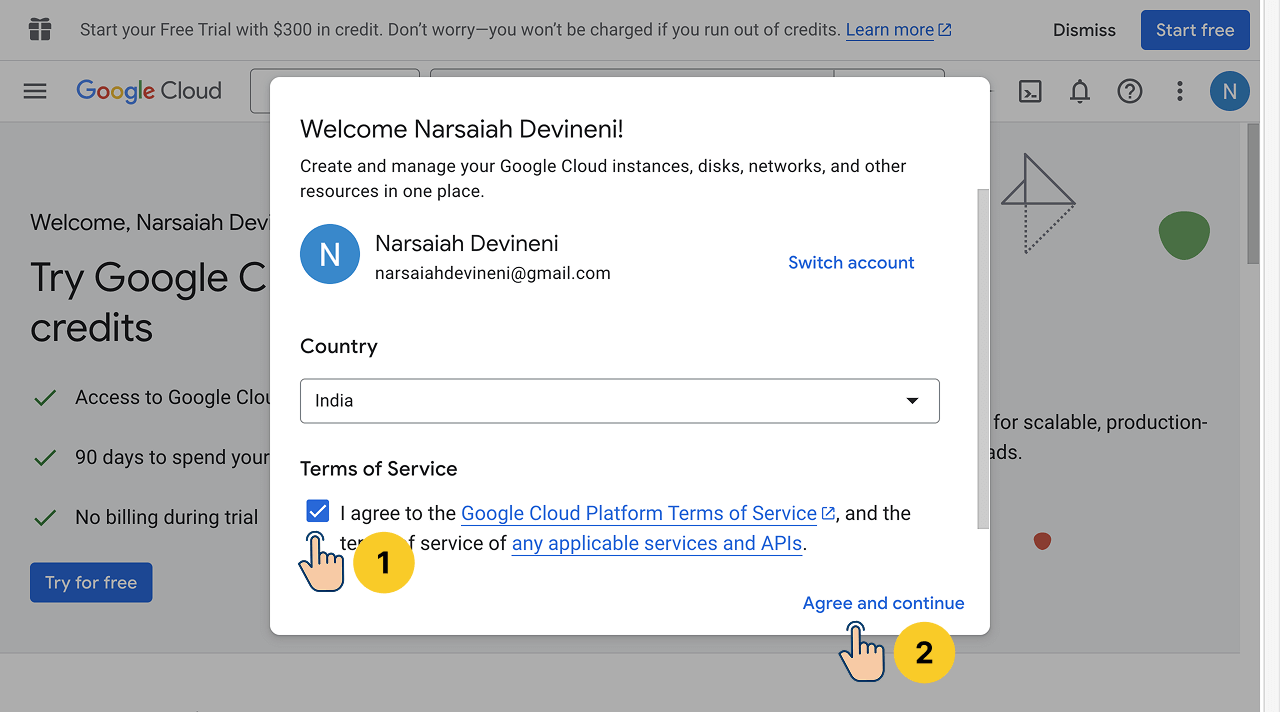
Go through the terms of service and if you're okay with it, Agree and continue.
Next…
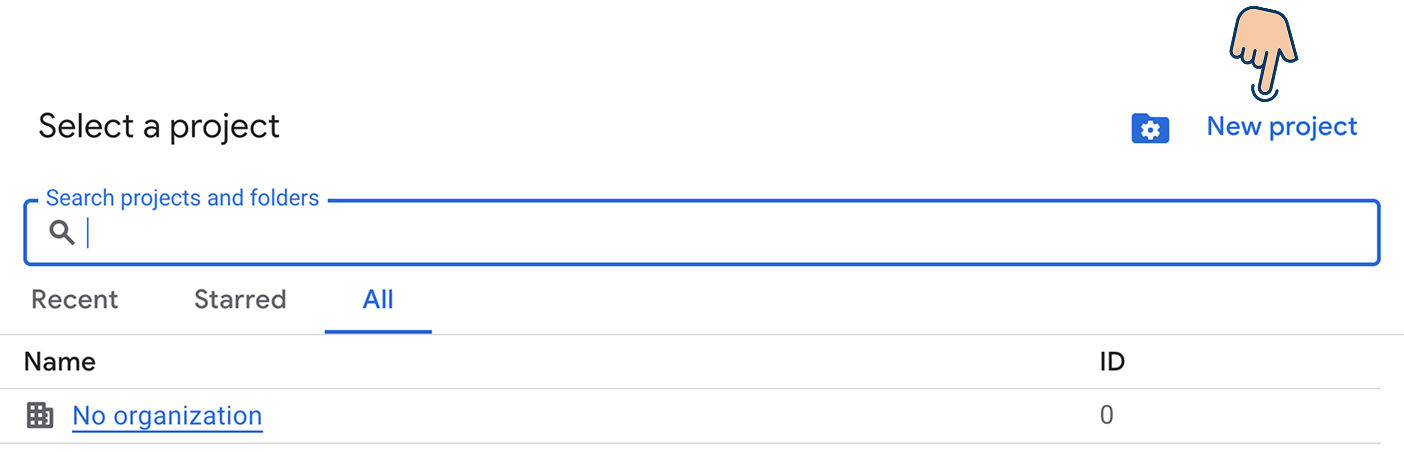
Step 3: Select a project
When we generate API credentials inside GCP, we must assign them to a particular project.
So, we must create a new project and then generate API credentials using it.
To achieve this, first click on the “Select Project” button located on the top-left side of the screen:

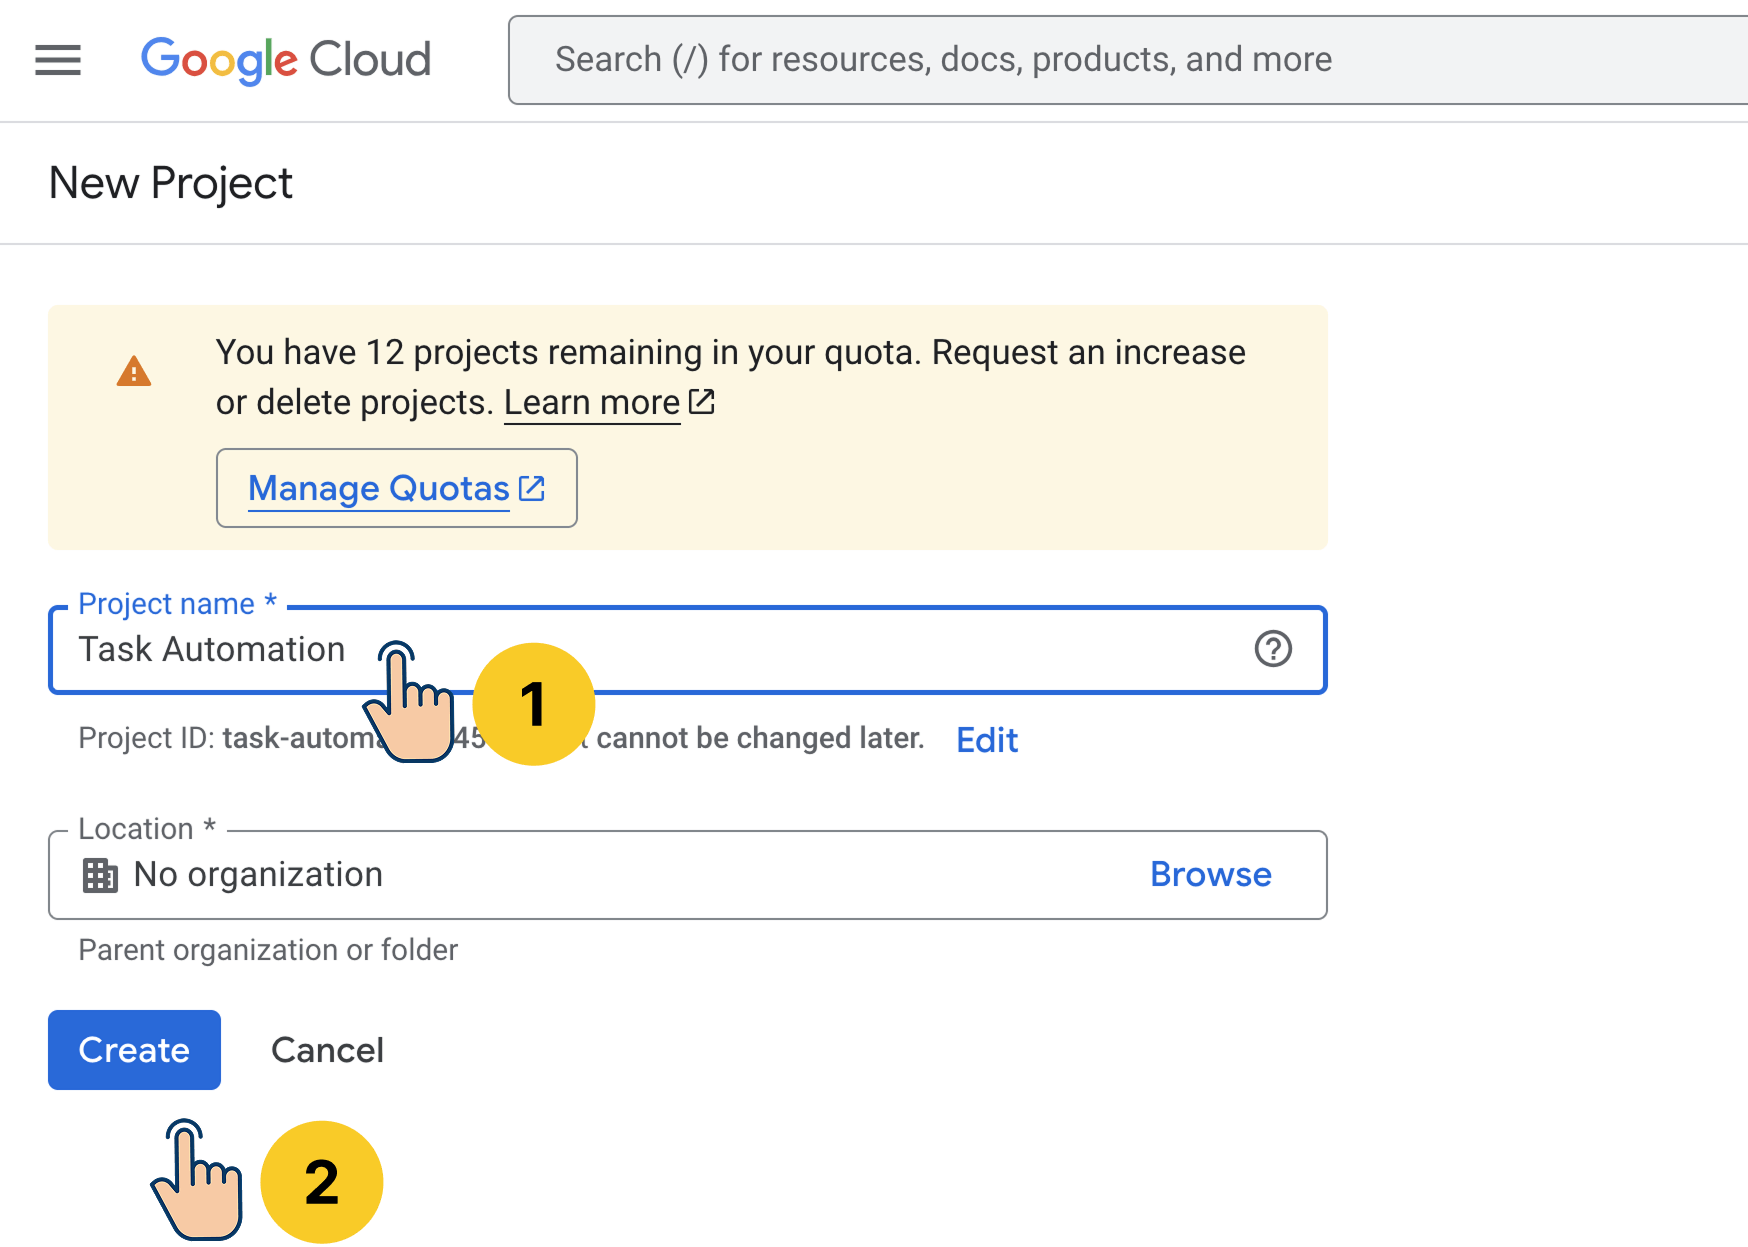
And then click on “New Project”:
Next, enter a recognizable project name, such as “Task Automation,” and create the project.
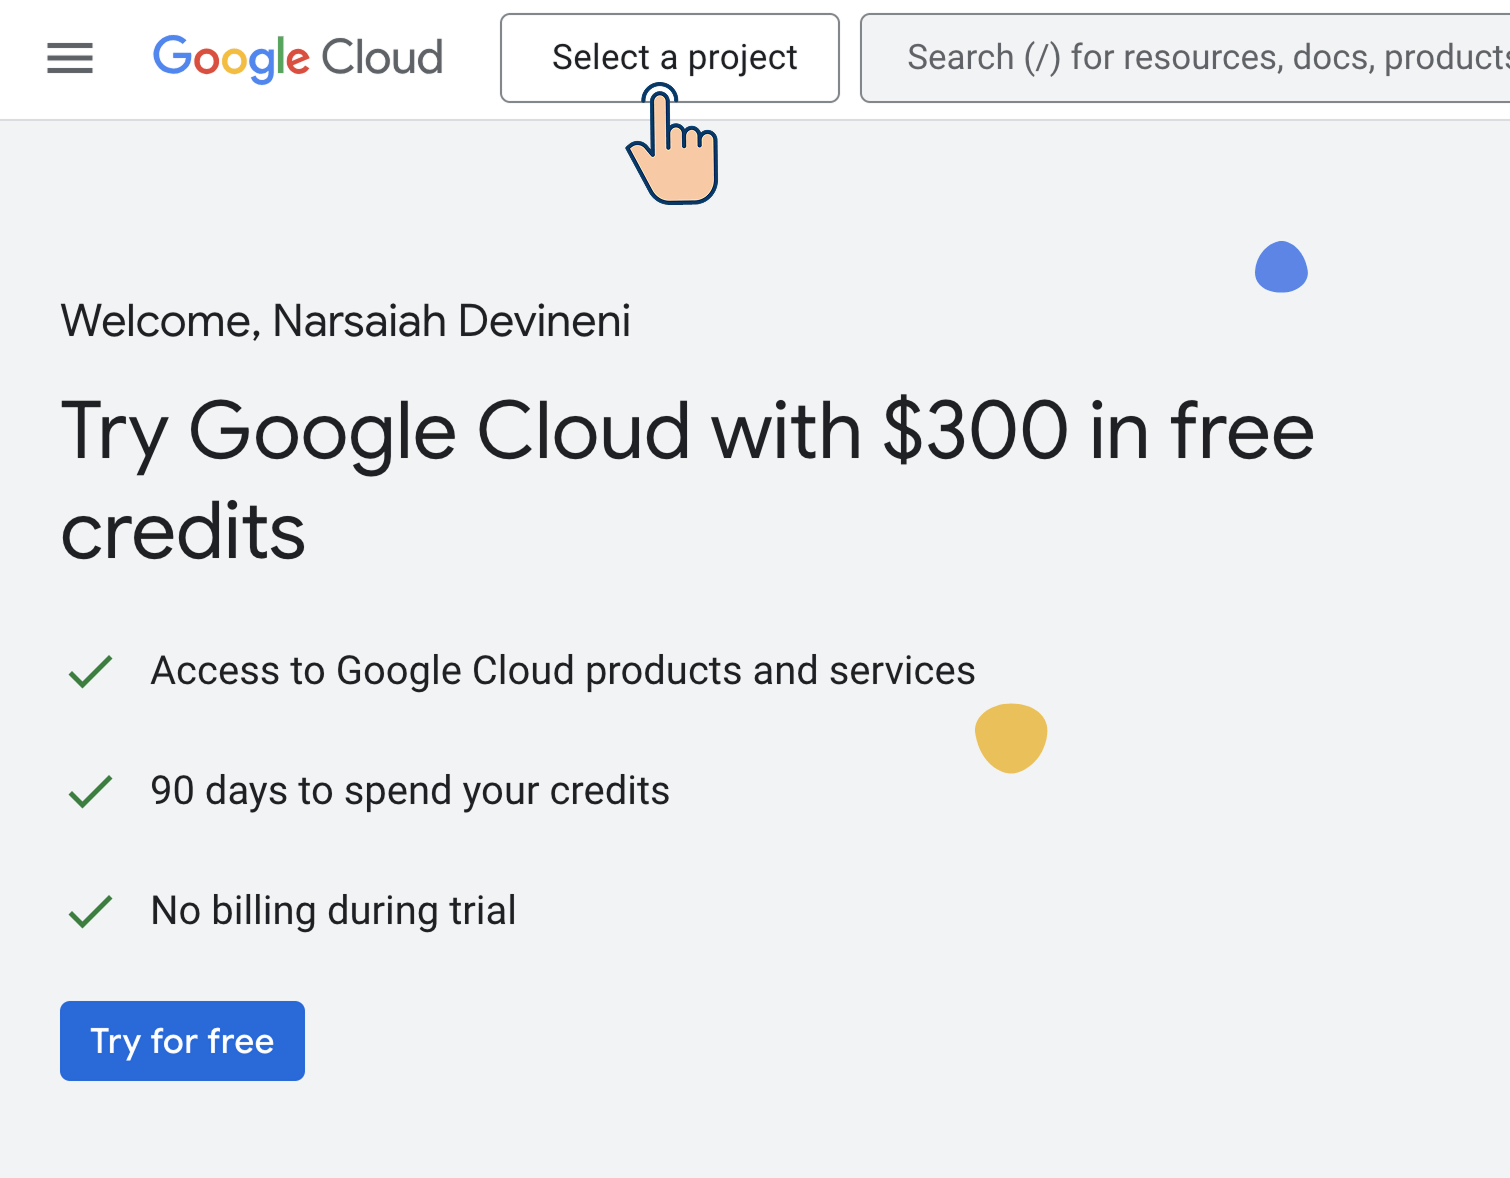
Once the project is created, click on the “Select Project” button once again:
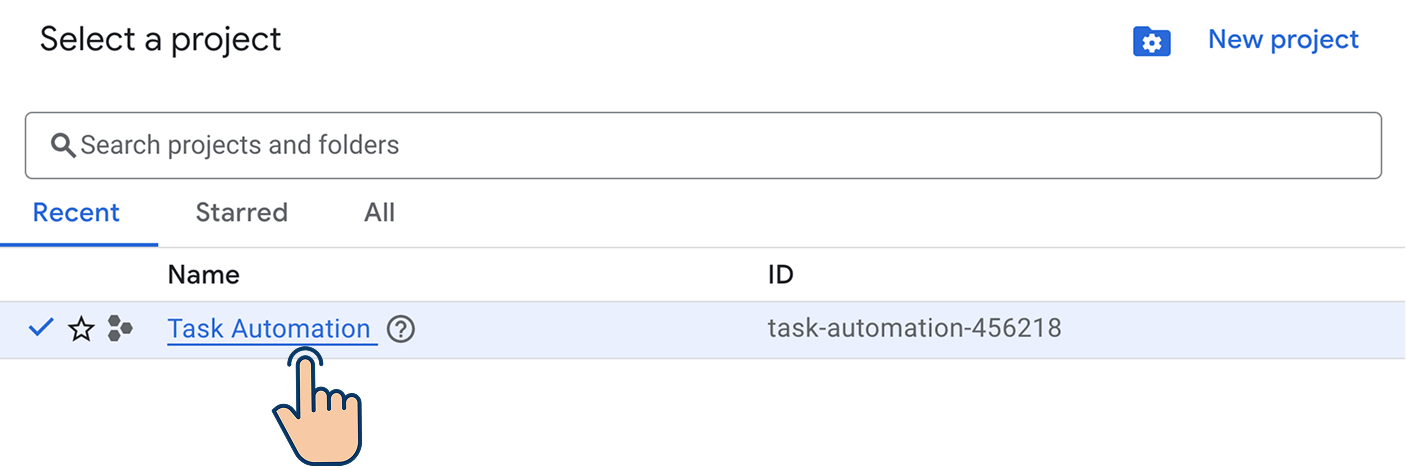
And then select the newly created project from the list:
That's all.
We have now set up the foundations for creating credentials for any Google Service.
Step 4: Enable APIs you want to work with
To send requests to a specific Google service, we must first enable API access for that service.
To do so, click on the navigation menu icon located on the top-left-hand corner of the screen:
And then go to:
APIs & Services → Library
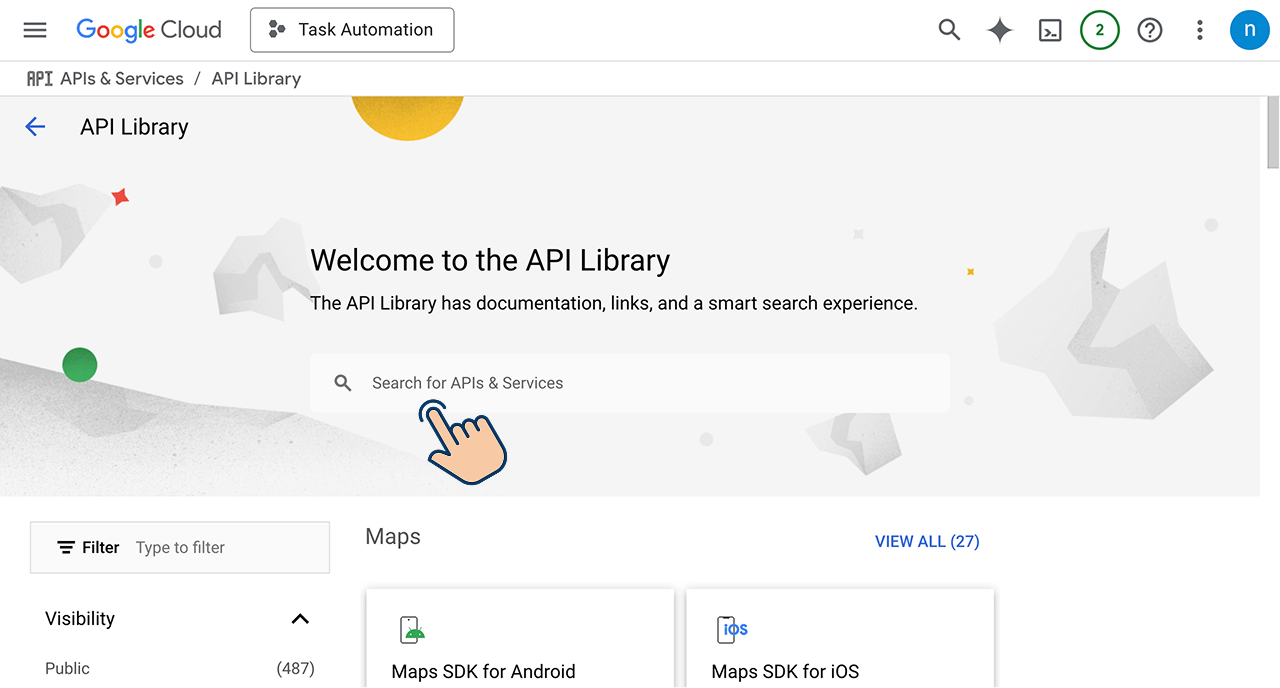
This will take you to the Google API Library.
From here, you can enable the API in three easy steps.
Step A: Search for the API you want to enable.
For example, I want to use the Google Sheets API.
So, I will search for it.
If everything goes well, I should see the “Google Sheets API” card as a search result:
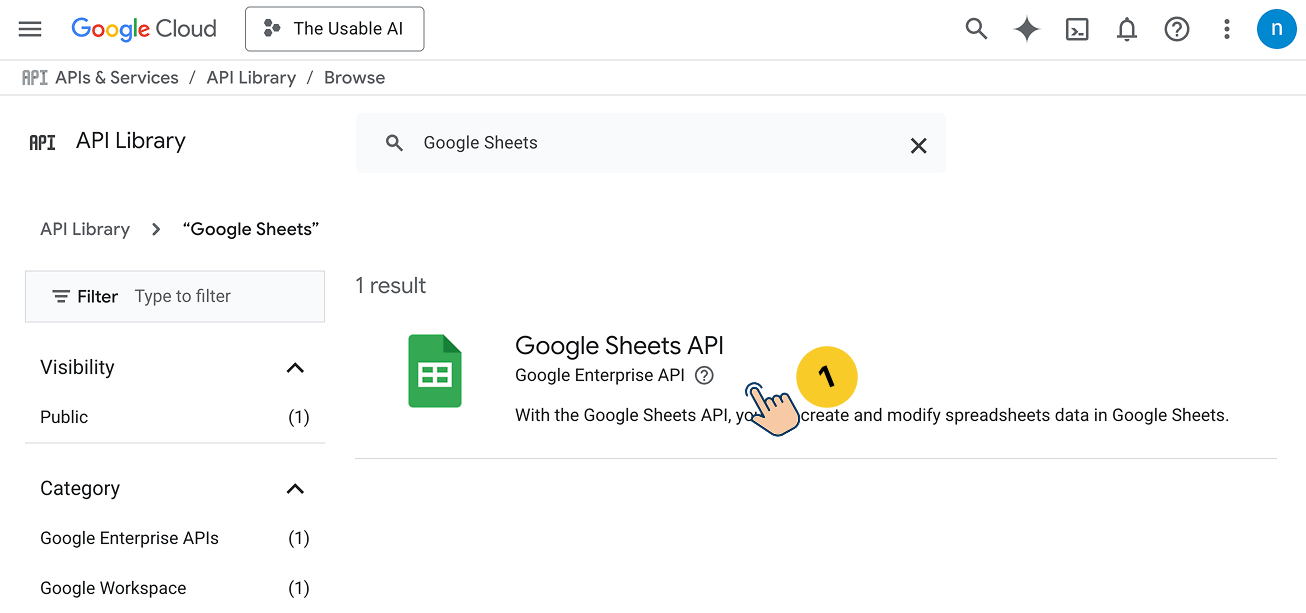
Next, I will click on the “Google Sheets API” card to access its API management screen.
Step B: Enable the API by clicking on the "Enable" button
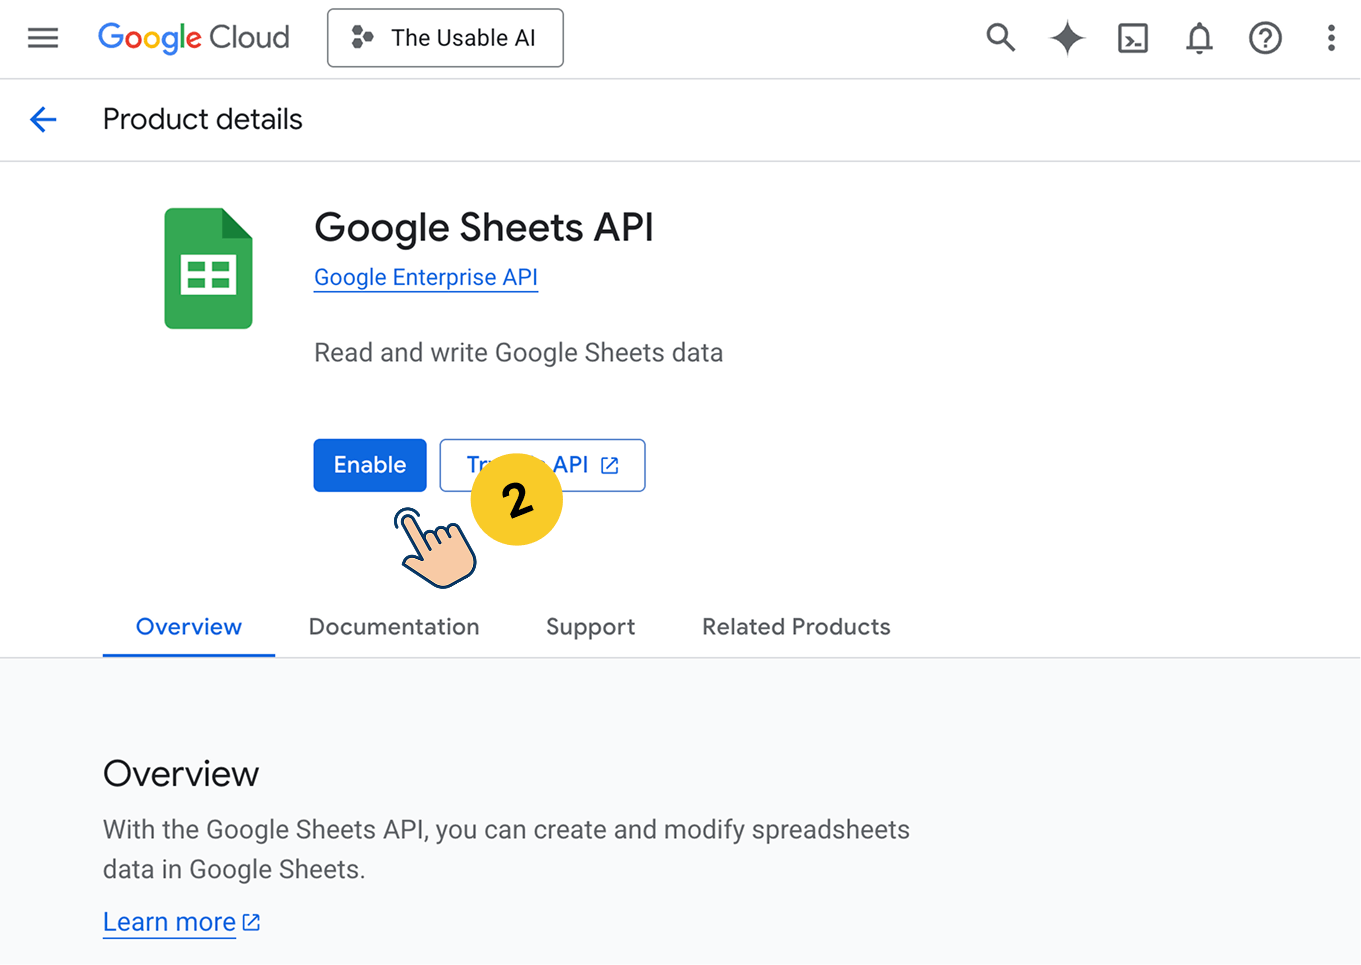
That's All.
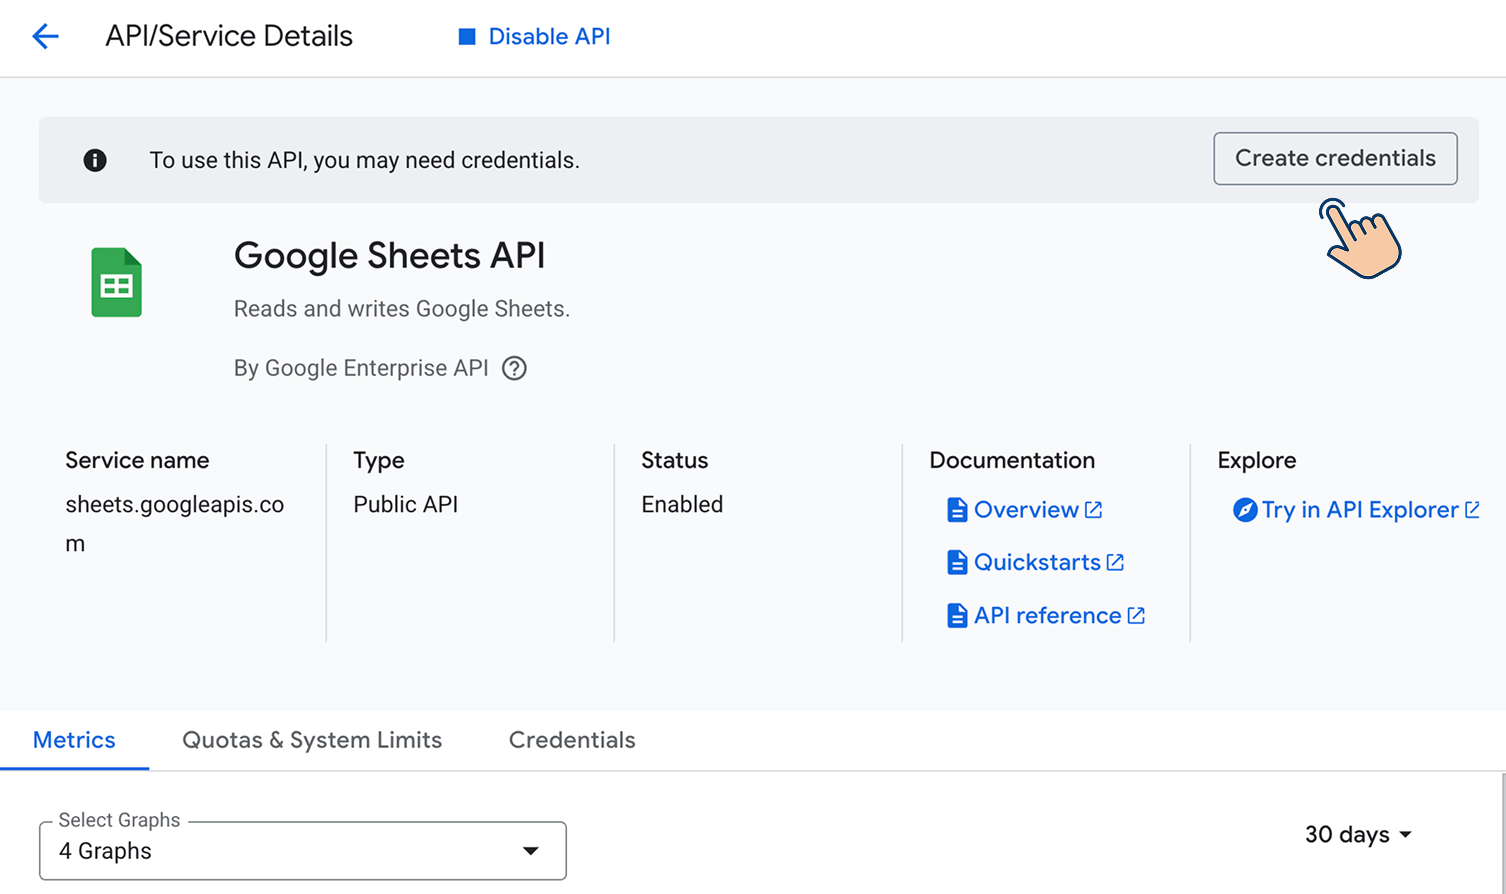
This will now take you to the Google Sheets API management screen:
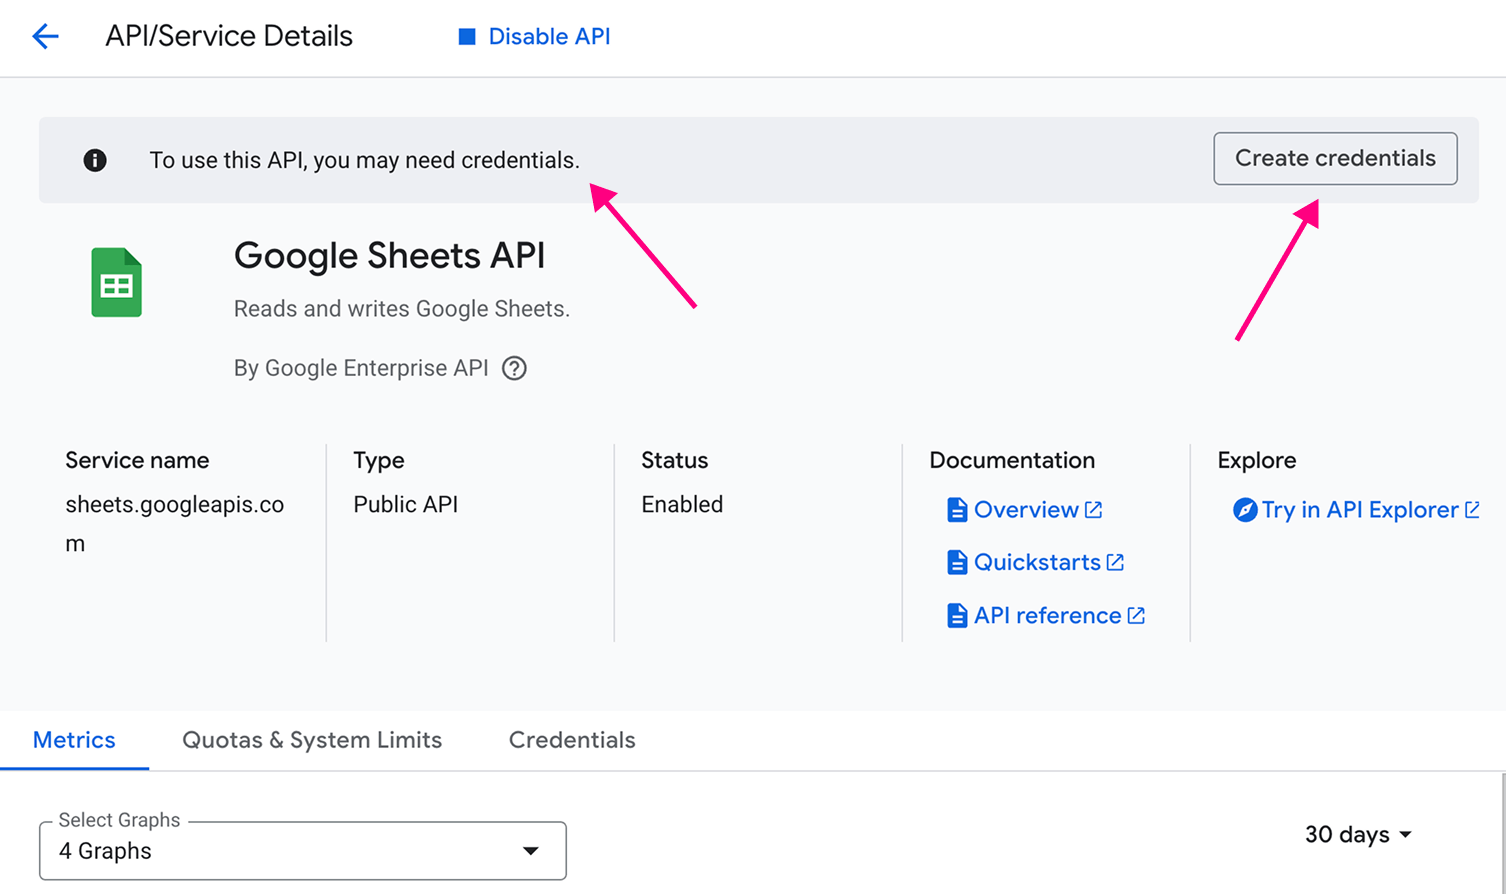
And if you notice, it says "To use this API, you may need credentials" and even provides a "Create credentials" button to help you get started.
This means that enabling the API is not enough. You should also generate credentials for it so that you can use it.
For example, if you want to use the Google Sheets API inside an automation tool like n8n, the first thing it will ask you for is two pieces of a credential:
- Client ID
- Client Secret
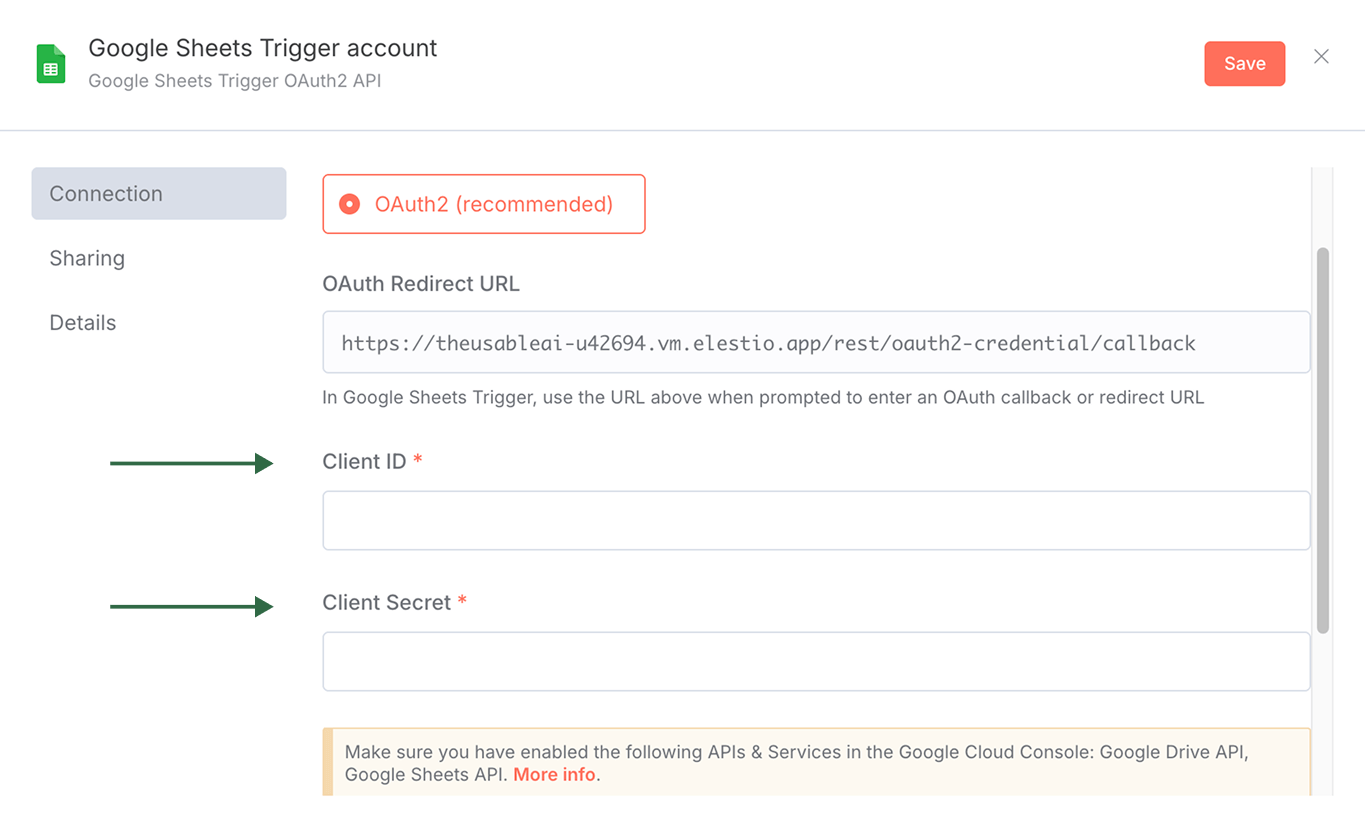
So, let's see how to generate API credentials for a Google service.
Step 5: How to generate credentials for an API
For the purposes of this lesson, let's create API credentials for:
- Google Sheets API
- Gmail API
- Google Calendar API
This will help you remember the process easily.
How to generate credentials for the Google Sheets API
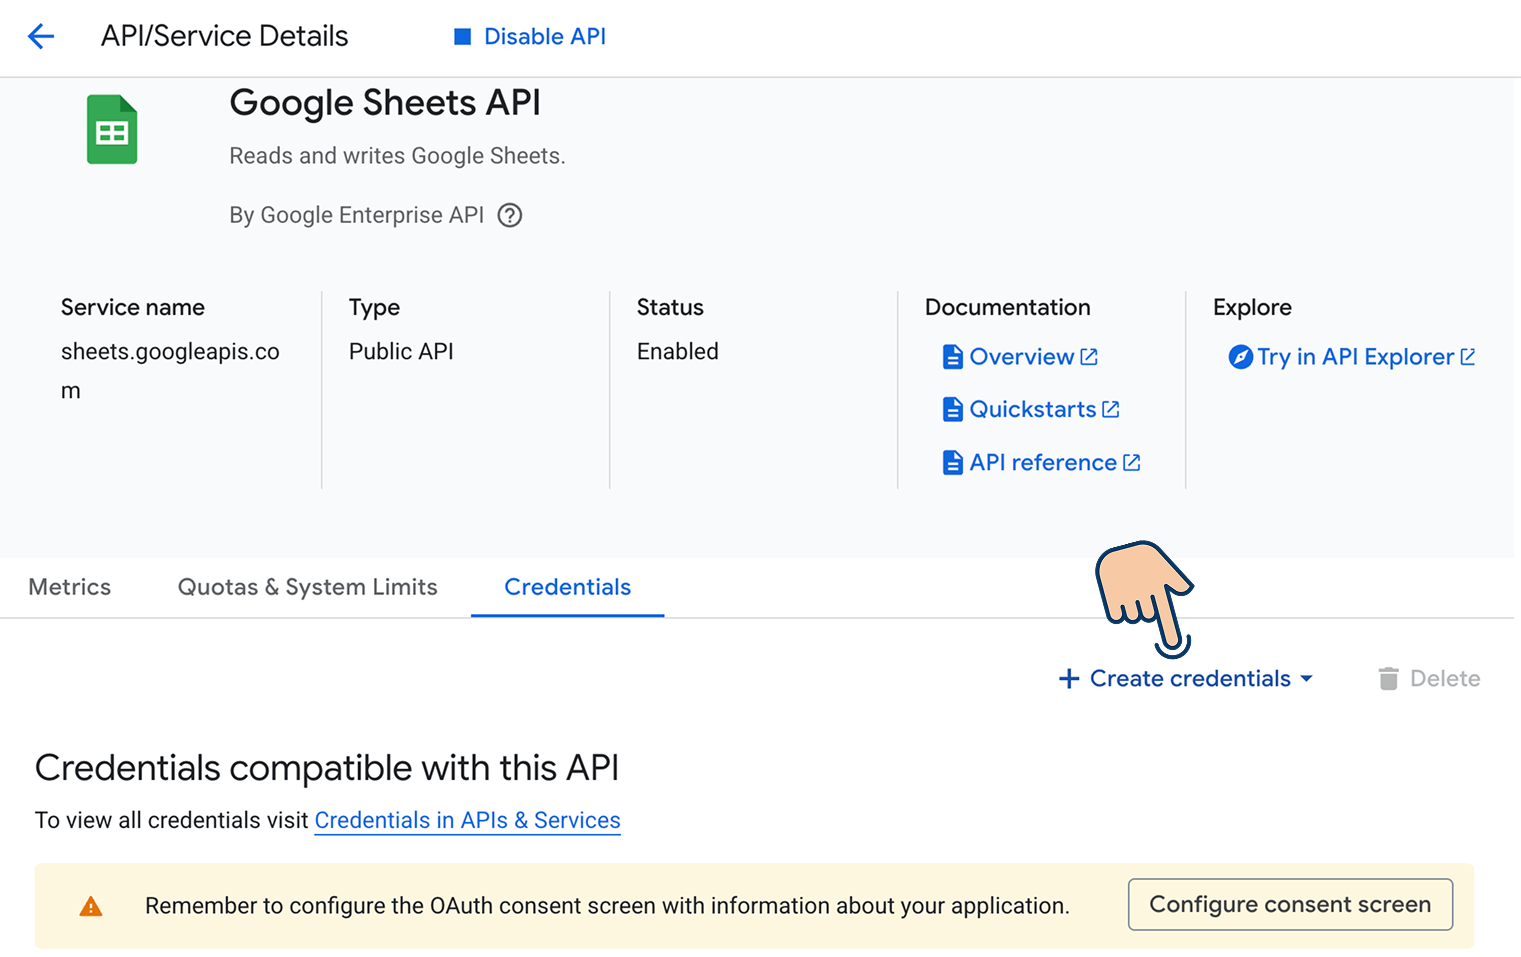
If you are already on the API management screen of the "Google Sheets" API and can see the "Create Credentials" button, click it.
If you can not see the "Create Credentials" button for some reason, click on the "Credentials" tab:
Next, click on the "Create Credentials" button:
And then select "OAuth Client ID" from the pop-up:

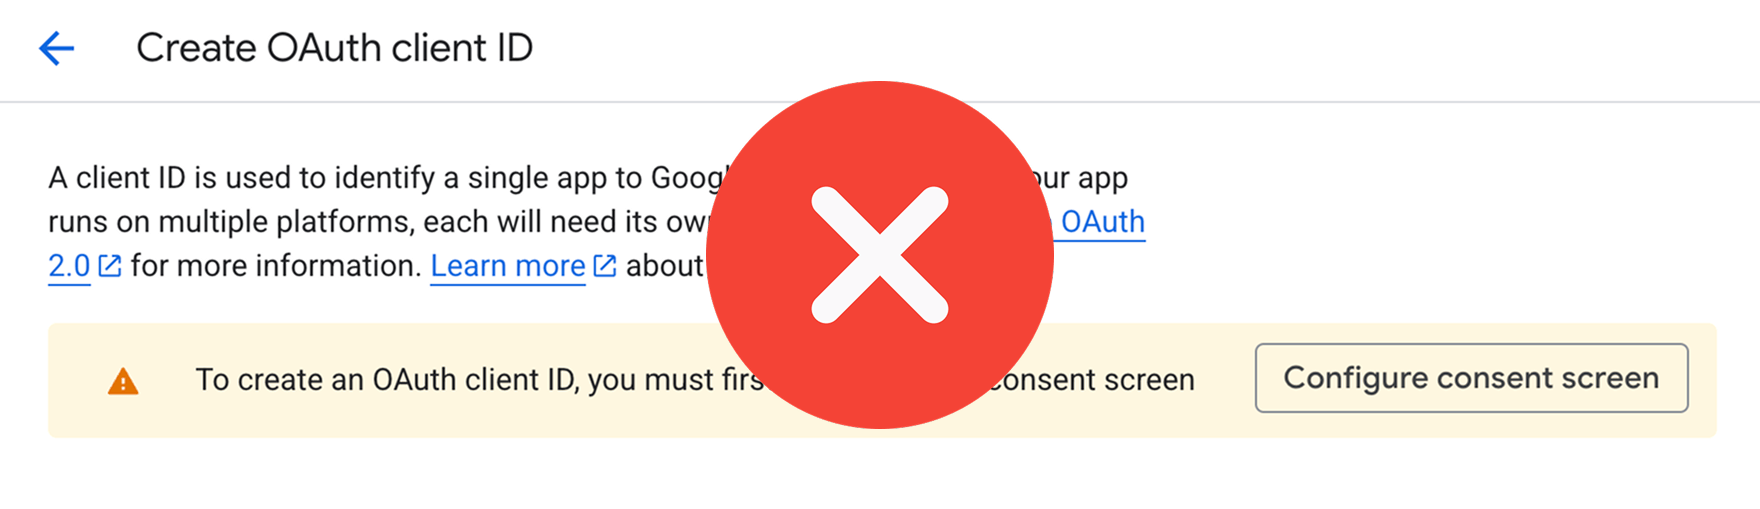
This will take you to the "Create OAuth client ID" screen:
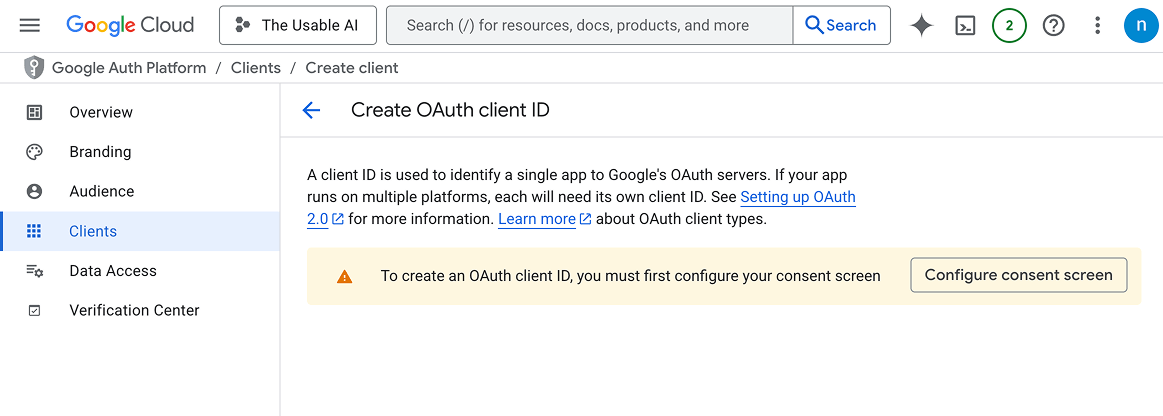
And if you notice, Google says that you must first configure the "Consent Screen" before creating credentials using the OAuth Client ID.
You'll see this "Configure consent screen" notification only if you're creating credentials for the first time inside a particular project.

Oh! What is a consent screen though?
When a tool like n8n attempts to use a Google API on your behalf, Google displays a consent screen.
It looks something like this:
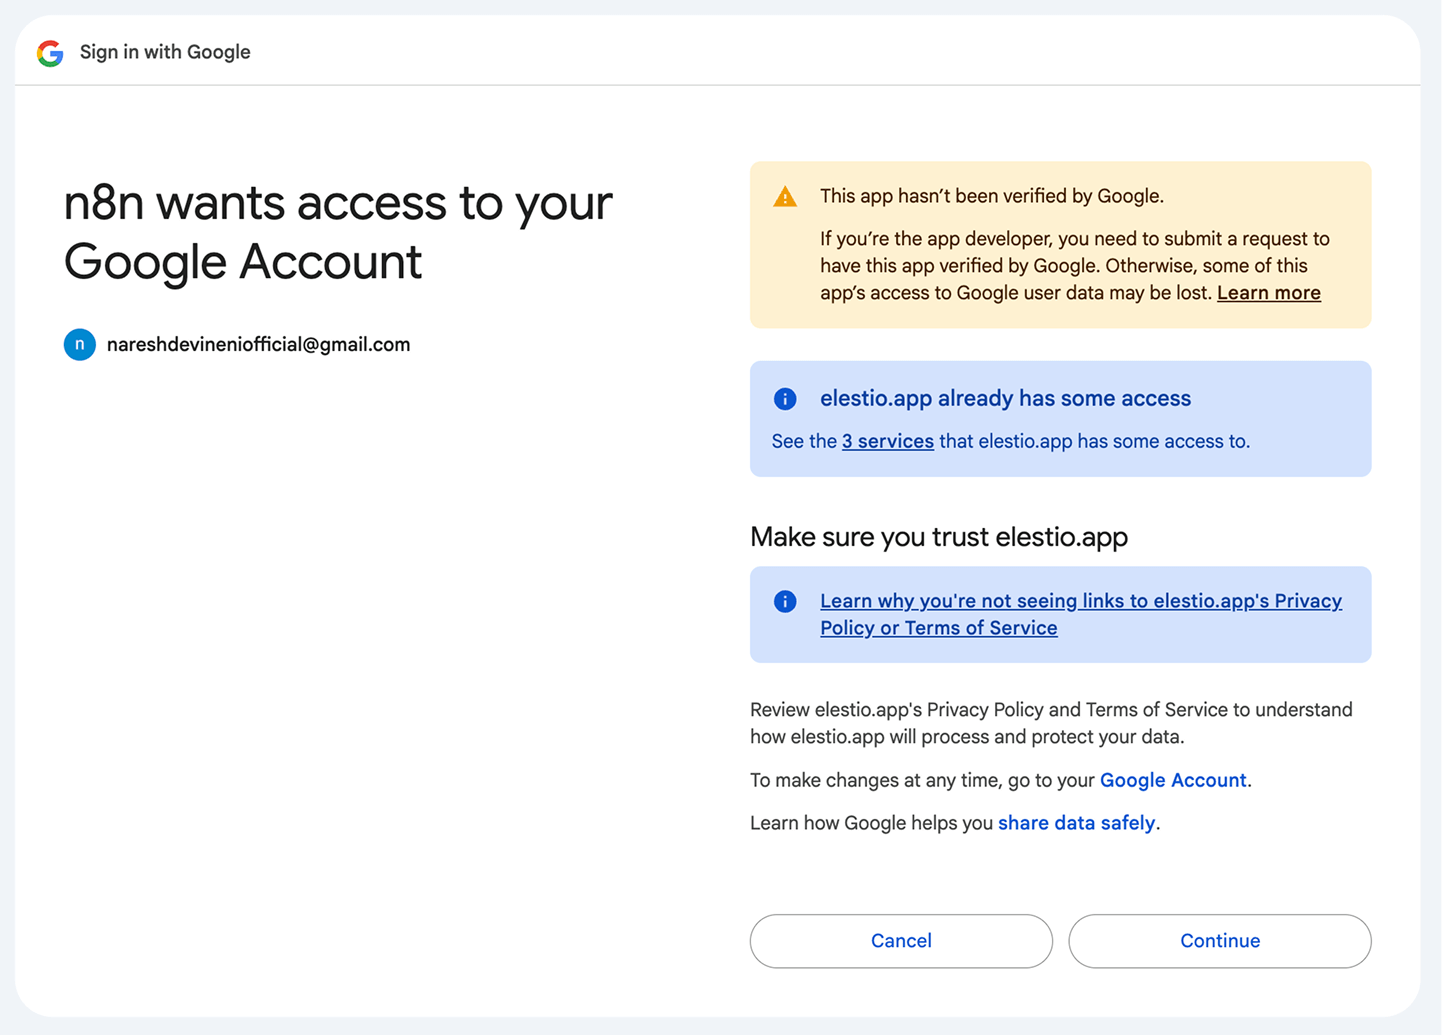
If you observe the above screenshot, the consent screen is simply asking for your permission to allow a tool like n8n to access a specific Google service on your behalf (via API).
So, let's now configure the consent screen and proceed.
Just to summarize, if you are creating credentials for a Google API for the first time, you need to go through a two-step process:
Step A: First, configure the consent screen
Step B: Only then, create the credentials
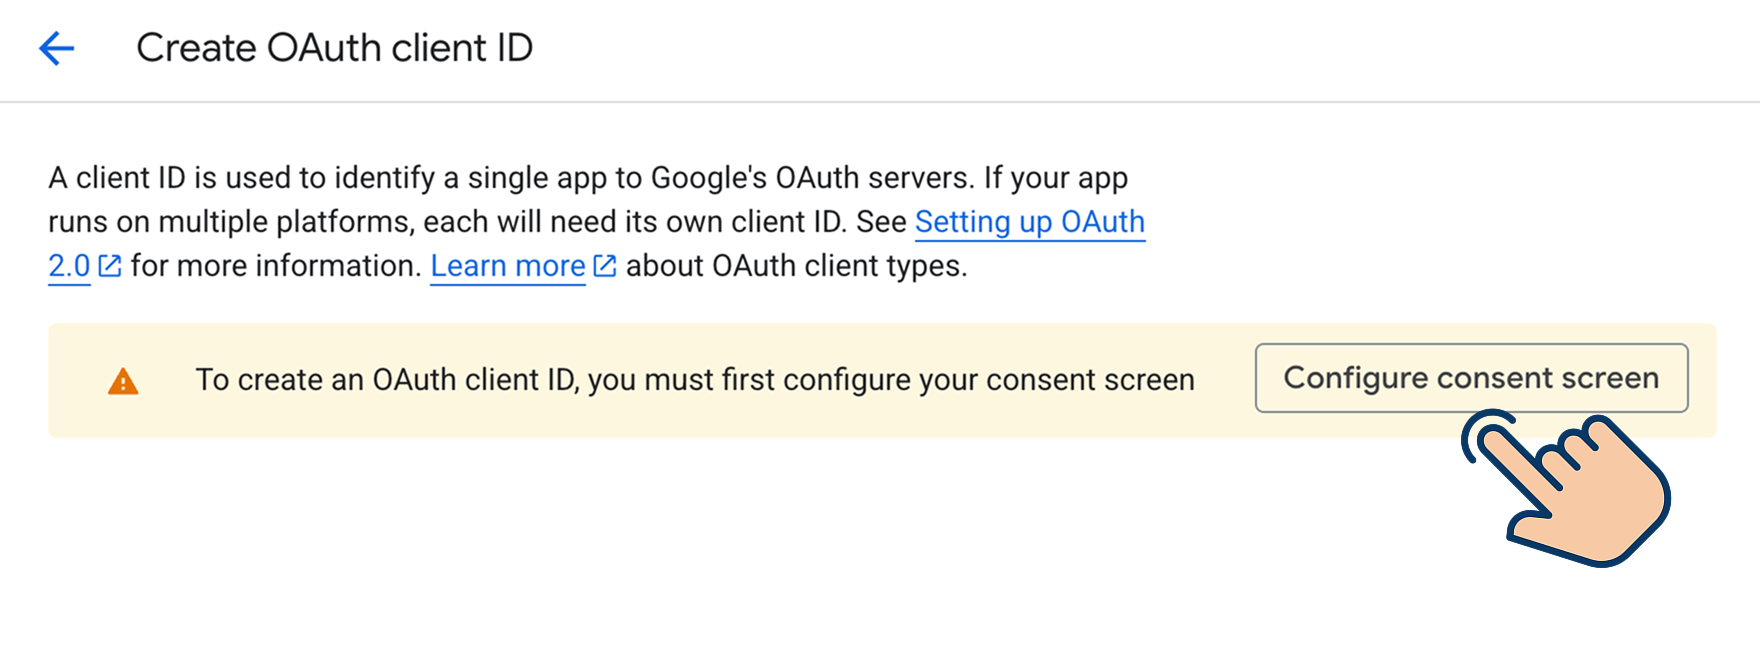
click
Click on the "Configure consent screen" button:
This will make you land on the branding screen:
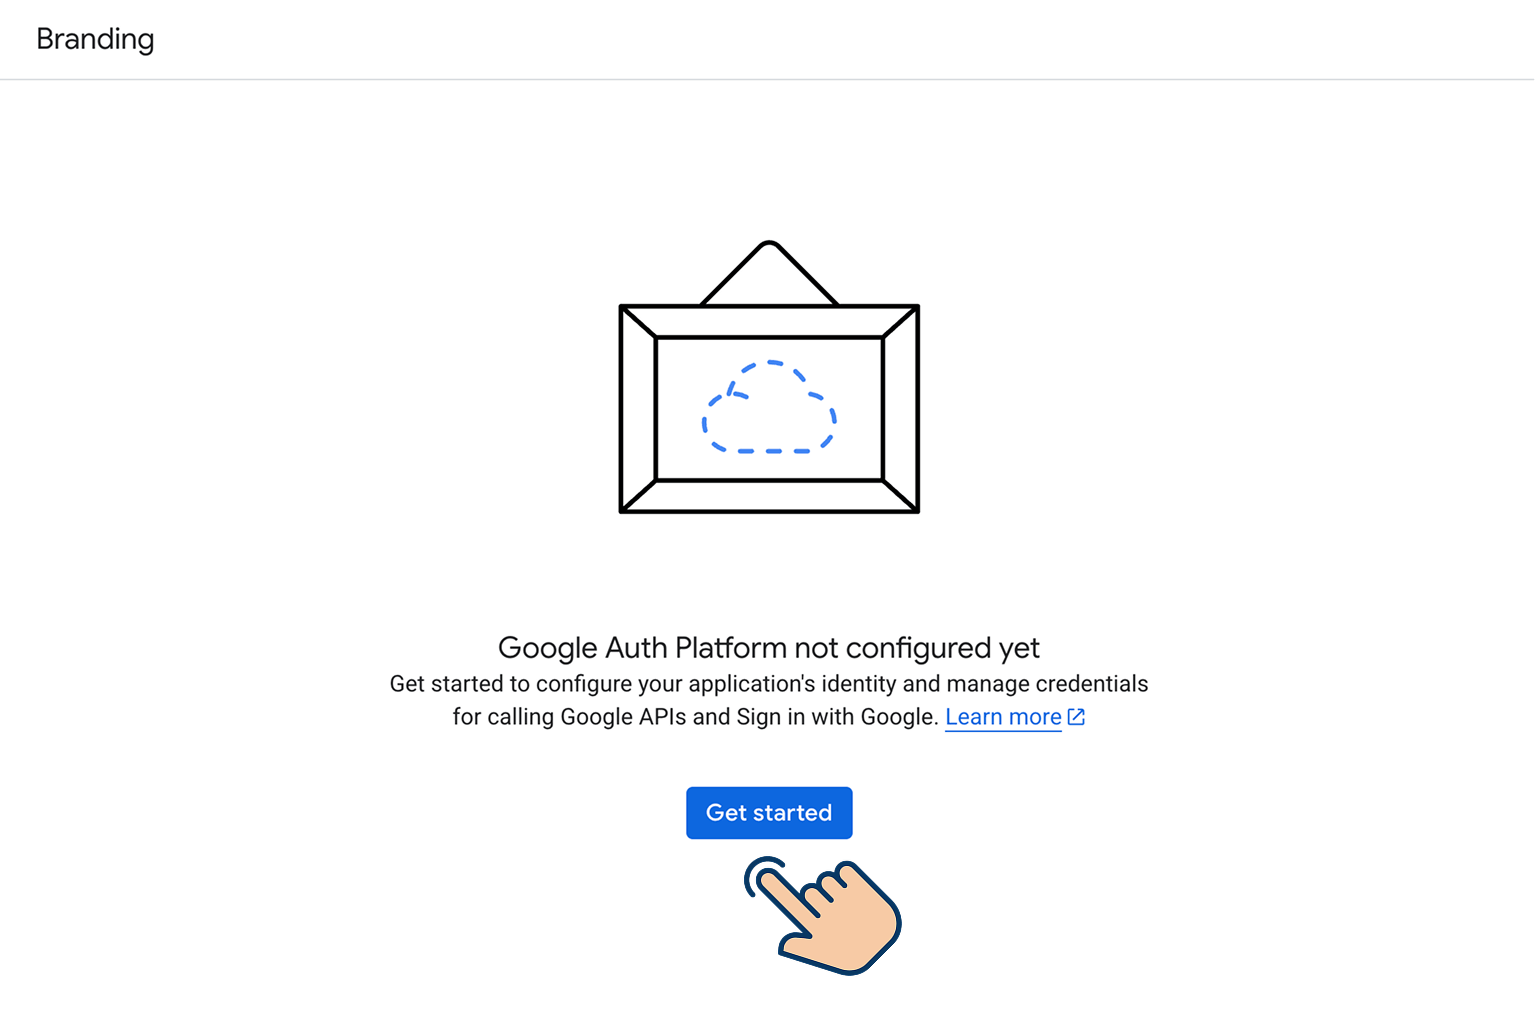
Click on the "Get Started" button to land on the "Project Configuration" screen.
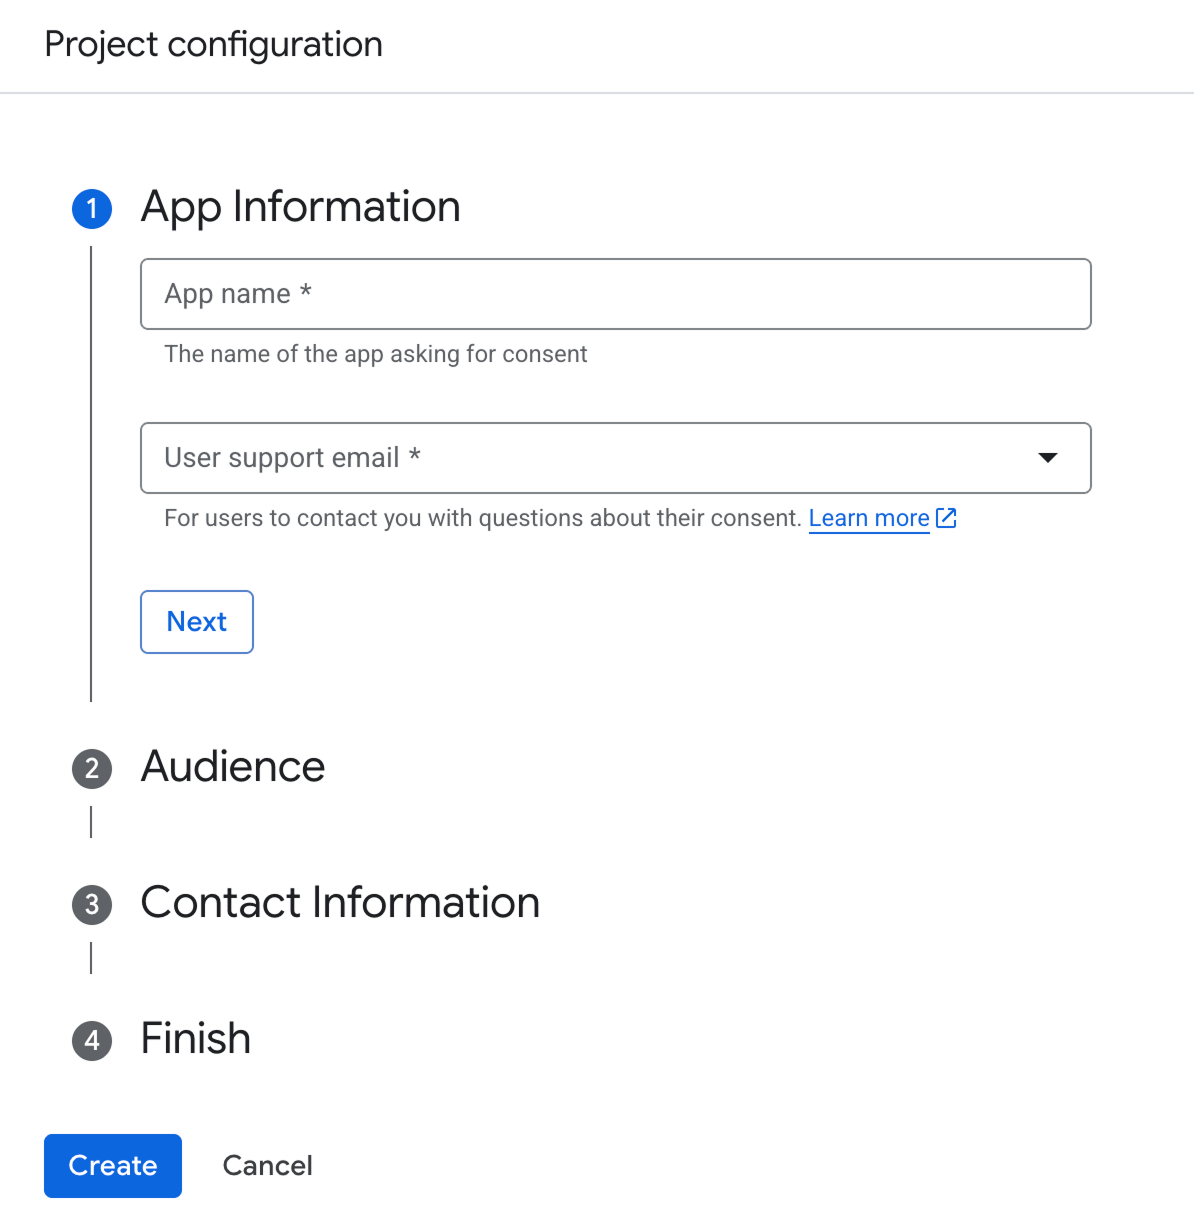
The project configuration screen is another four-step process.
As the first step for configuring the project, we need to enter the App information:
- App name
- User support email (your email)
The "App name" must be entered in a way that allows you to easily recognize what it is created for.
For example, I am creating credentials to use the Google Sheets API for a WhatsApp Customer Support project.
So, that's what I entered for the App name:
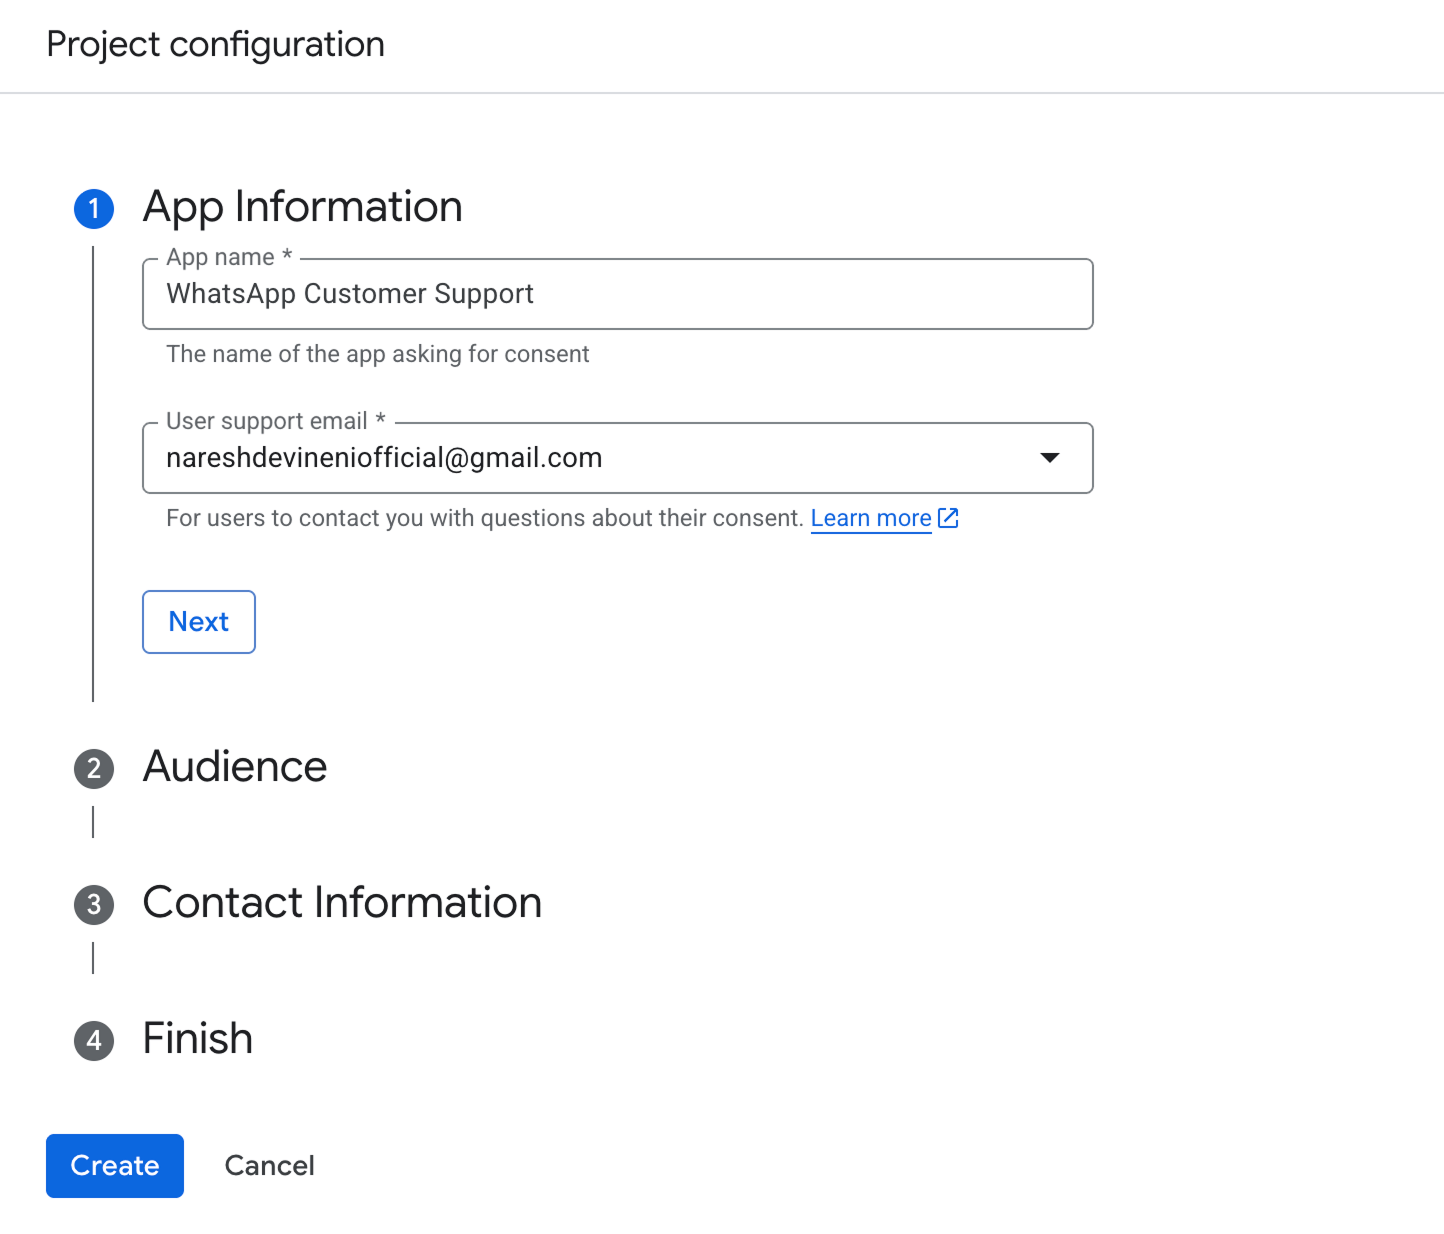
And for the "User support email", I selected my email address.
Anyway, once you have entered the App information, click on the "Next" button to select the audience for the project.
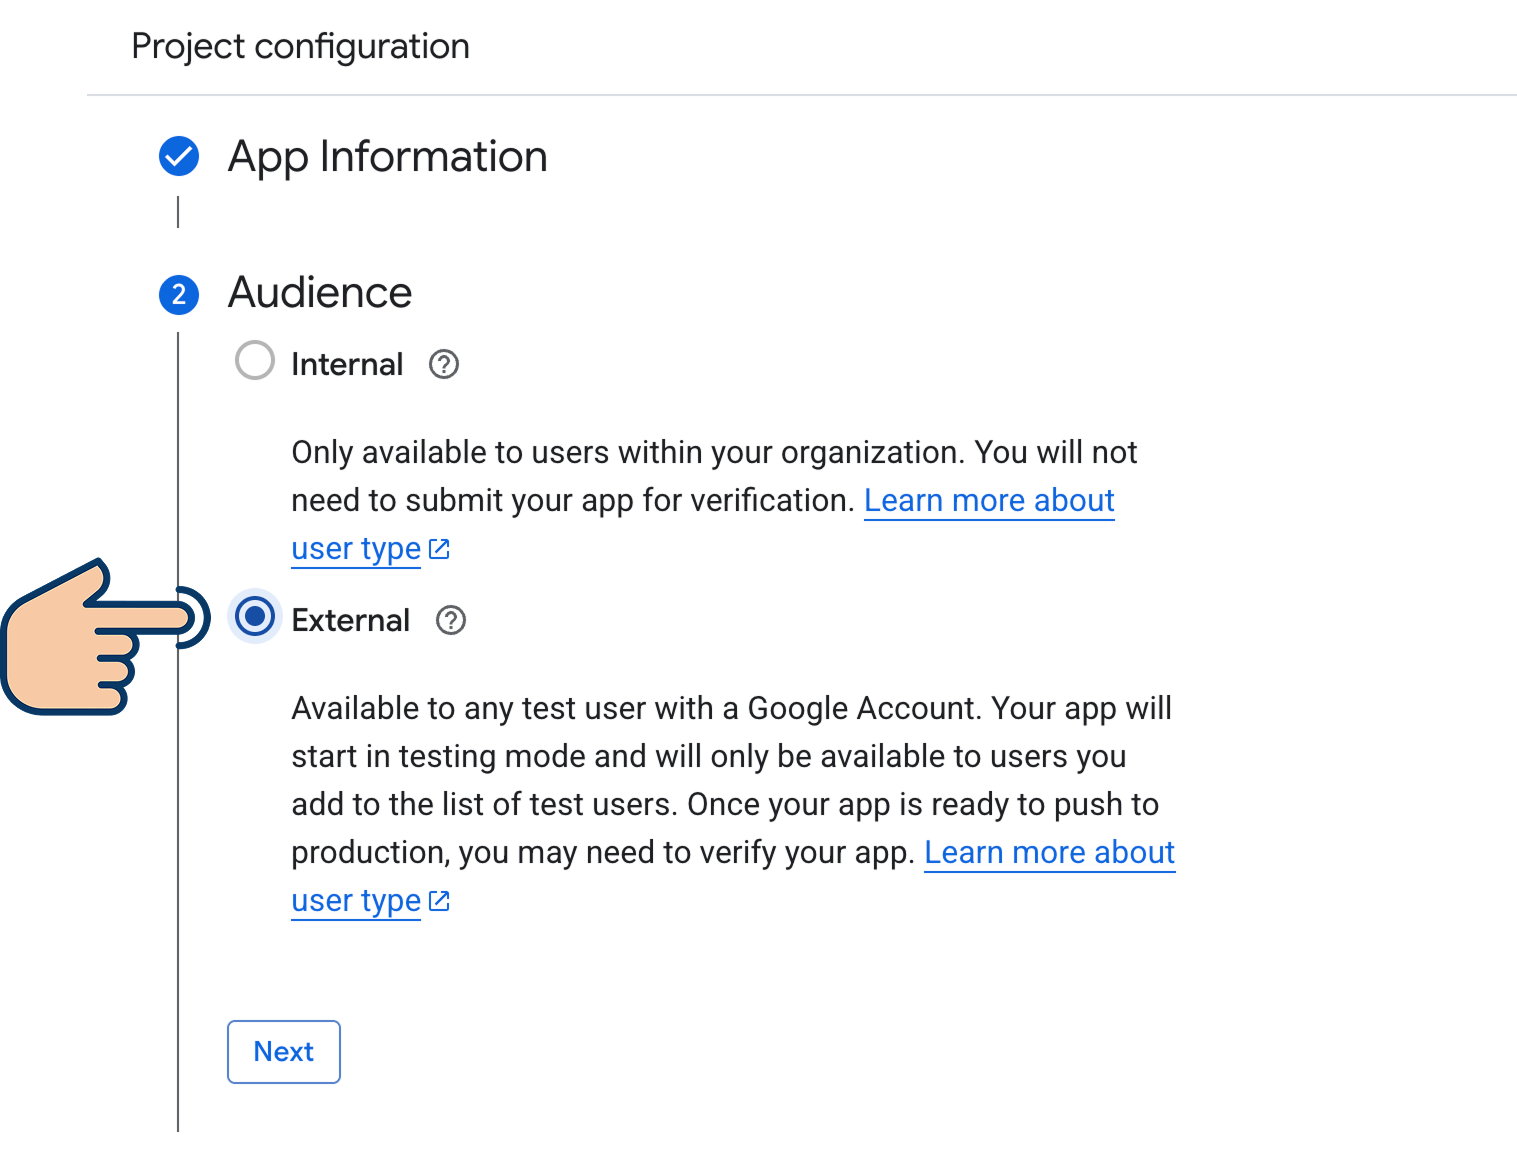
Select "External" for the audience, as we will be using the Google Sheets API within an external tool, such as n8n.
After that, click on the "Next" button again to enter the contact email:
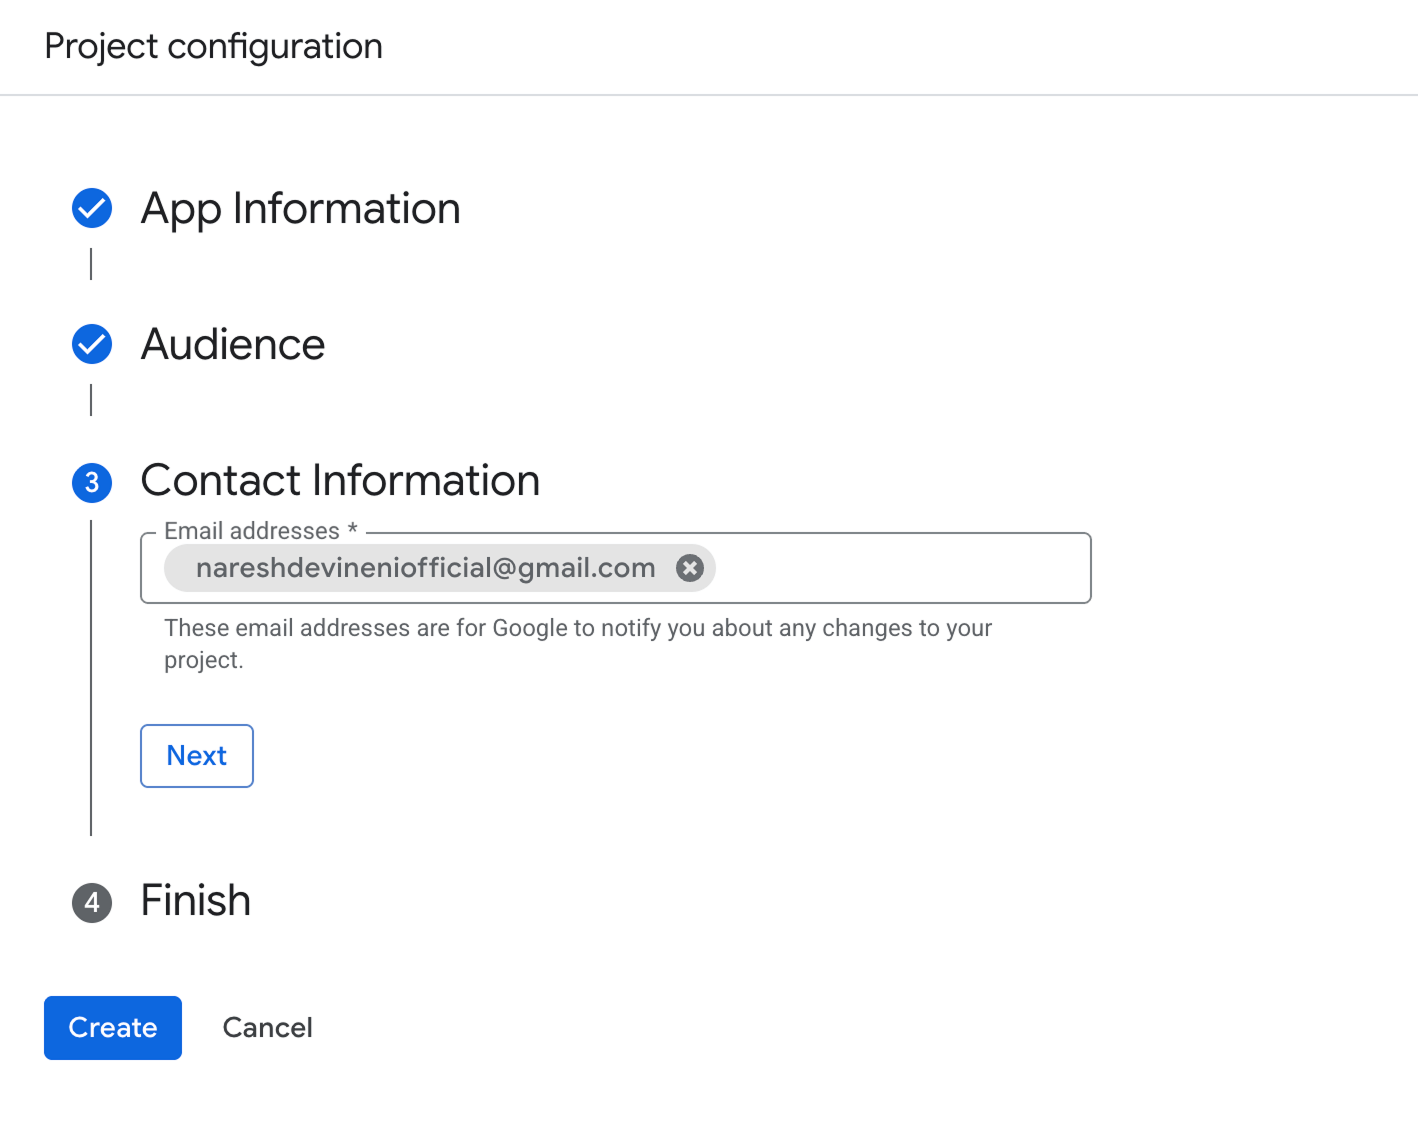
Google will use the email you have provided to send you notifications when there are any changes to your project.
After entering the contact email, click the "Next" button one last time and agree to the "Google API Services: User Data Policy" after reading it.
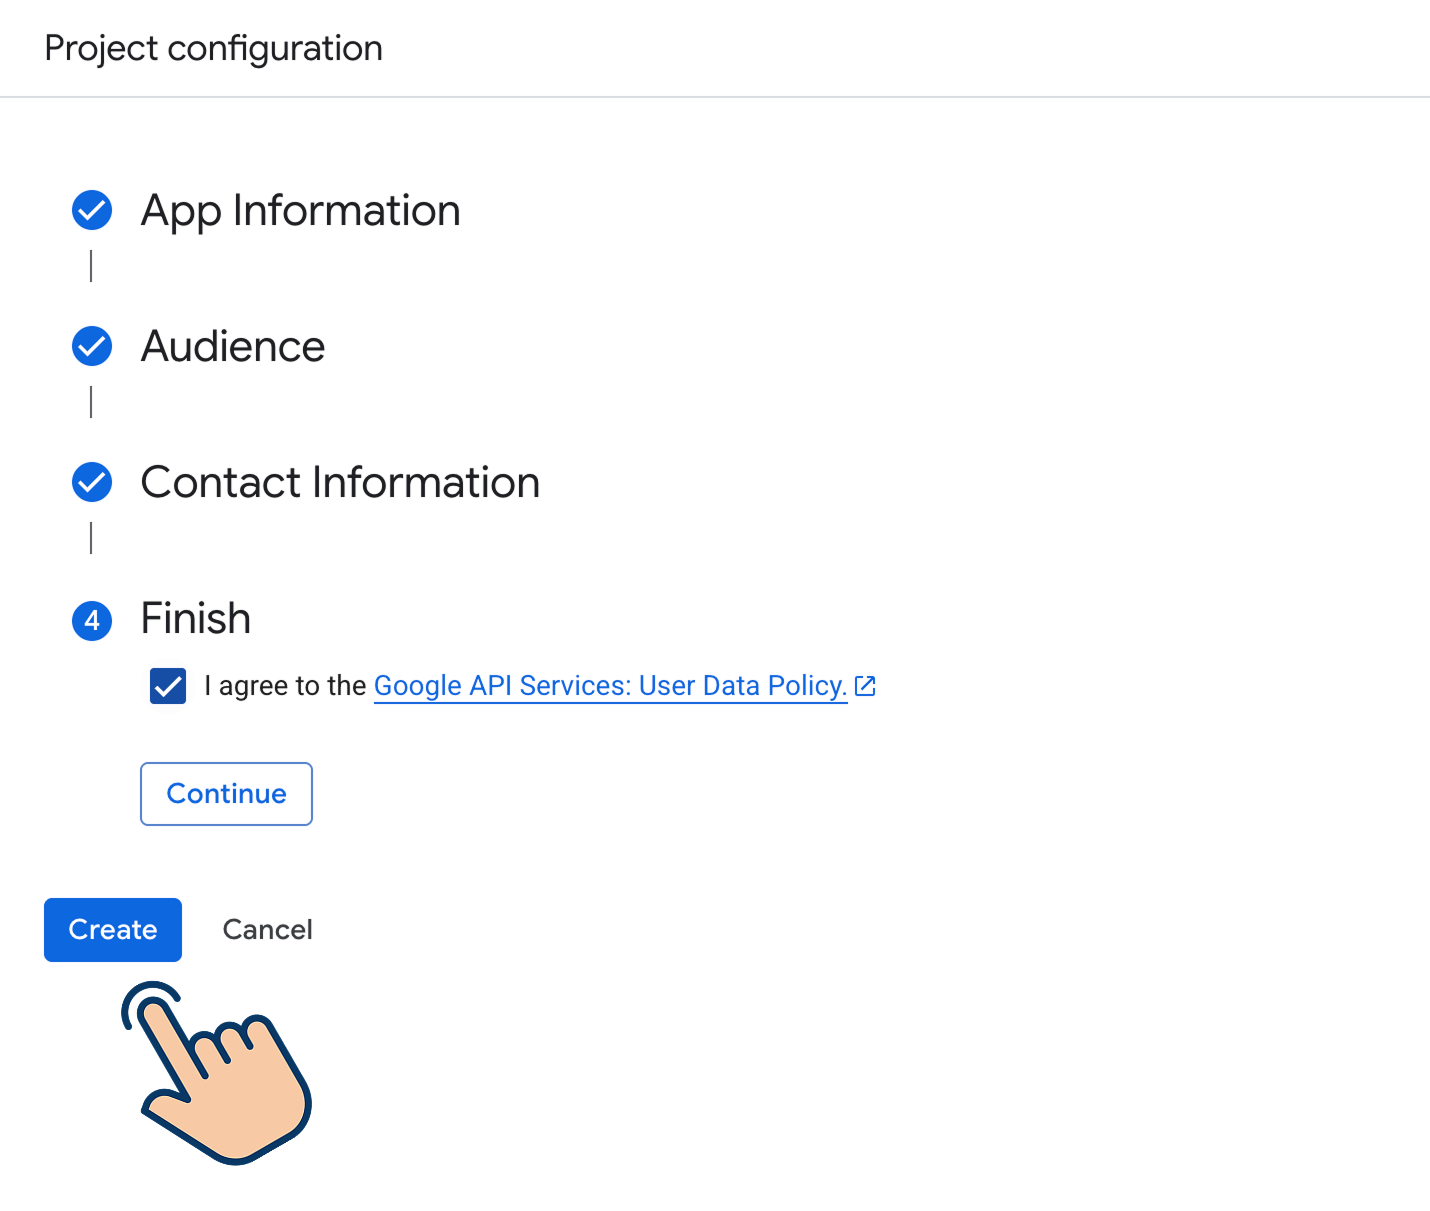
Finally, click the "Create" button.
That's all.
We are finally done with configuring the consent screen and its branding information.
But we are only halfway through.
The next step is to...
Step B: Create credentials for the Google API we want to use (Google Sheets).
After clicking the "Create" button in the previous step, you'll be redirected to the "OAuth Overview".
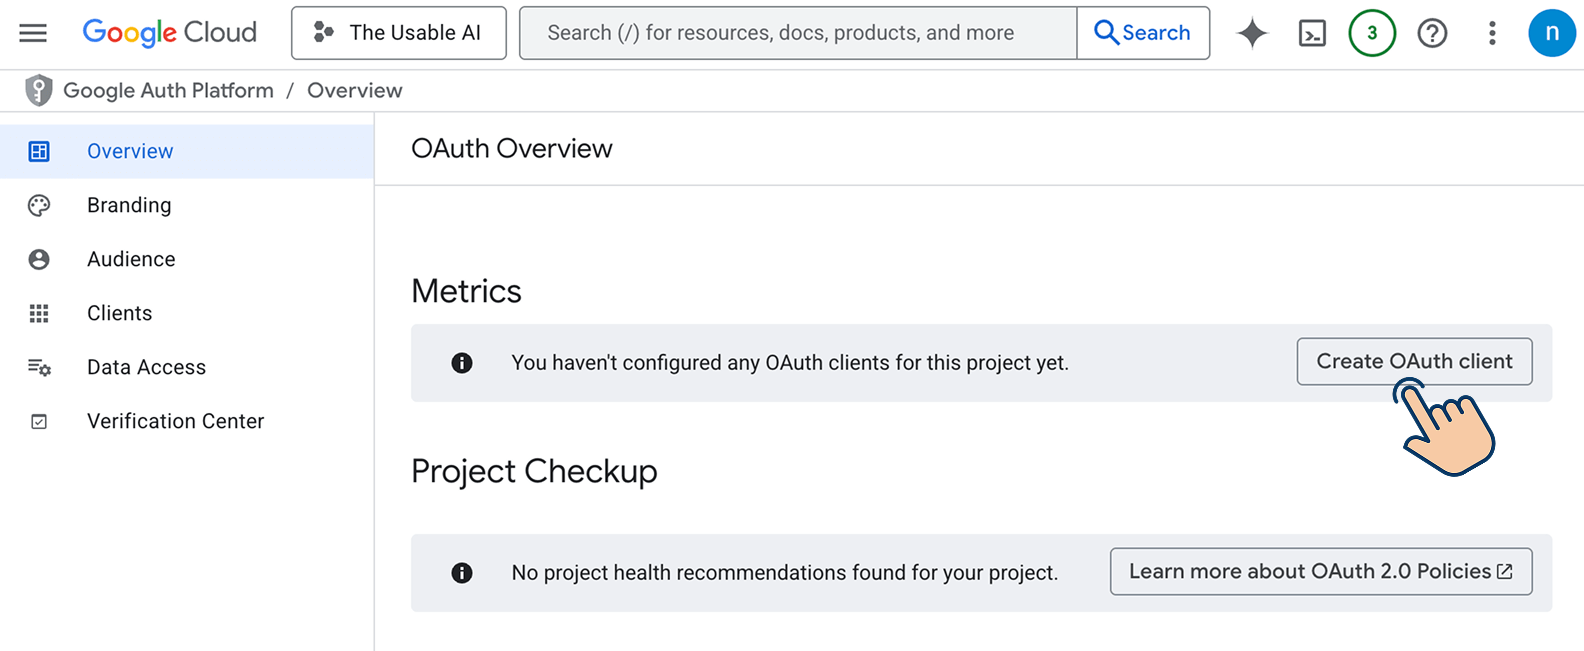
Next, click on the "Create OAuth Client" button to start creating the credentials.
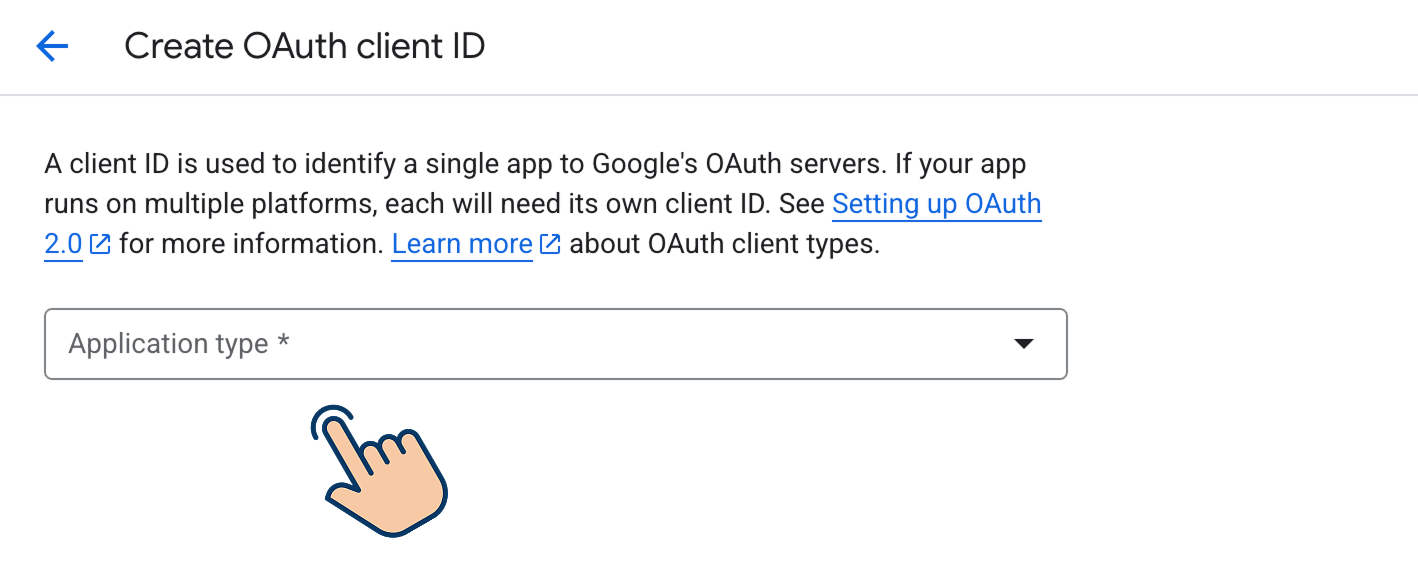
First, we will need to select the "Application Type".
In my case, I want to use the Google Sheets API with an automation tool, n8n, make.com, Zapier, etc.
They are all web applications. Simply, they are software that are accessed through a web browser.
So, I will select "Web Application" as the application type.
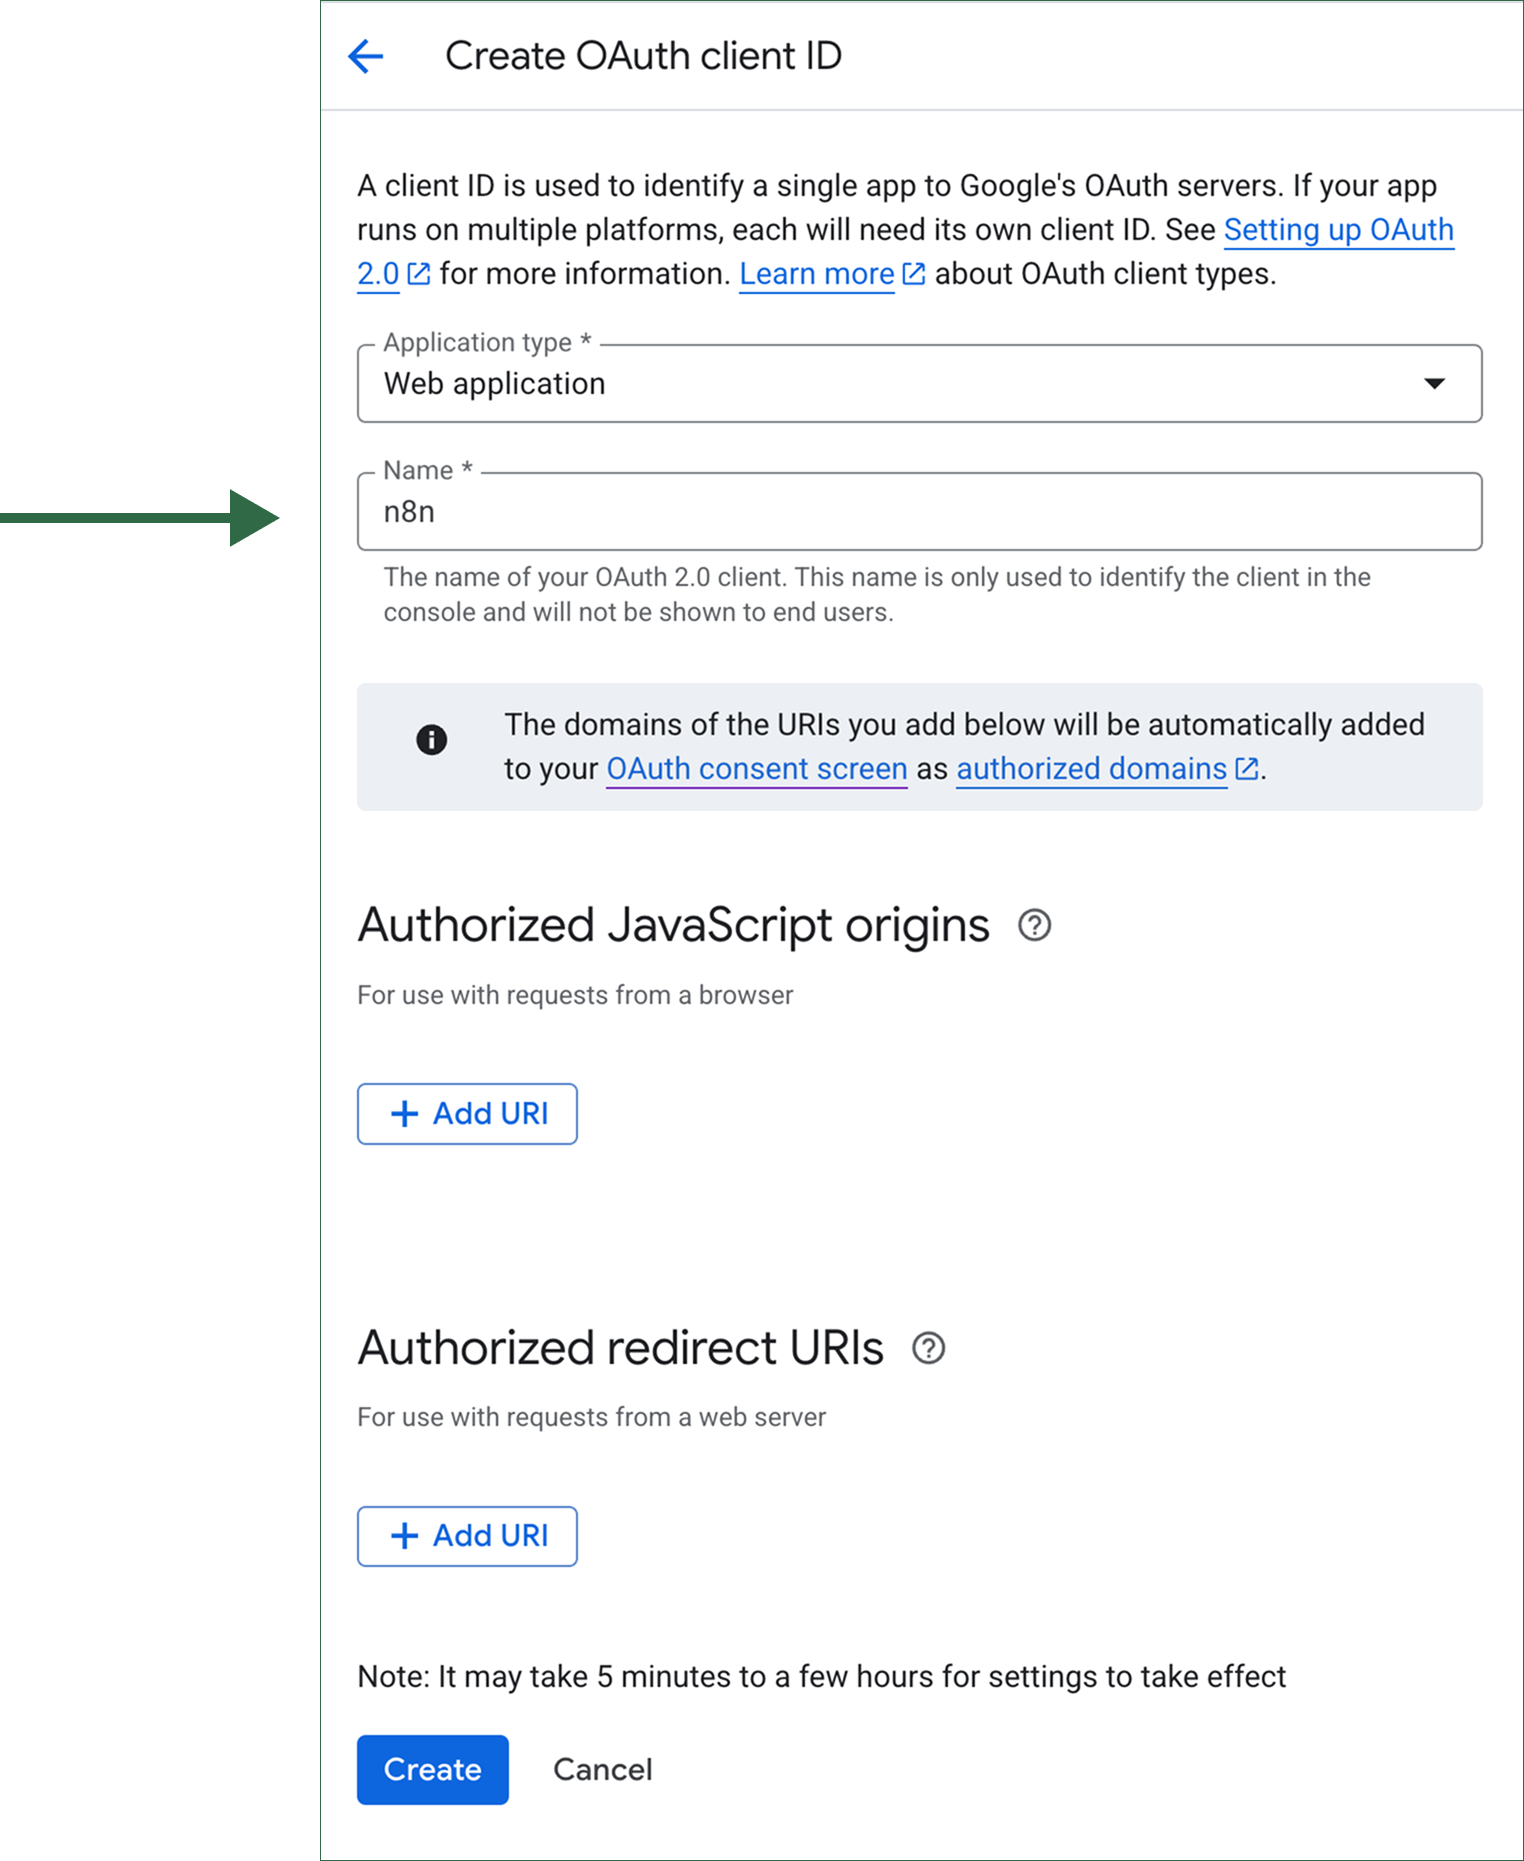
Next, for the Application "name", I typed "n8n" because I am creating credentials for an n8n automation.
It just helps me recognize the purpose of the credentials at some point in the future.
Anyway, next, go to the "Authorized redirect URIs" section and click on the "Add URIs" button.

This URI is provided by the application that uses the Google API on your behalf.
For example, in my case, I am trying to use the Google Sheets API within n8n.
So, n8n is providing me with the URI:
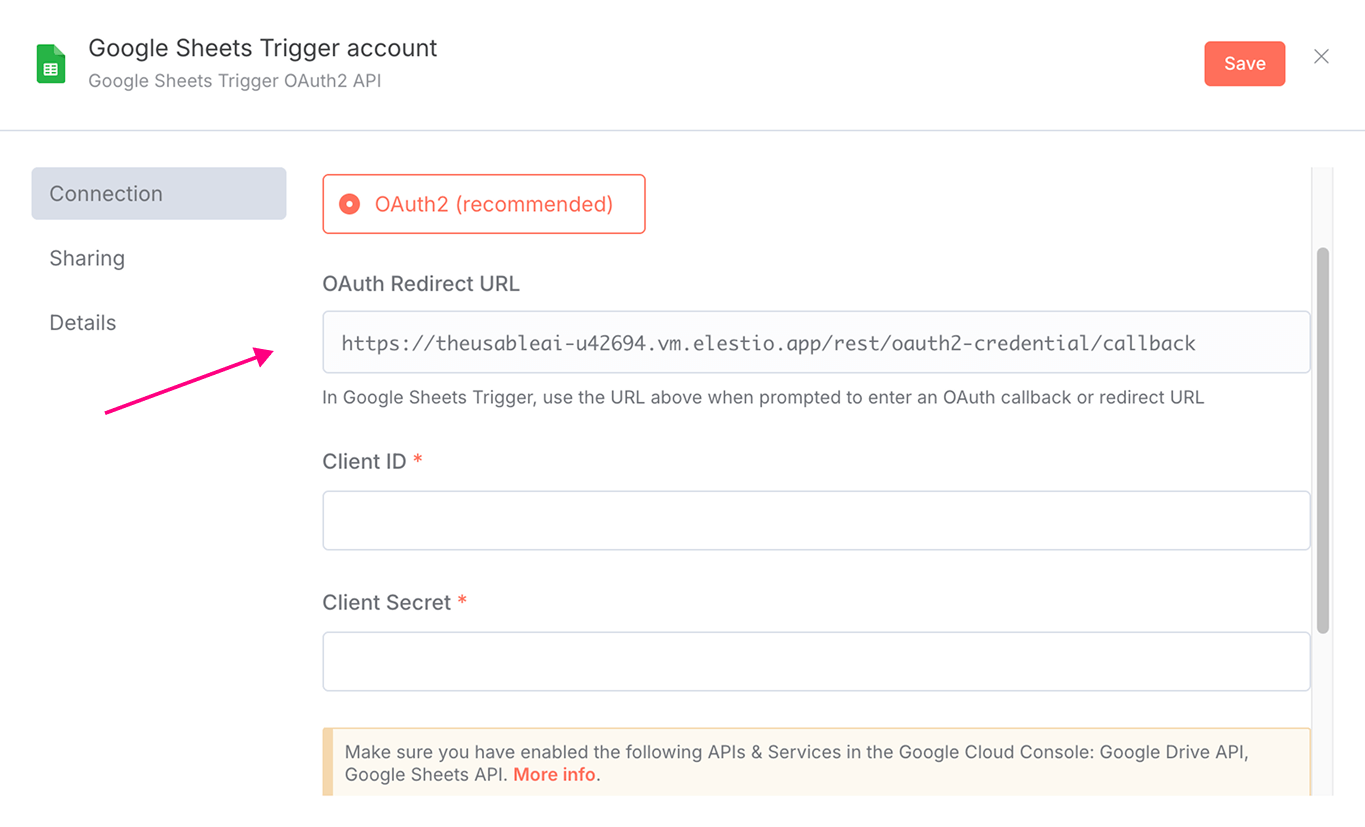
And I will copy it and paste it into the "Authorized redirect URIs" field:
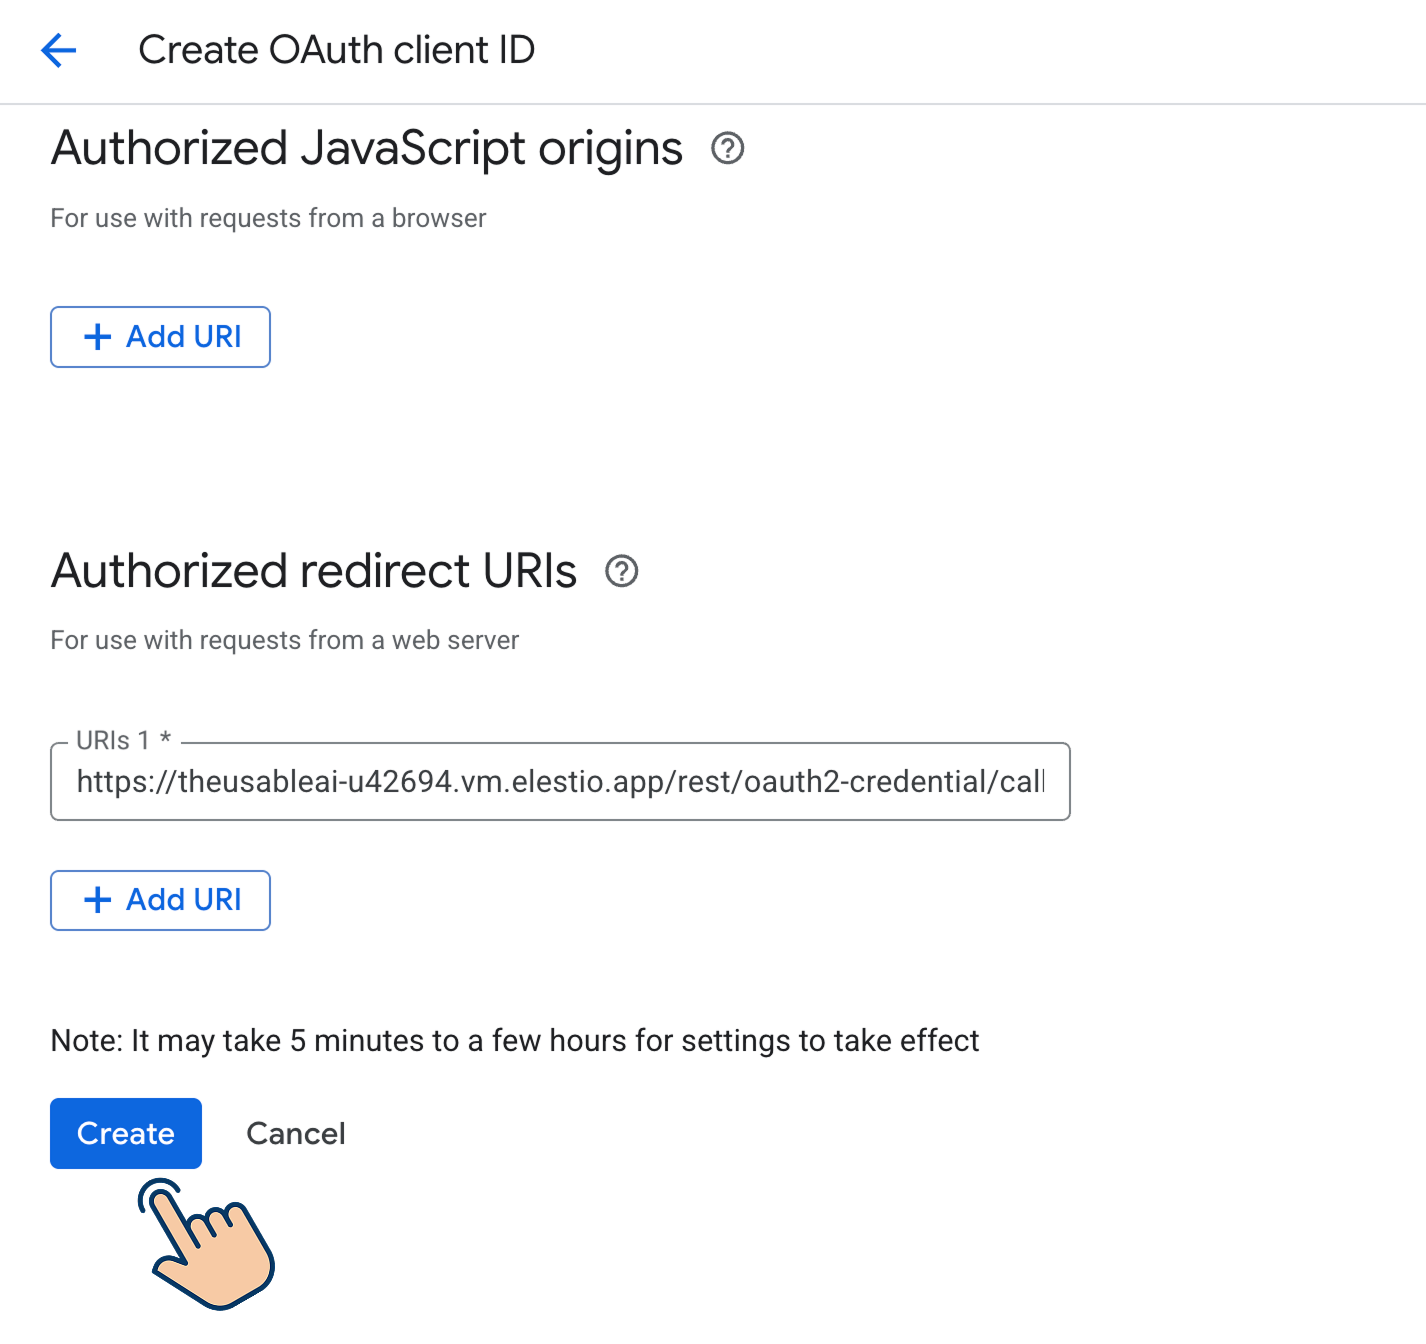
Finally, click the "Create" button to complete the credential creation process.
And as soon as credentials are created, you'll see a pop-up with Client ID and Client Secret:
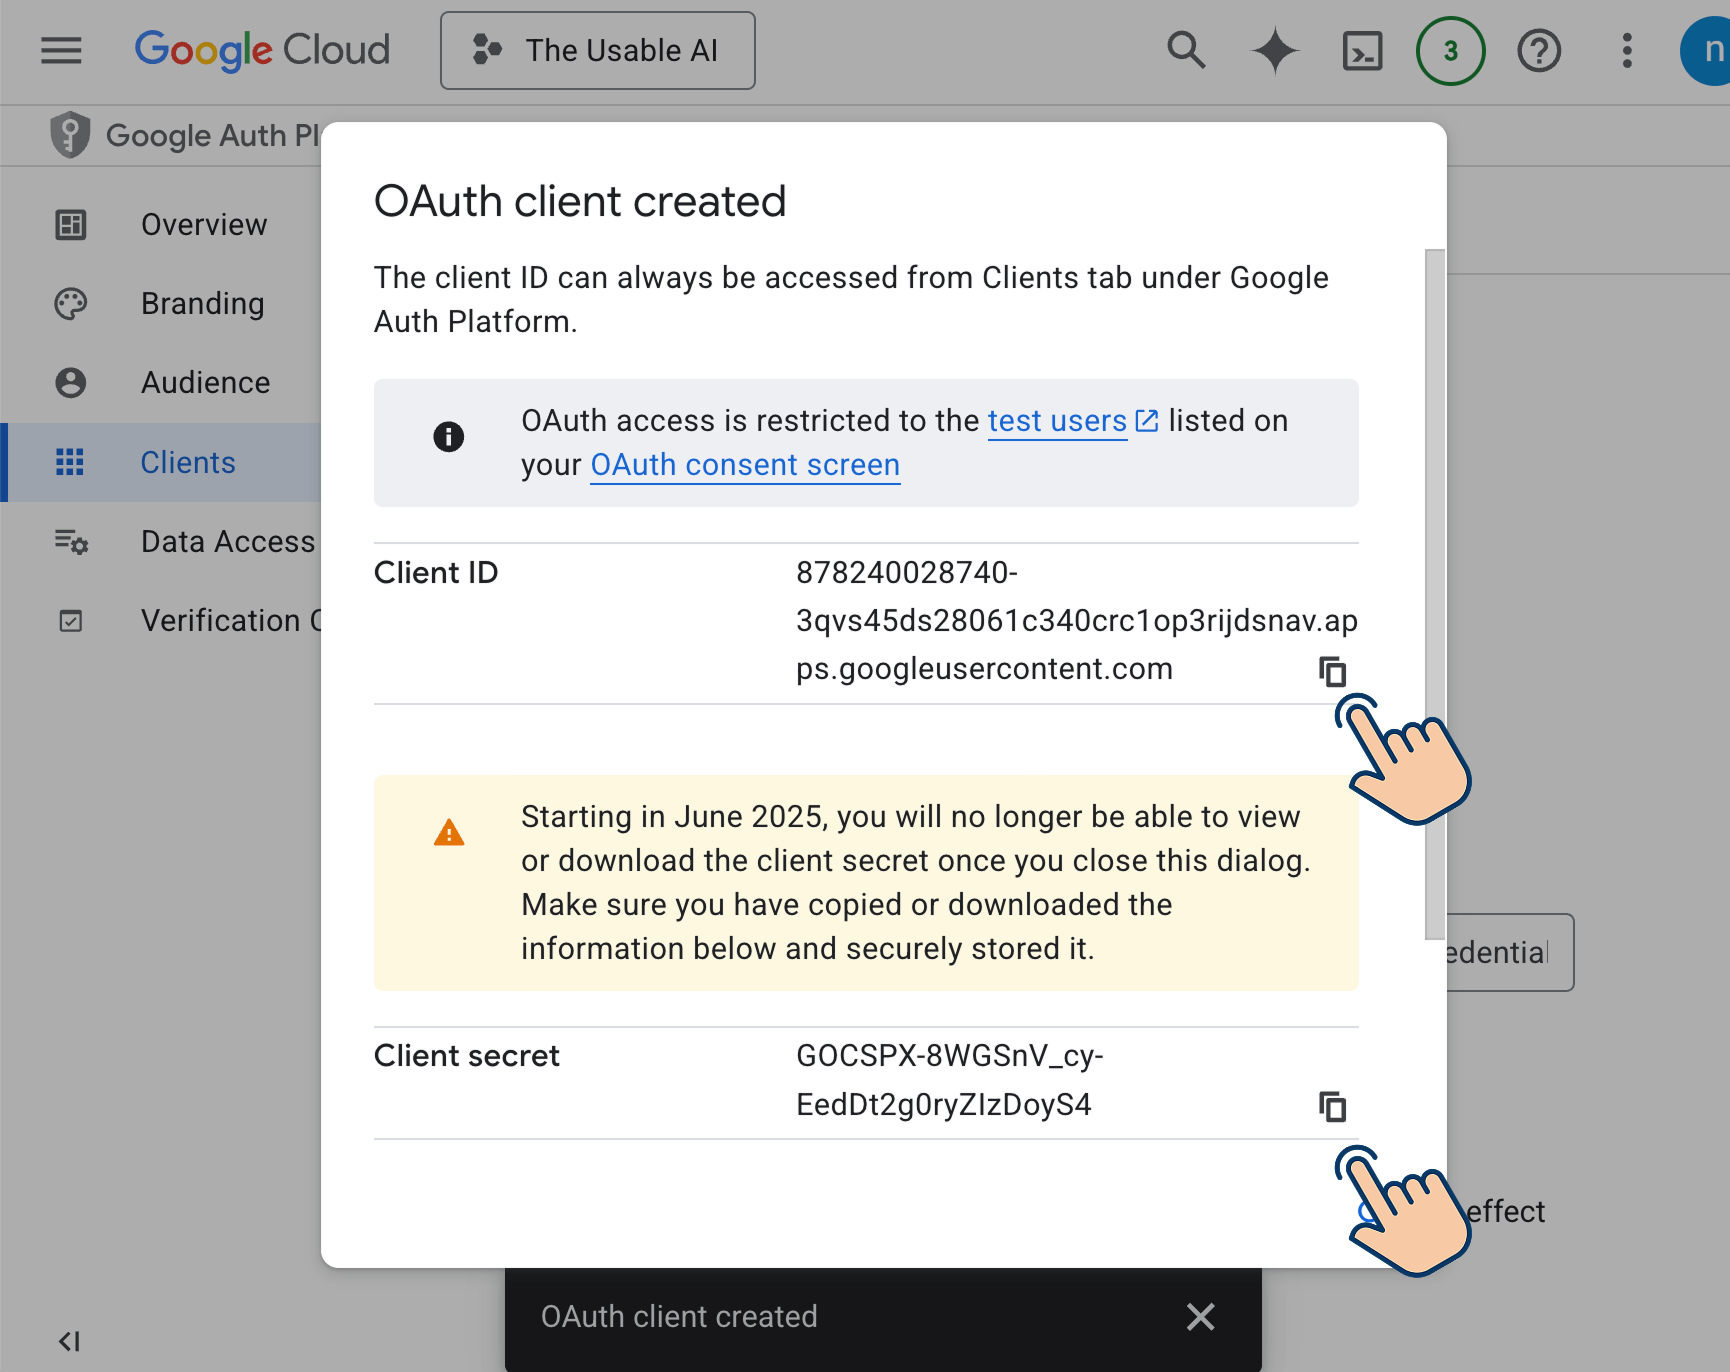
Copy them and enter them into the application that asked for those credentials.
In my case, n8n asked for them, so I will add the above credentials to n8n like this:
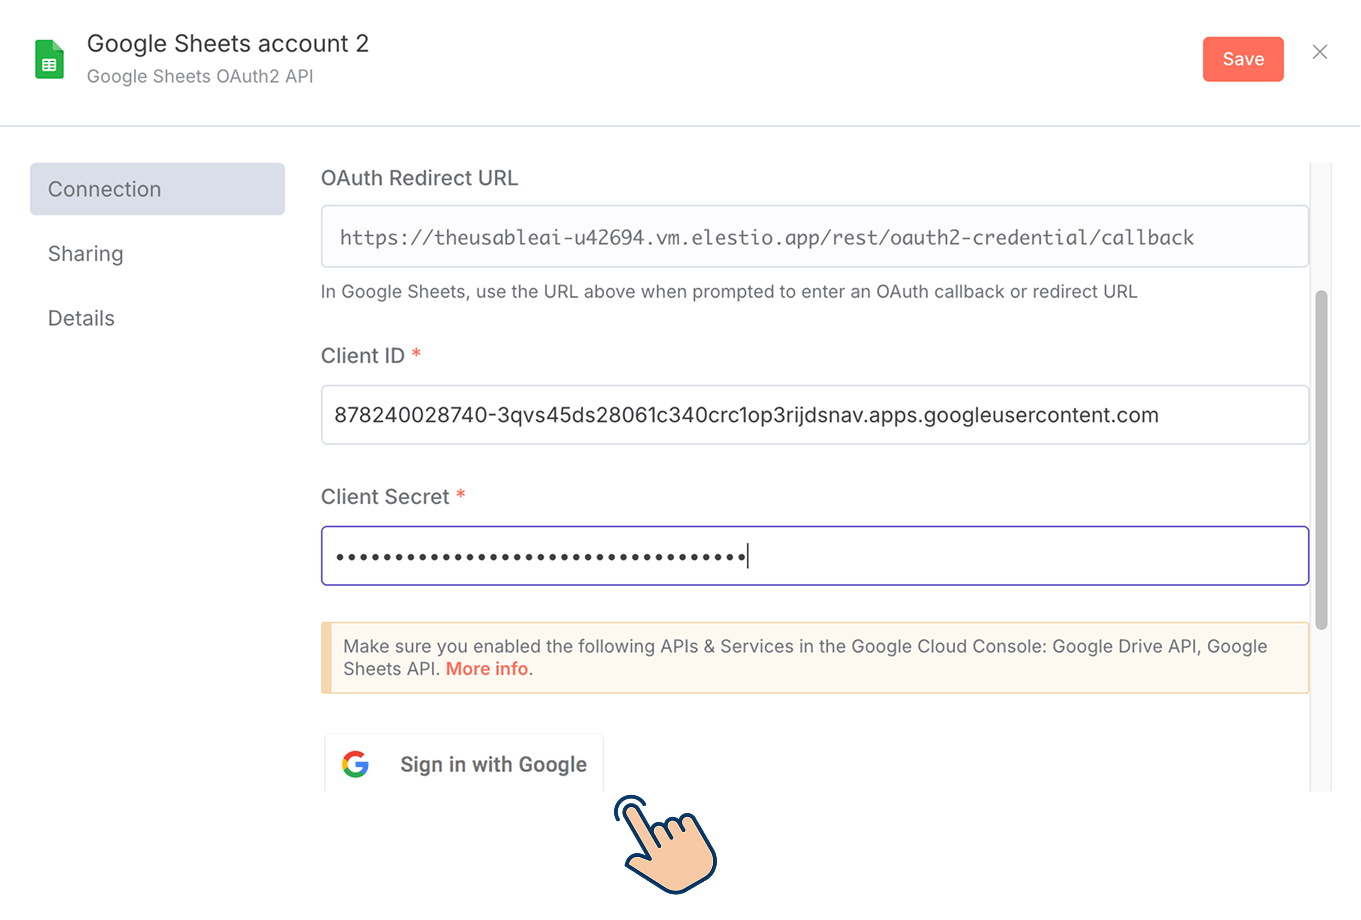
And as soon as I added credentials to n8n, it is showing a new "Sign in with Google" button now.
We are seeing the "Sign in with Google" button because adding credentials is not enough.
We have to provide consent to make n8n use the Google Sheets API on our behalf.
So, click the "Sign in with Google" button if you are using n8n and select the Google account you used for setting up Google Cloud Console.
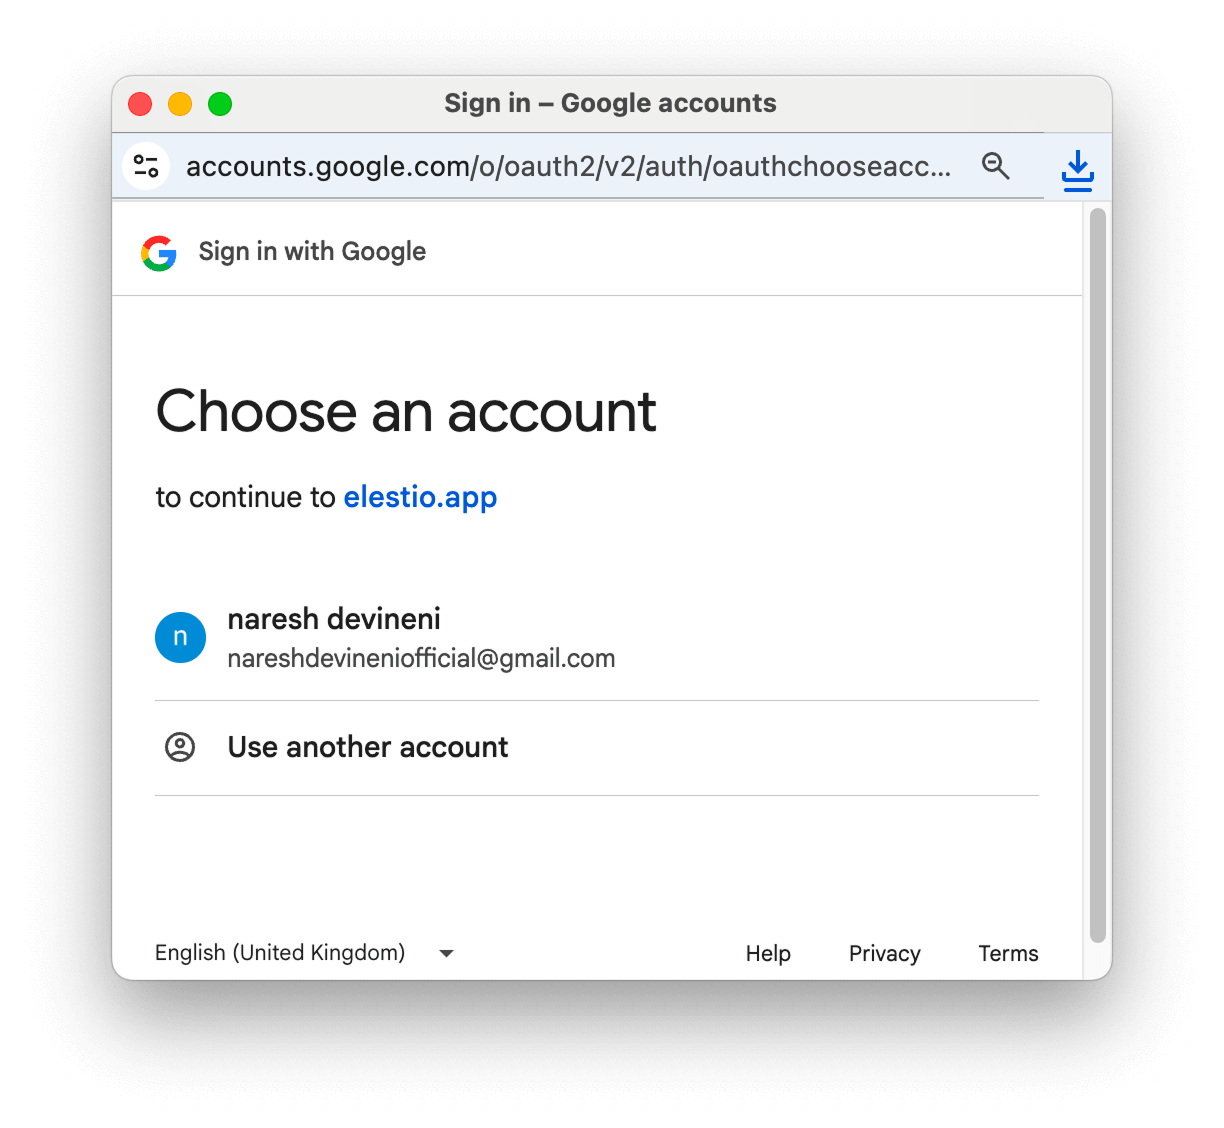
And bang!
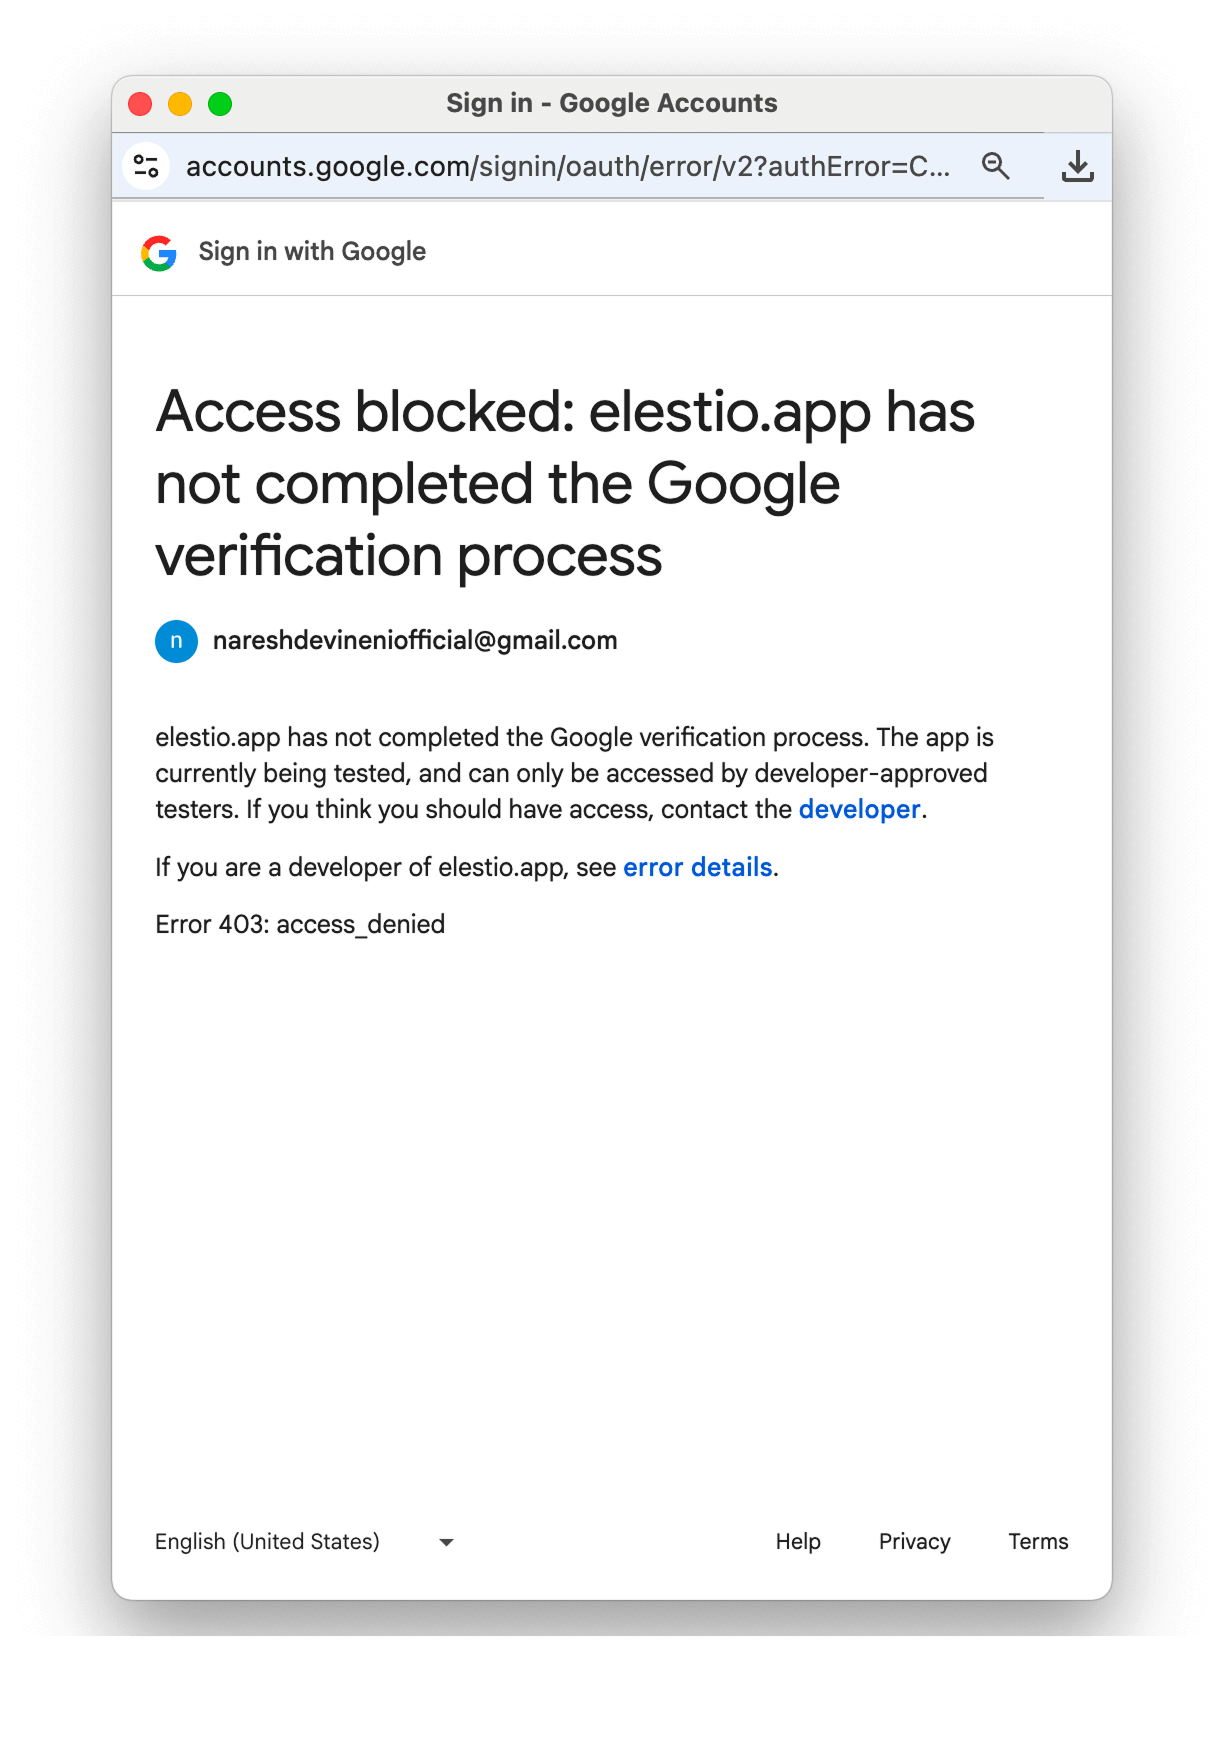
What happened? Why was the access blocked?
Haha! Don't worry!
The problem was that, although we created the credentials on Google Cloud Console, we didn't publish them.
To publish them, access the menu on the left and go to:
APIs & Services → Credentials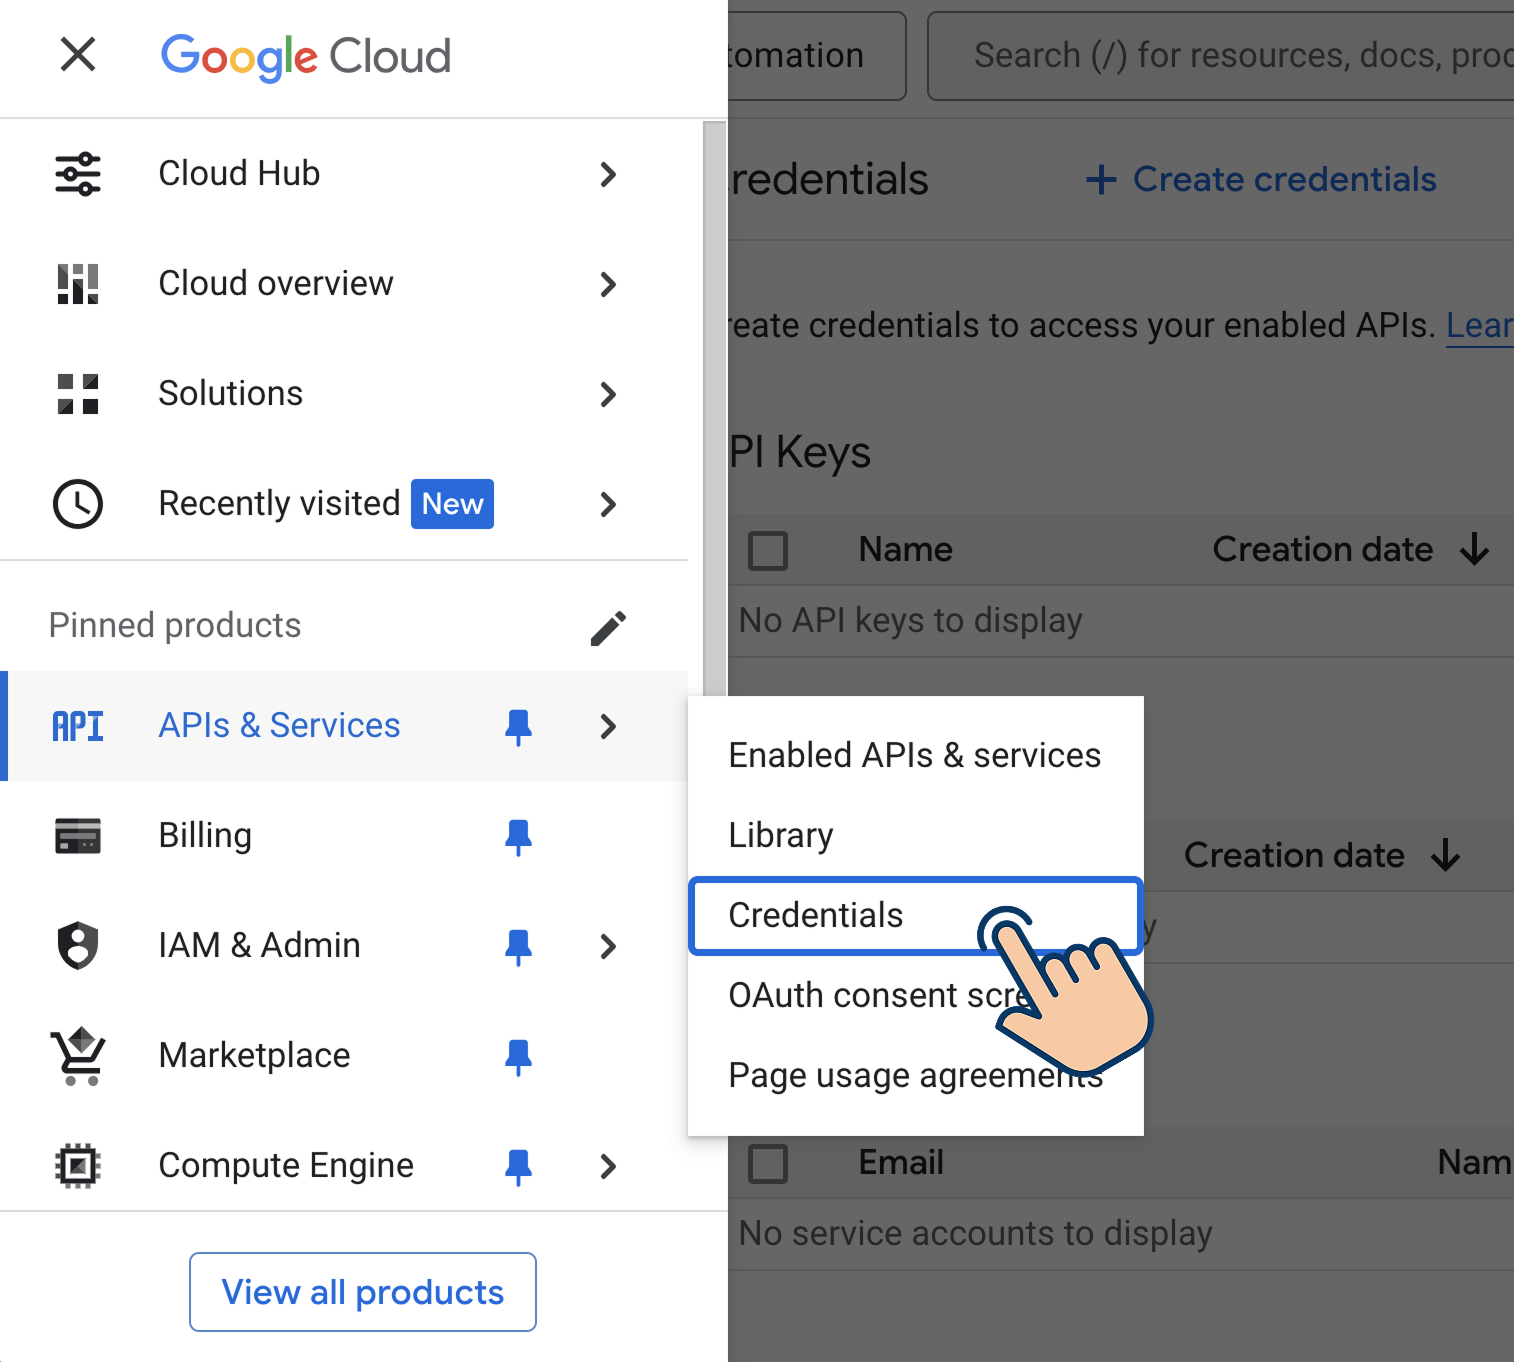
If you have followed along with me, you will see a web application underneath the "OAuth 2.0 Client IDs" section:
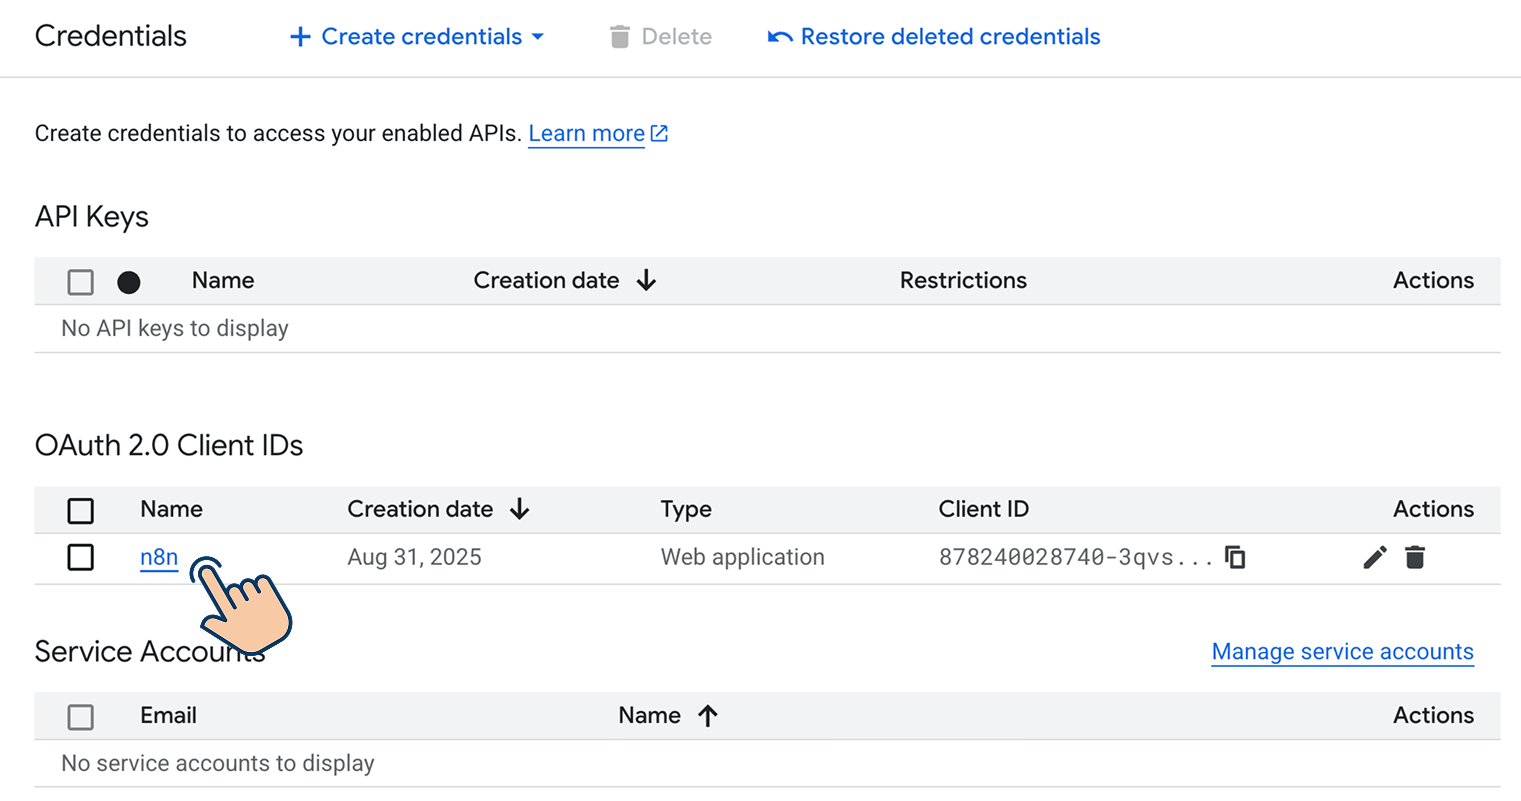
If you remember, we created this web application for creating credentials.
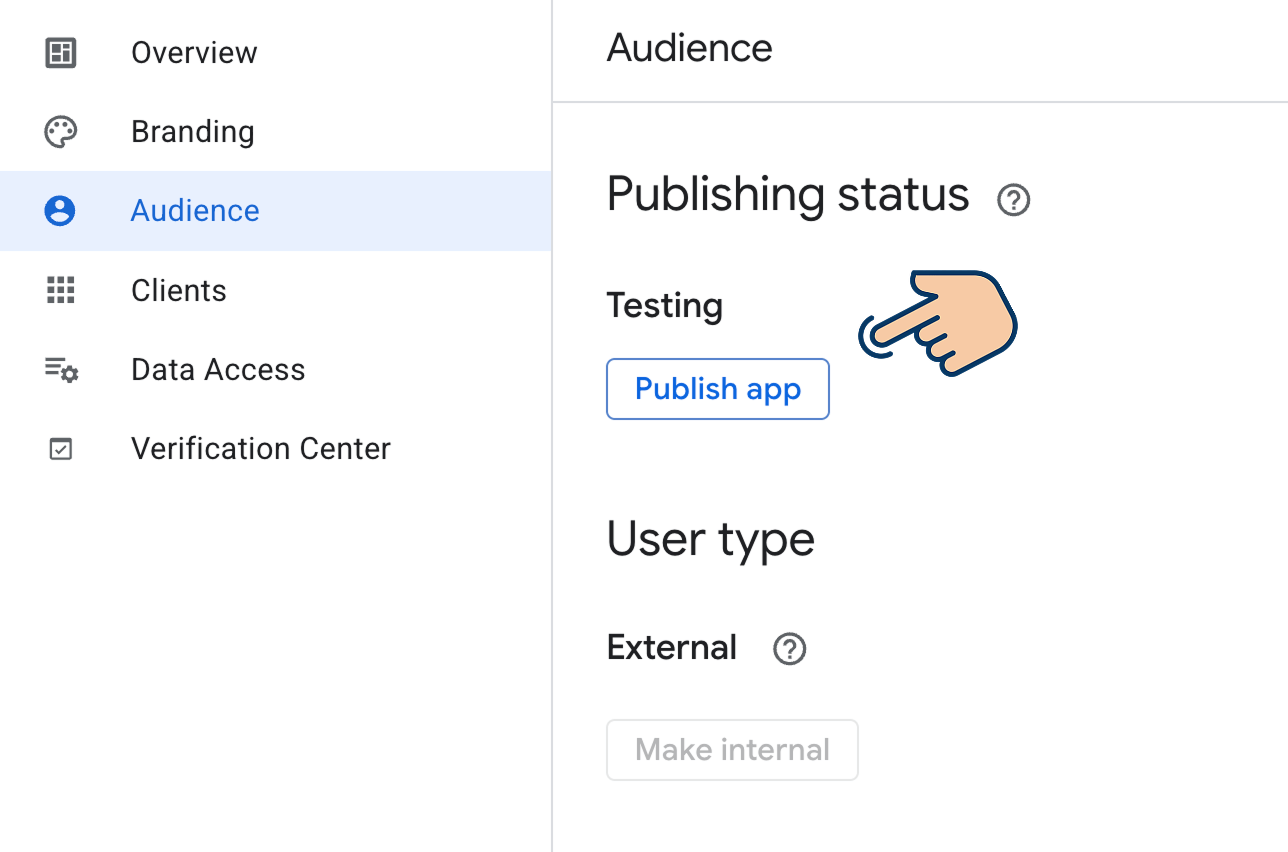
Anyway, click on the application name (in my case, it is "n8n") and then go to the "Audience" screen:

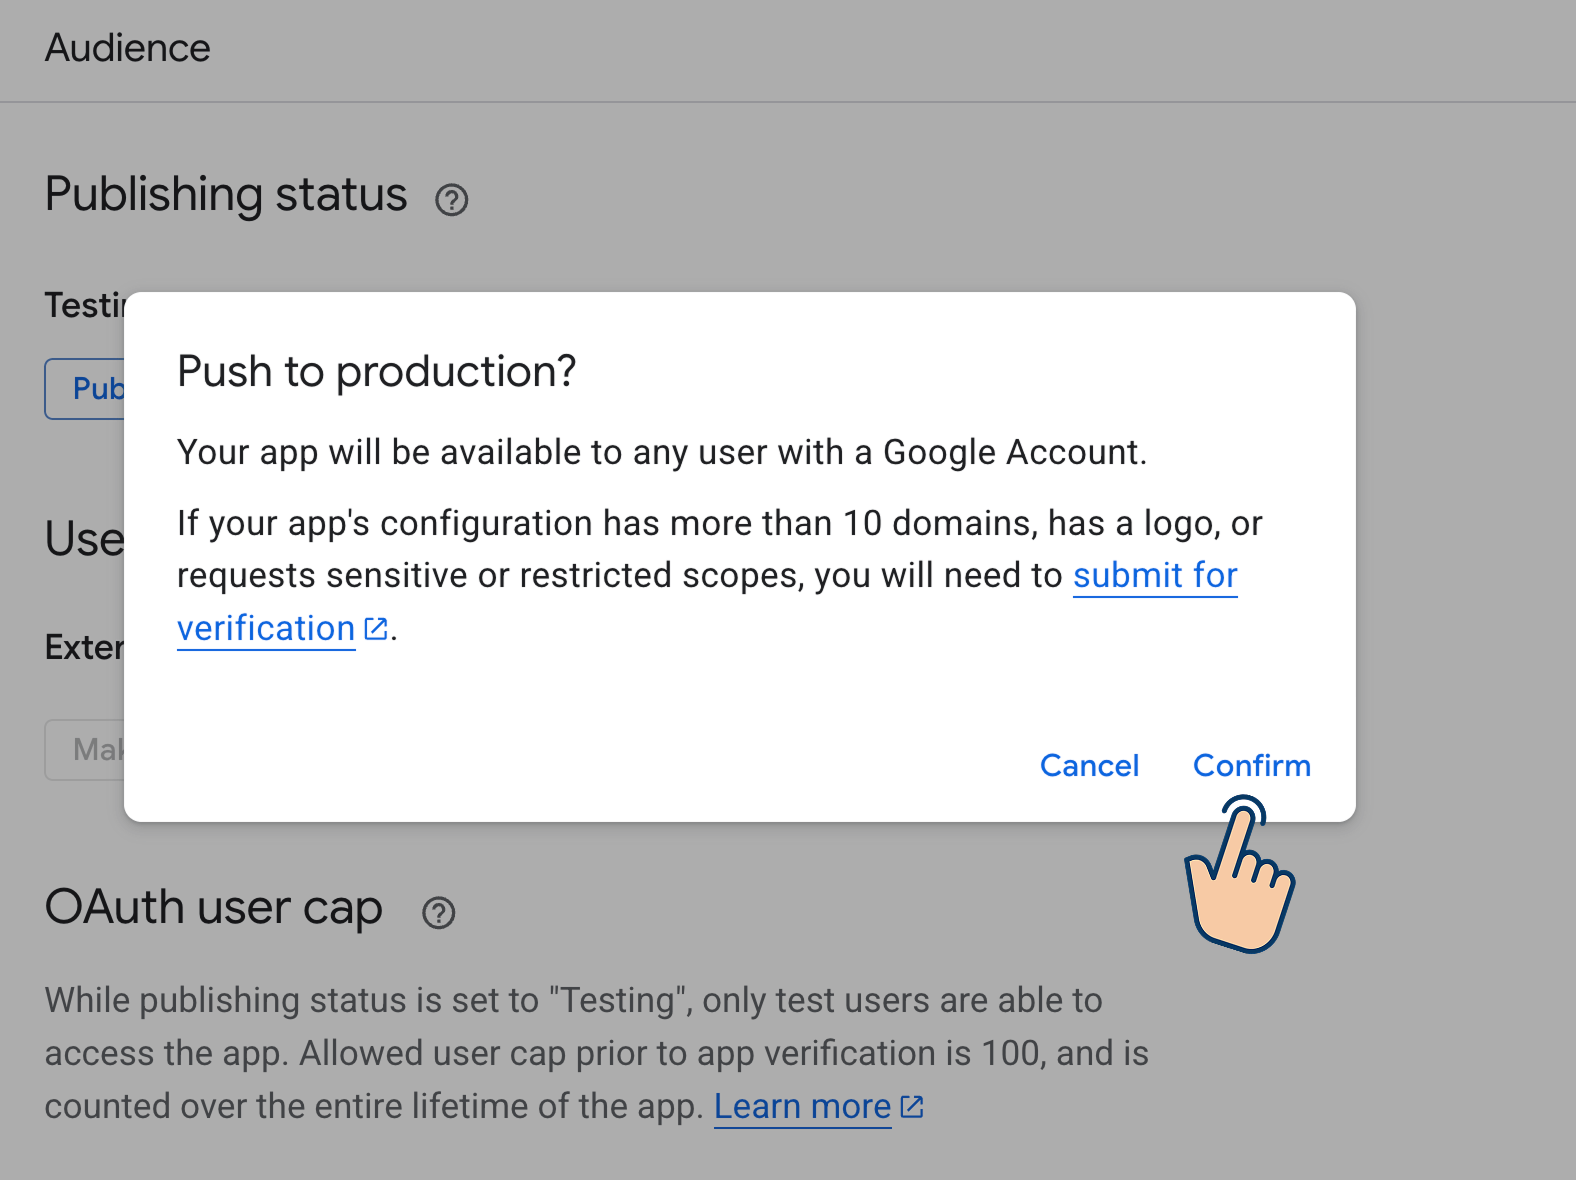
Click the "Publish App" button.
And, finally, "Confirm" to make the credentials live:
That's all. Our credentials are now live.
Come on, let's go back to n8n to try to sign in with Google again:
And select the Google account that you used for Cloud Console again:
And this time, because we have published the Client App, we should now see a consent screen:
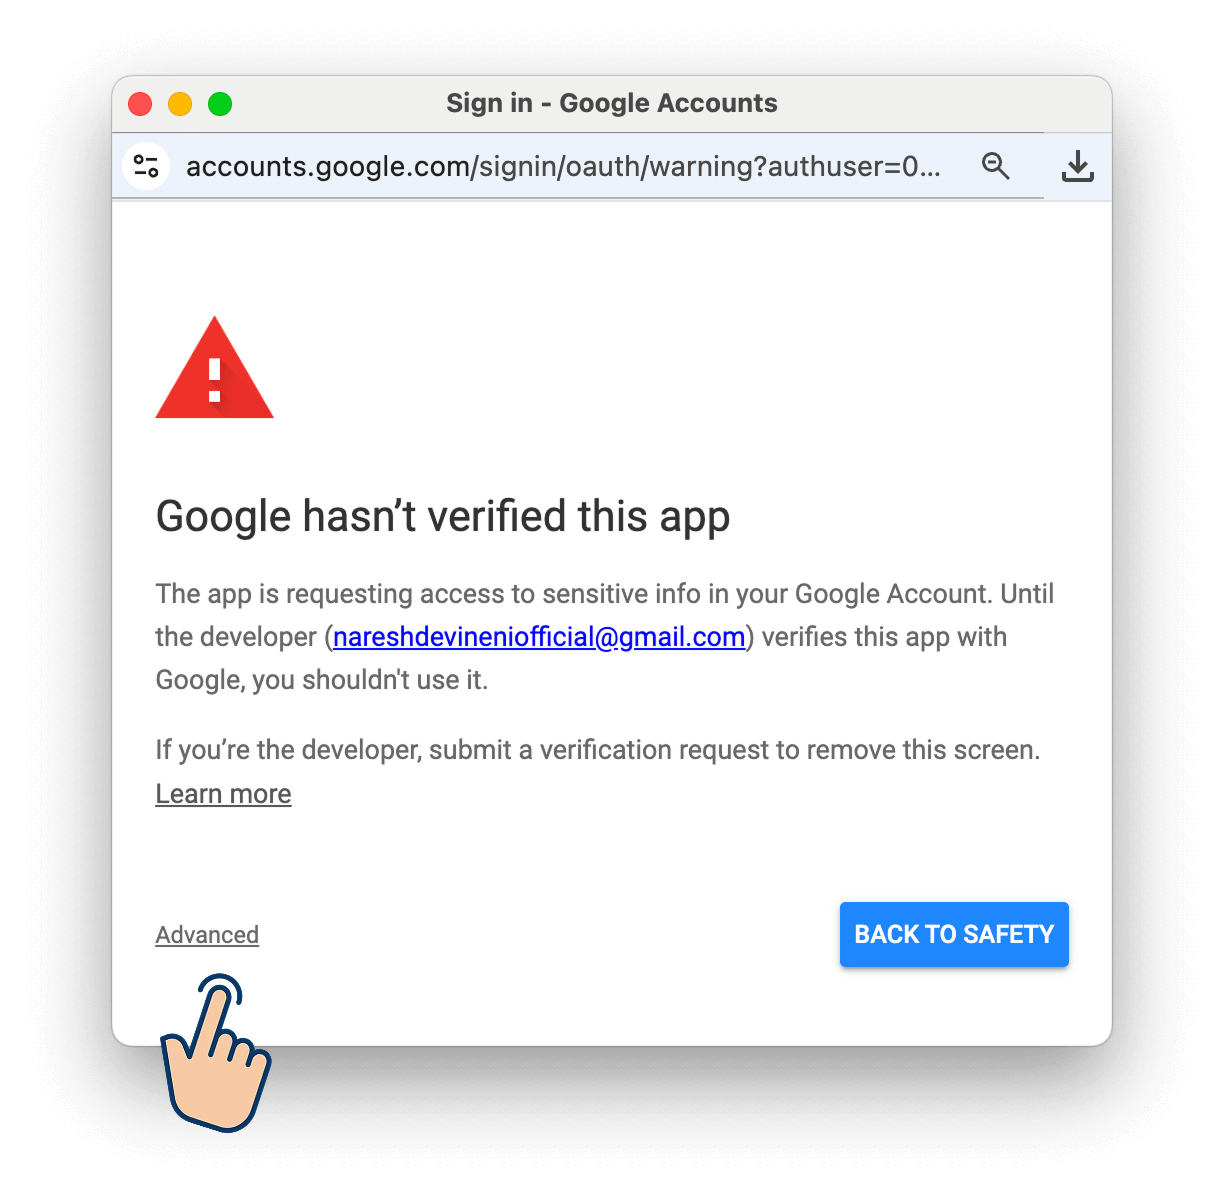
Wait! That's not a consent screen. Am I getting hacked or what? Why should I get back to safety?
Hahaha. Don't panic. You're not getting hacked.
We didn't verify the Google Client App we published previously and because we didn't verify, Google is thinking it is not safe.
Oh now what? I don't have the patience :( Will this tutorial ever get over?
Hmmm.
You don't have to verify the app.
Because you are the person who created the app and you trust yourself, just click on the "Advanced" button:
And then click on the "Go to the app (unsafe)" button:
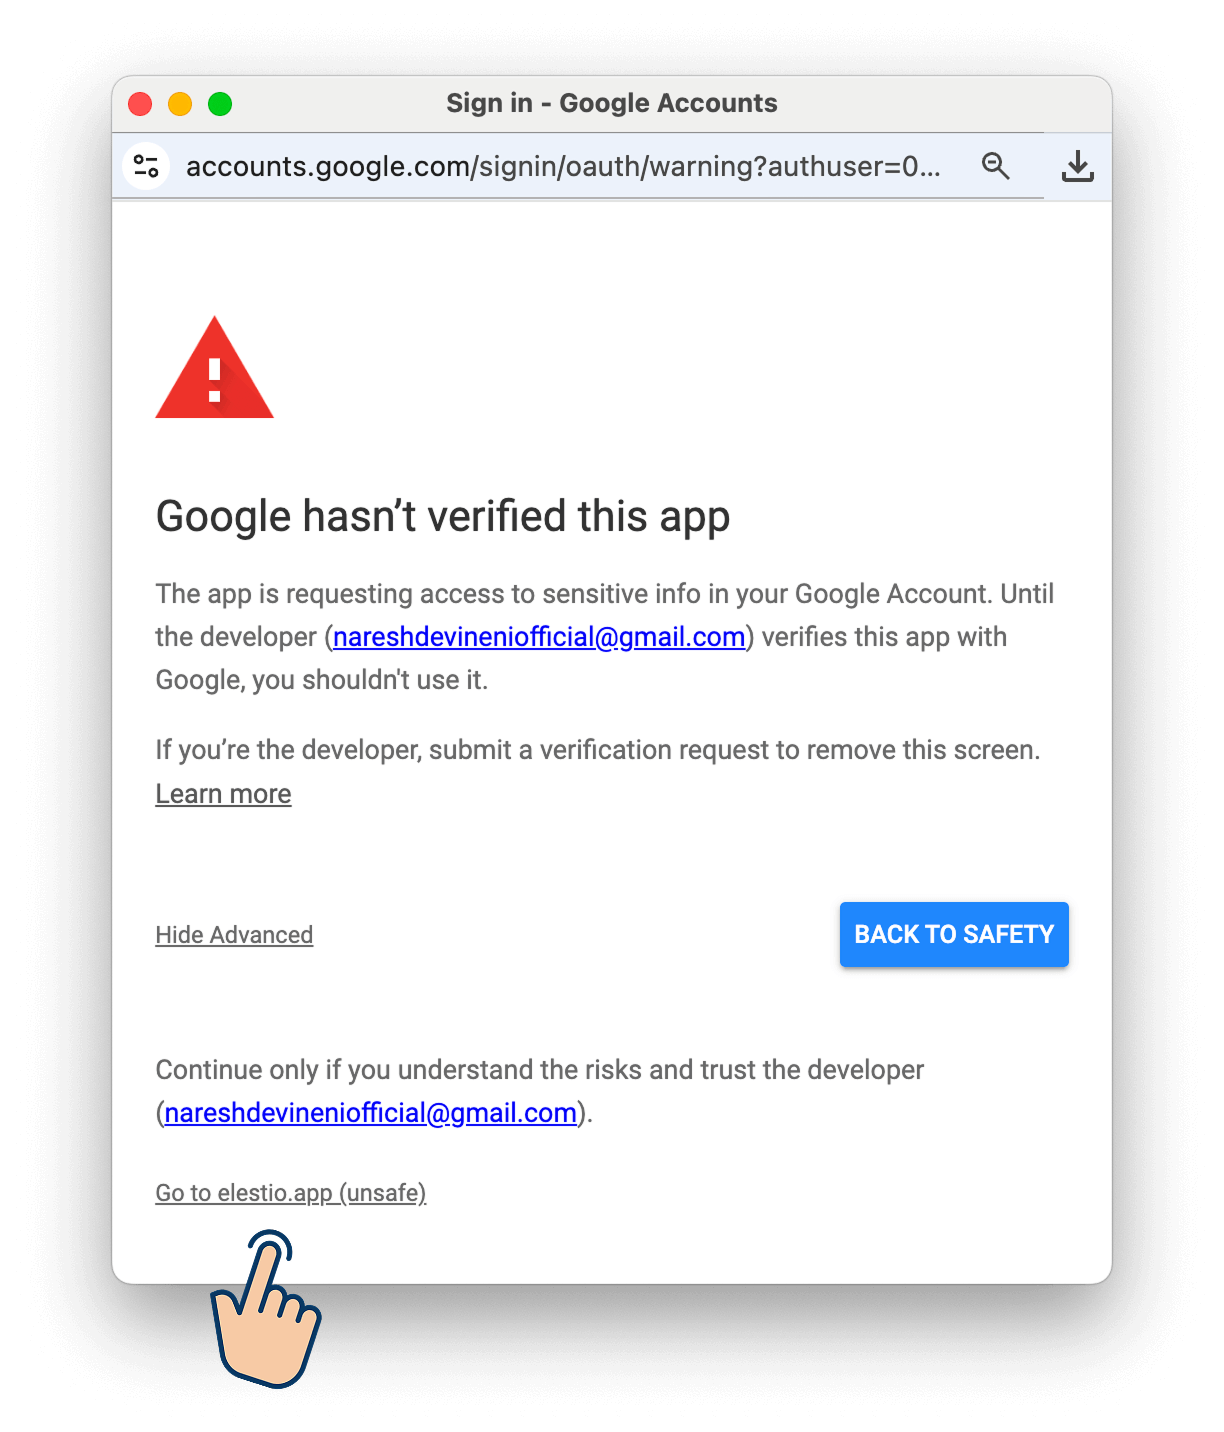
This will finally make you see the consent screen:
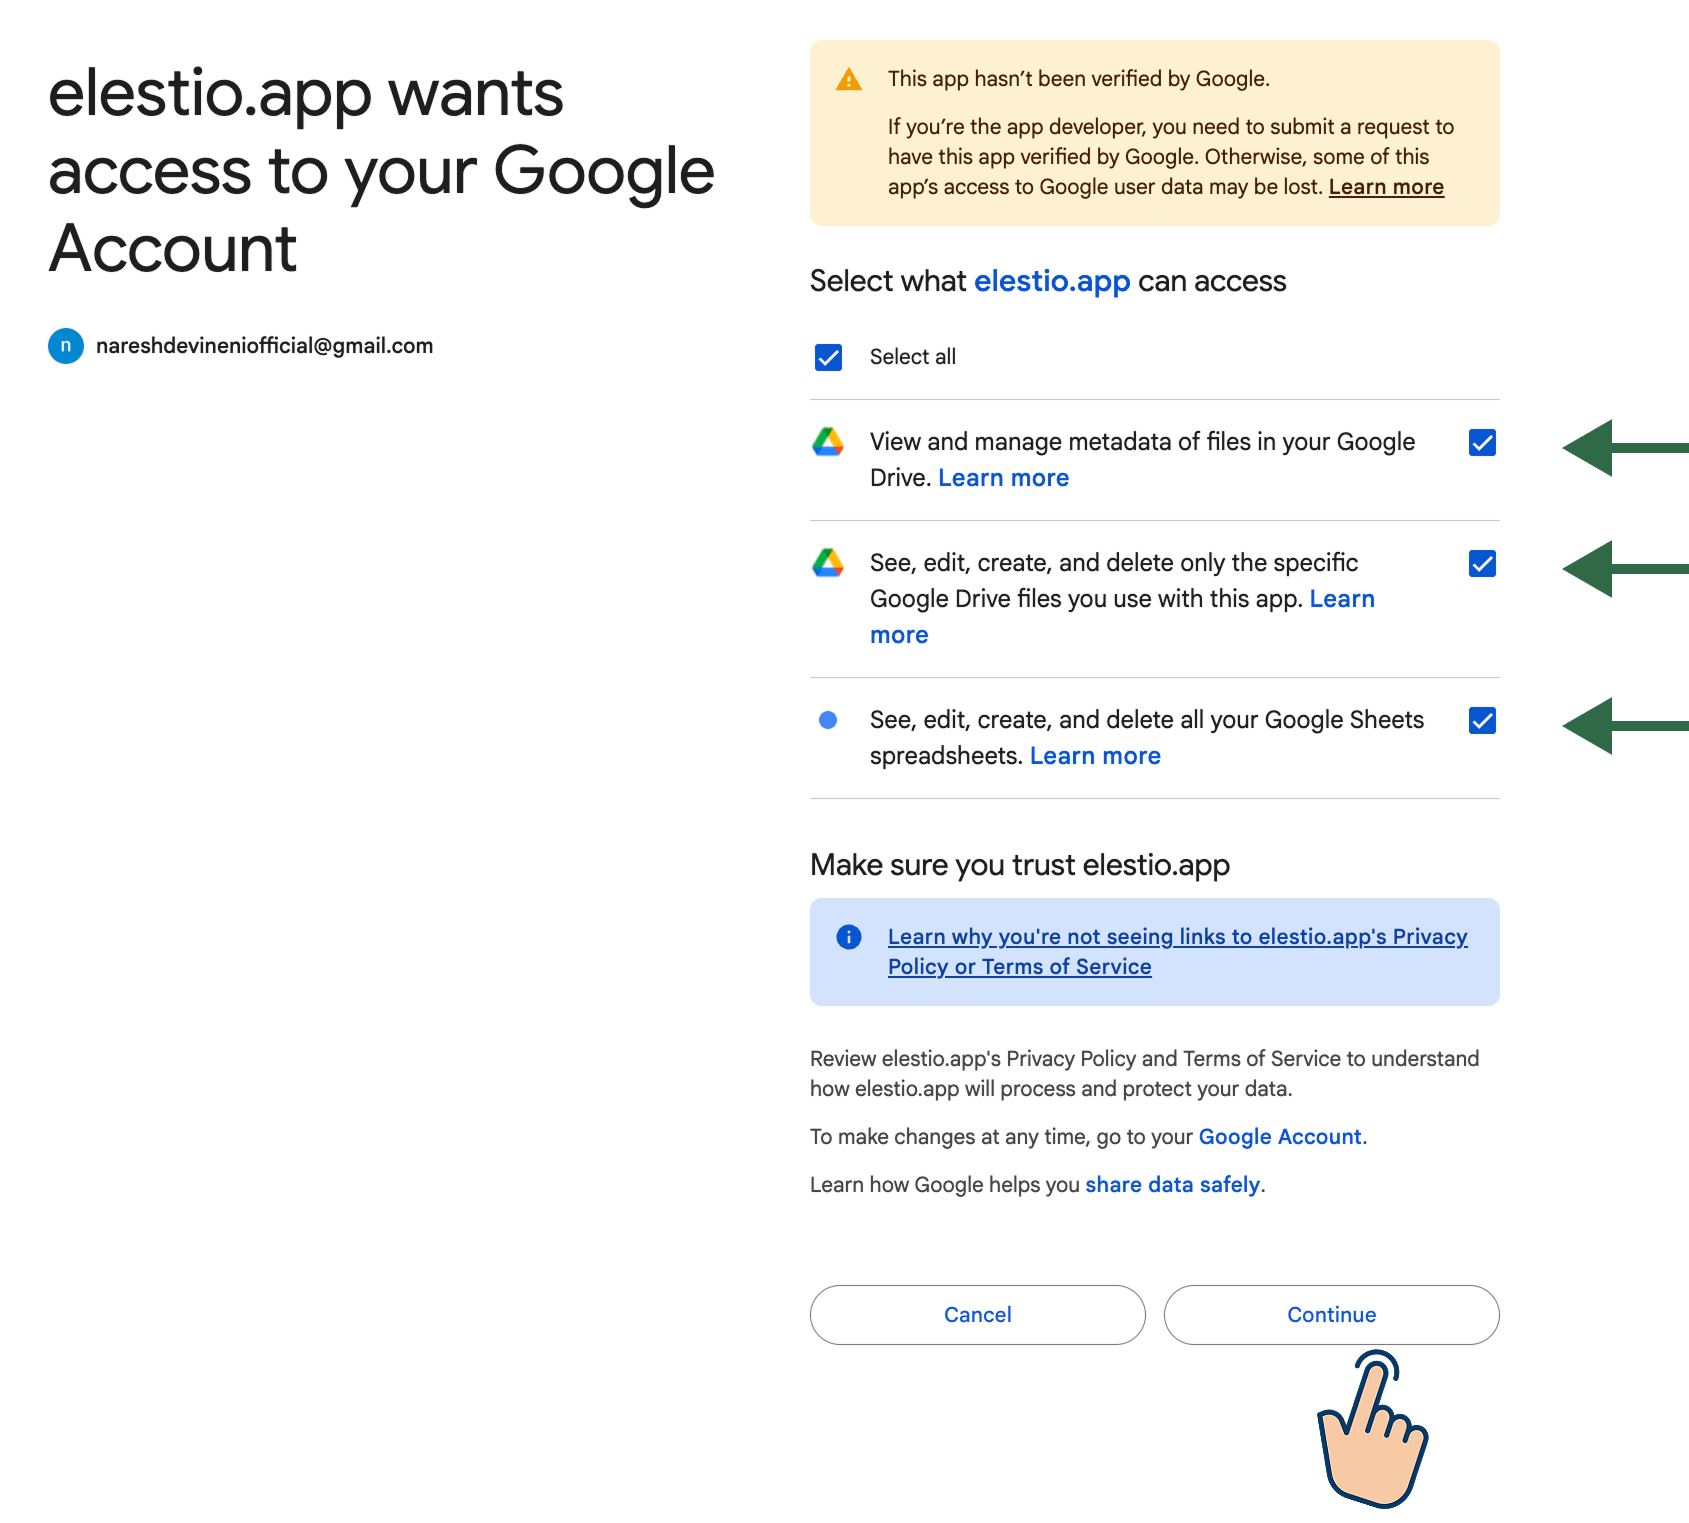
Now, because our Google Sheets are stored inside our Google Drive, and because our automation might create, edit, update, or delete our Google Sheets, we have to provide necessary permissions to an automation tool like n8n.
So, I selected all the permissions related to managing my Google Sheets for n8n.
And finally, I clicked on the "Continue" button, indicating I am providing consent to n8n to manage my Google Sheets via Google Drive.
If everything goes well, I should see a "Connection Successful" message from my n8n:

This means, my n8n is now succesfully connect to Google Sheets API and it can manage my Google Sheets through automation I create.
Nice! But I think I gave extra permissions to my n8n. Is there anyway to fix it?
Yep!
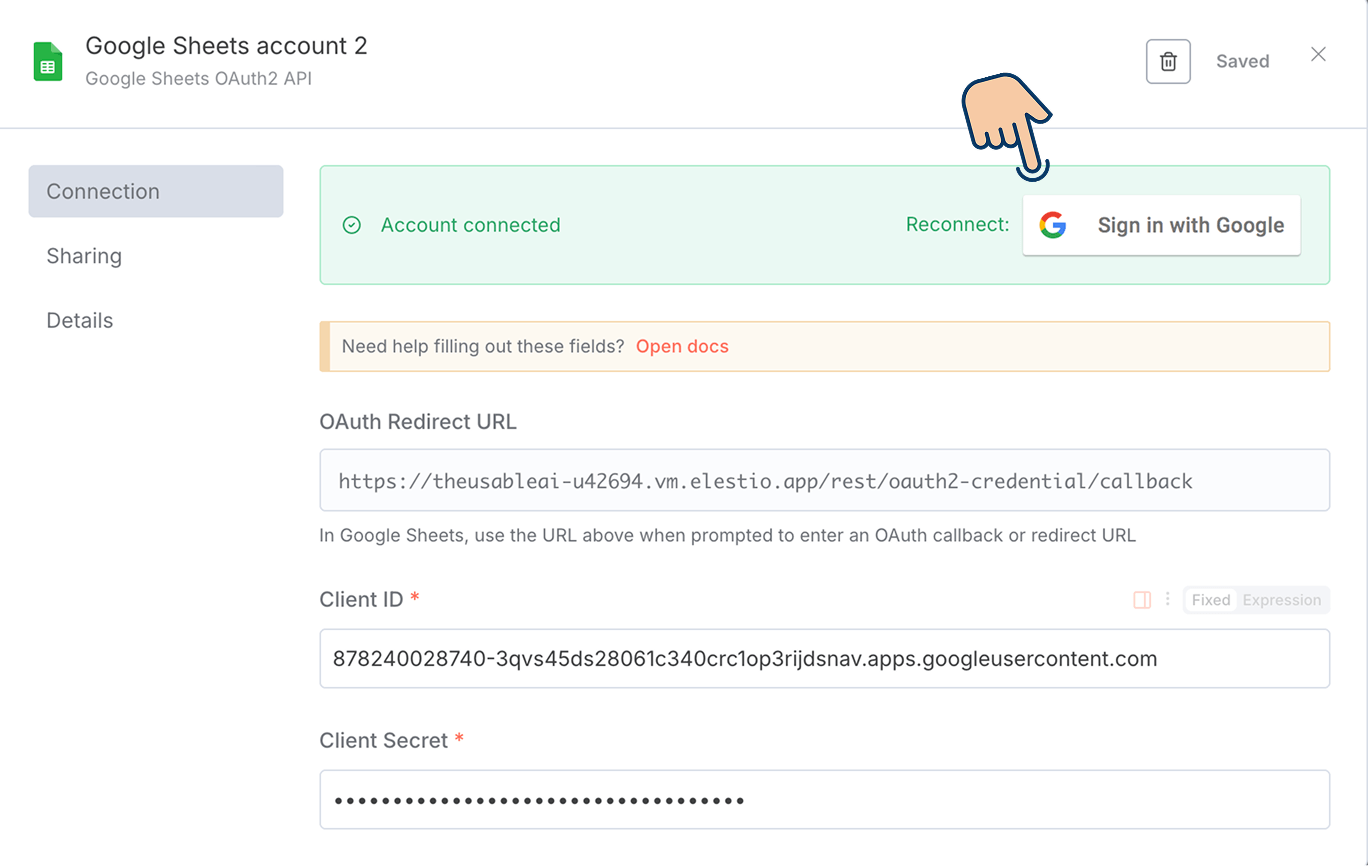
To update the permissions, you can always reconnect with Google inside n8n:
Nice, Thanks :)
You're welcome 😁
That's all you need to know about creating and using Google API credentials.
Hey! Wait wait. Can you quickly show me how to create Gmail API credentials?
Sure. Why not?
How to generate credentials for the Gmail API
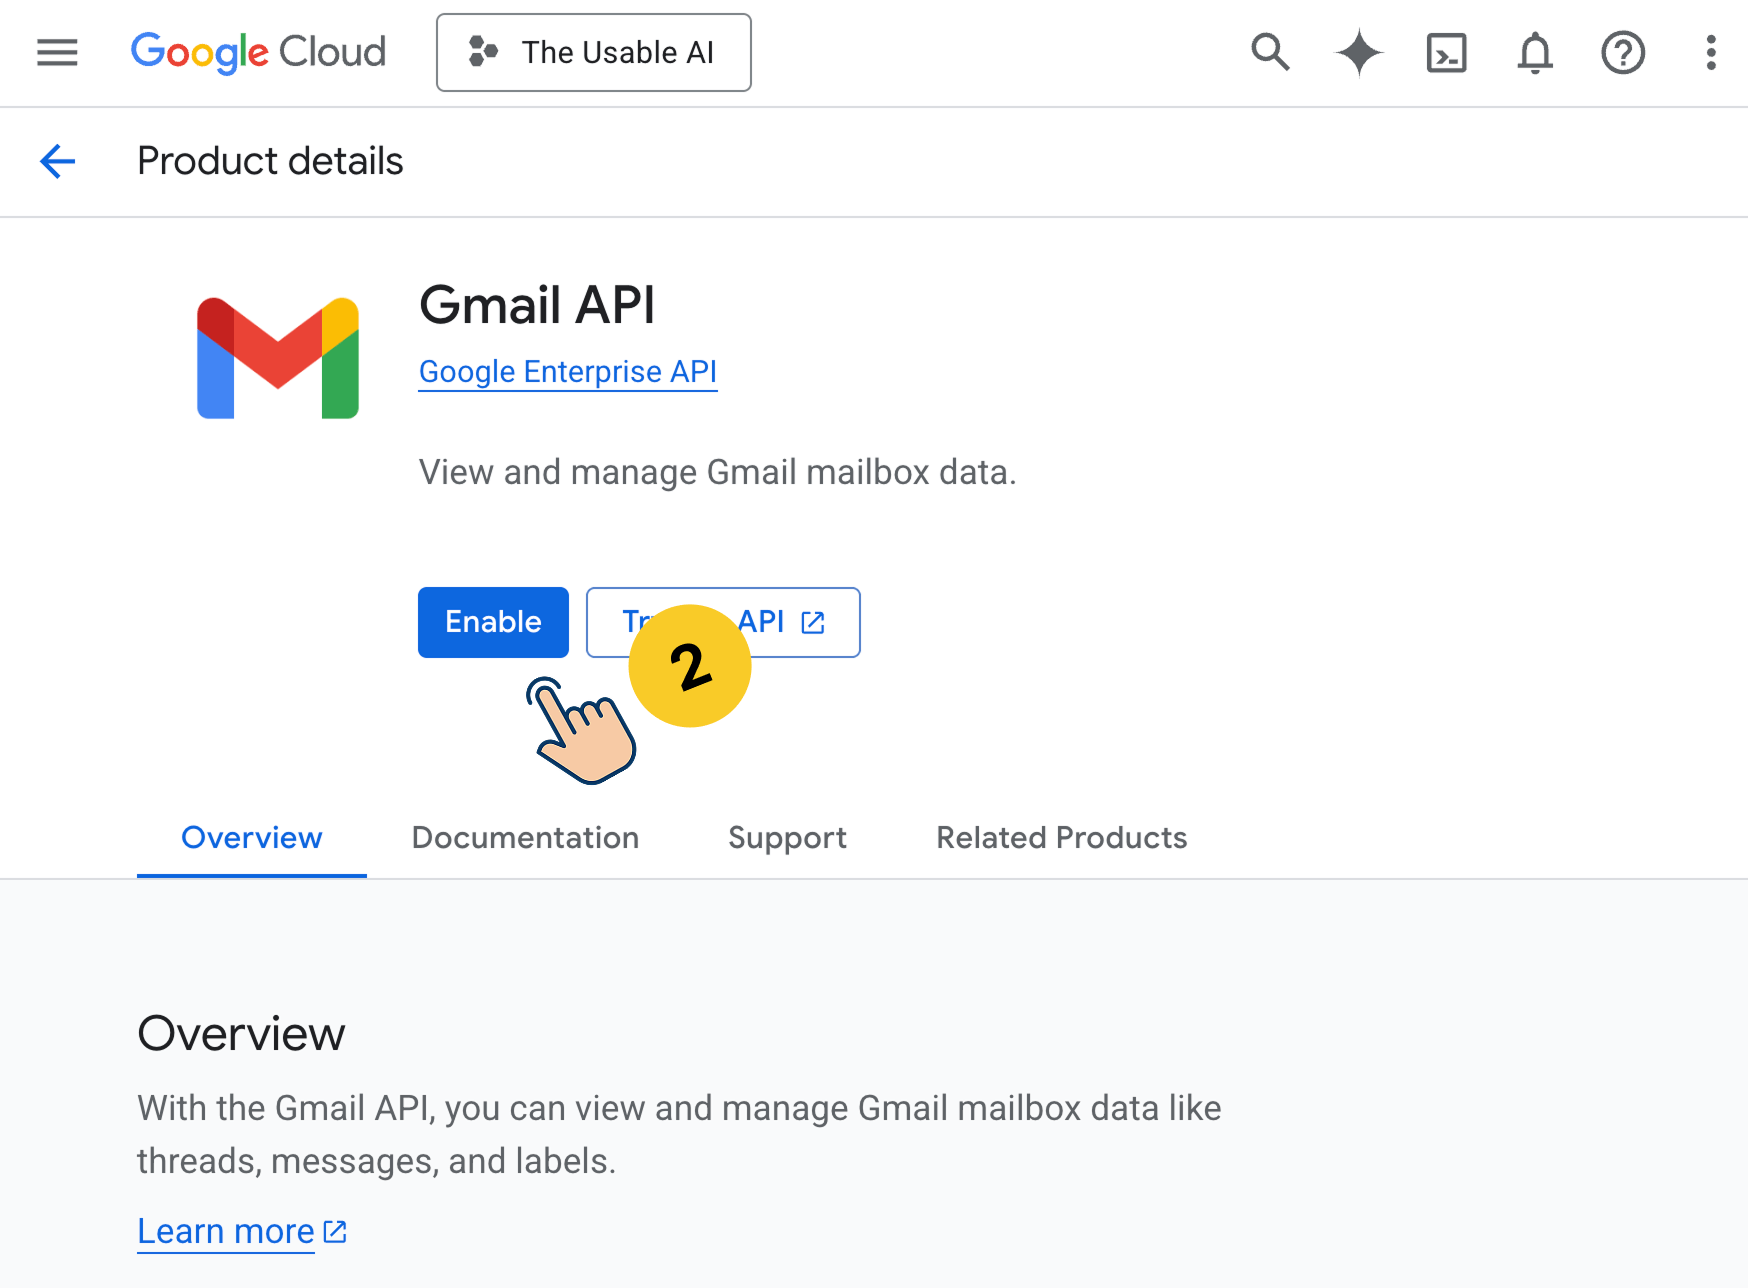
First, we need to enable the Gmail API.
So, from the main navigation on the left, go to:
APIs & Services → LibraryNext, search for the Gmail API and enable it:

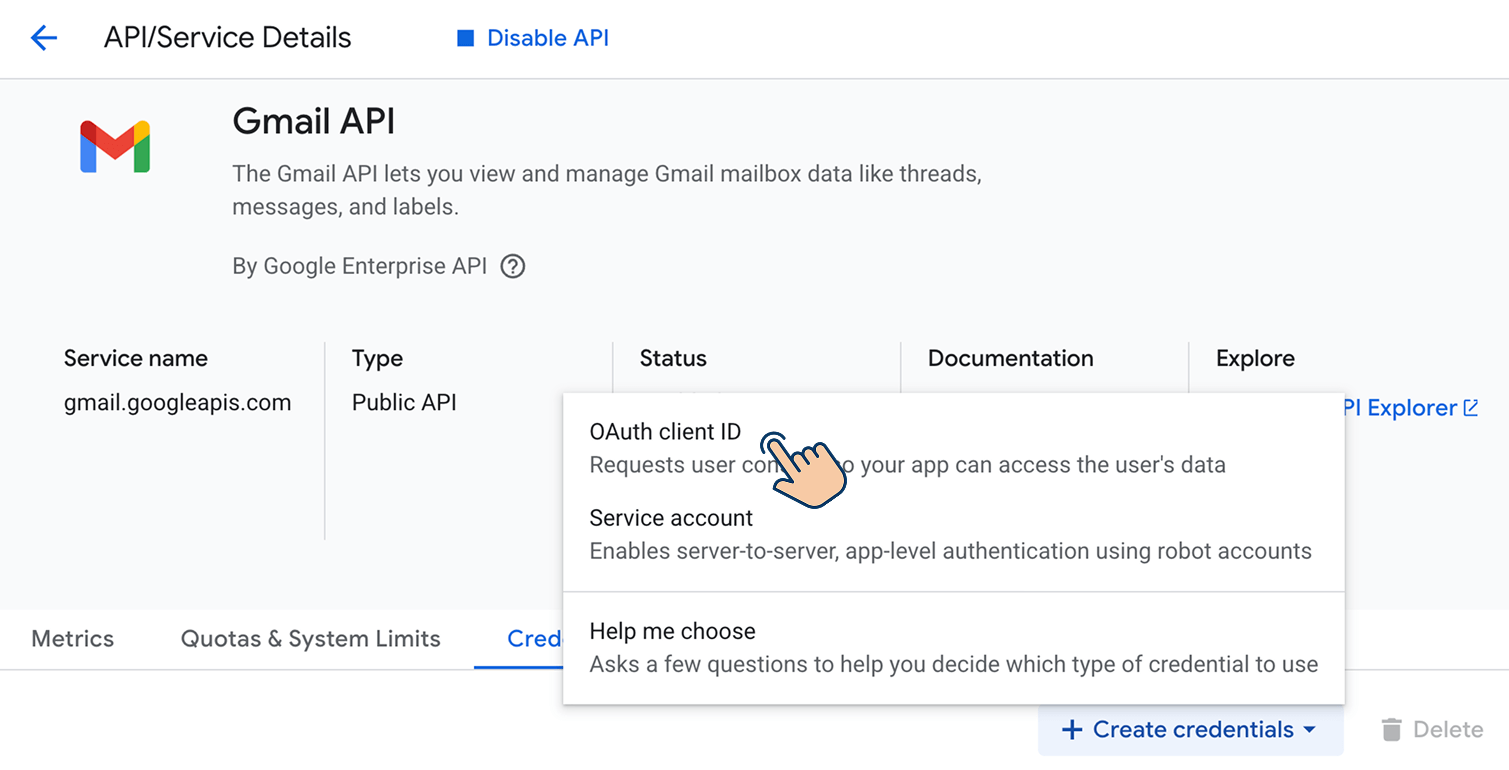
Next, switch to the "Credentials" tab and then click on "Create credentials":

Next, select "OAuth client ID" from the pop-up:
And if you notice, this time, we will no longer see the "Configure consent screen" notification:
You only need to configure the consent screen when you are generating credentials for the first time inside a Google Console project.
And because we have already configured it when we created credentials for the Google Sheets API, we will jump directly to the "Create OAuth client ID" screen:
In here, as you already know, you will select the application type as "Web Application" because an automation tool like n8n is a web application.
You will enter a recognizable app name, copy the Authorized redirect URI from n8n before creating the credentials.
Finally, you will get the credentials that are specific to using Gmail API inside an automation tool like n8n:
Wow! that easy?
Yep, that's easy 😄
Nice! I also heard you can generate an API key instead of OAuth Client ID?
Yep, we can.
But API keys are not as secure as OAuth Client Credentials.
API keys do not have the extra "consent" step that OAuth approach and because of this, it is easy to steal API keys.
Got it. But I still want to learn it. I will be careful.
Okay, if you say so 🕶️
How to create an API Key and then assign it to specific “enabled” APIs
Generating API keys is easy and has a different flow when compared to creating OAuth client credentials.
To send requests to a specific Google service via an API key, we still must first enable API access for that service.
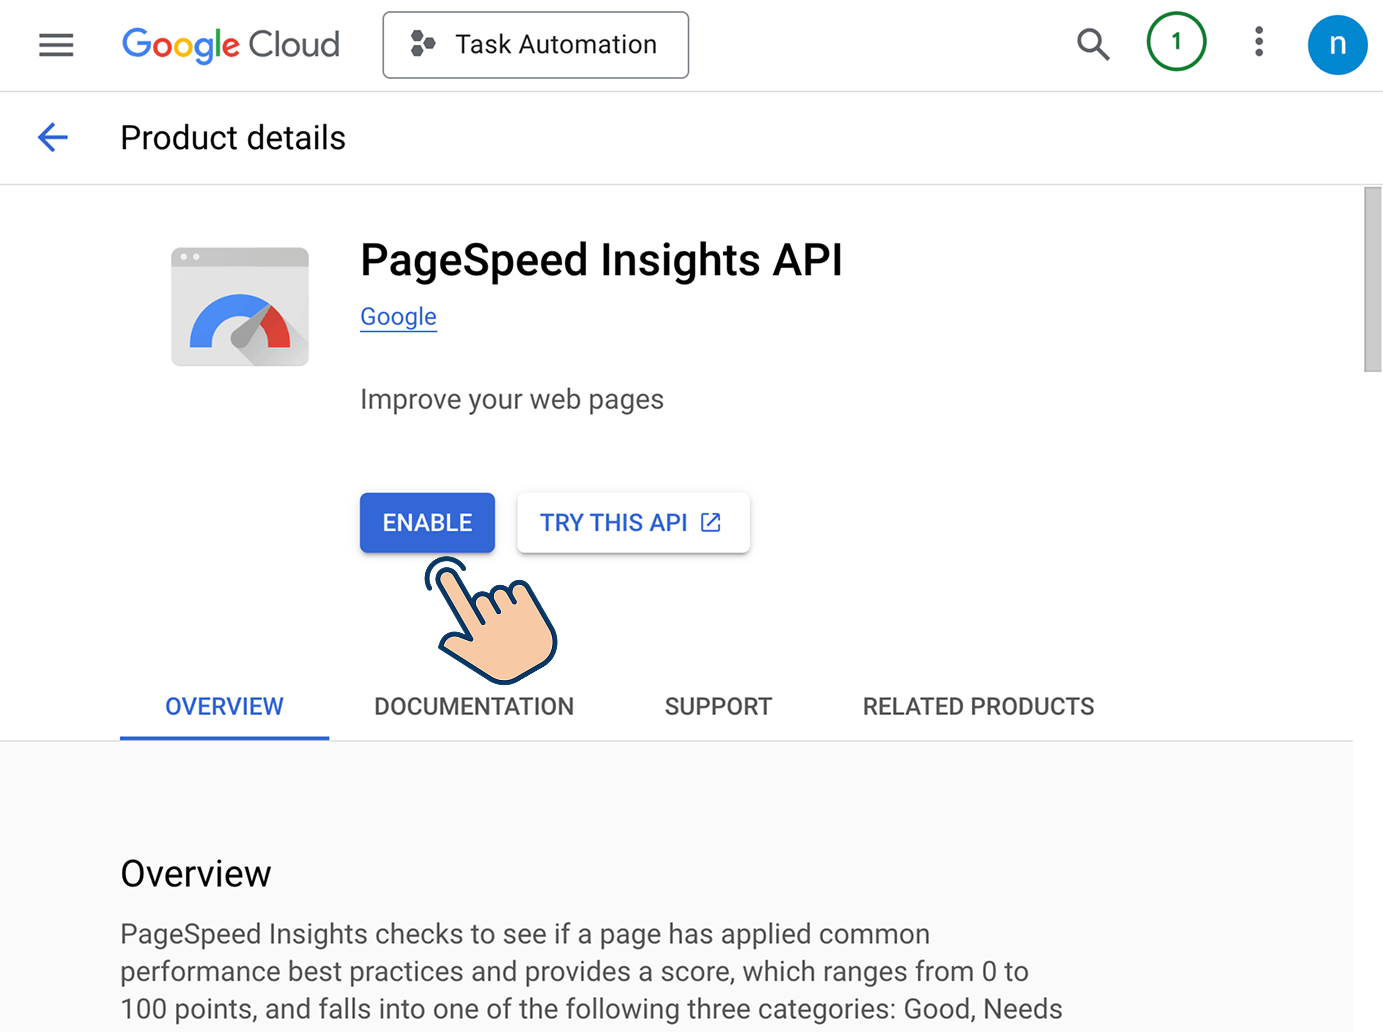
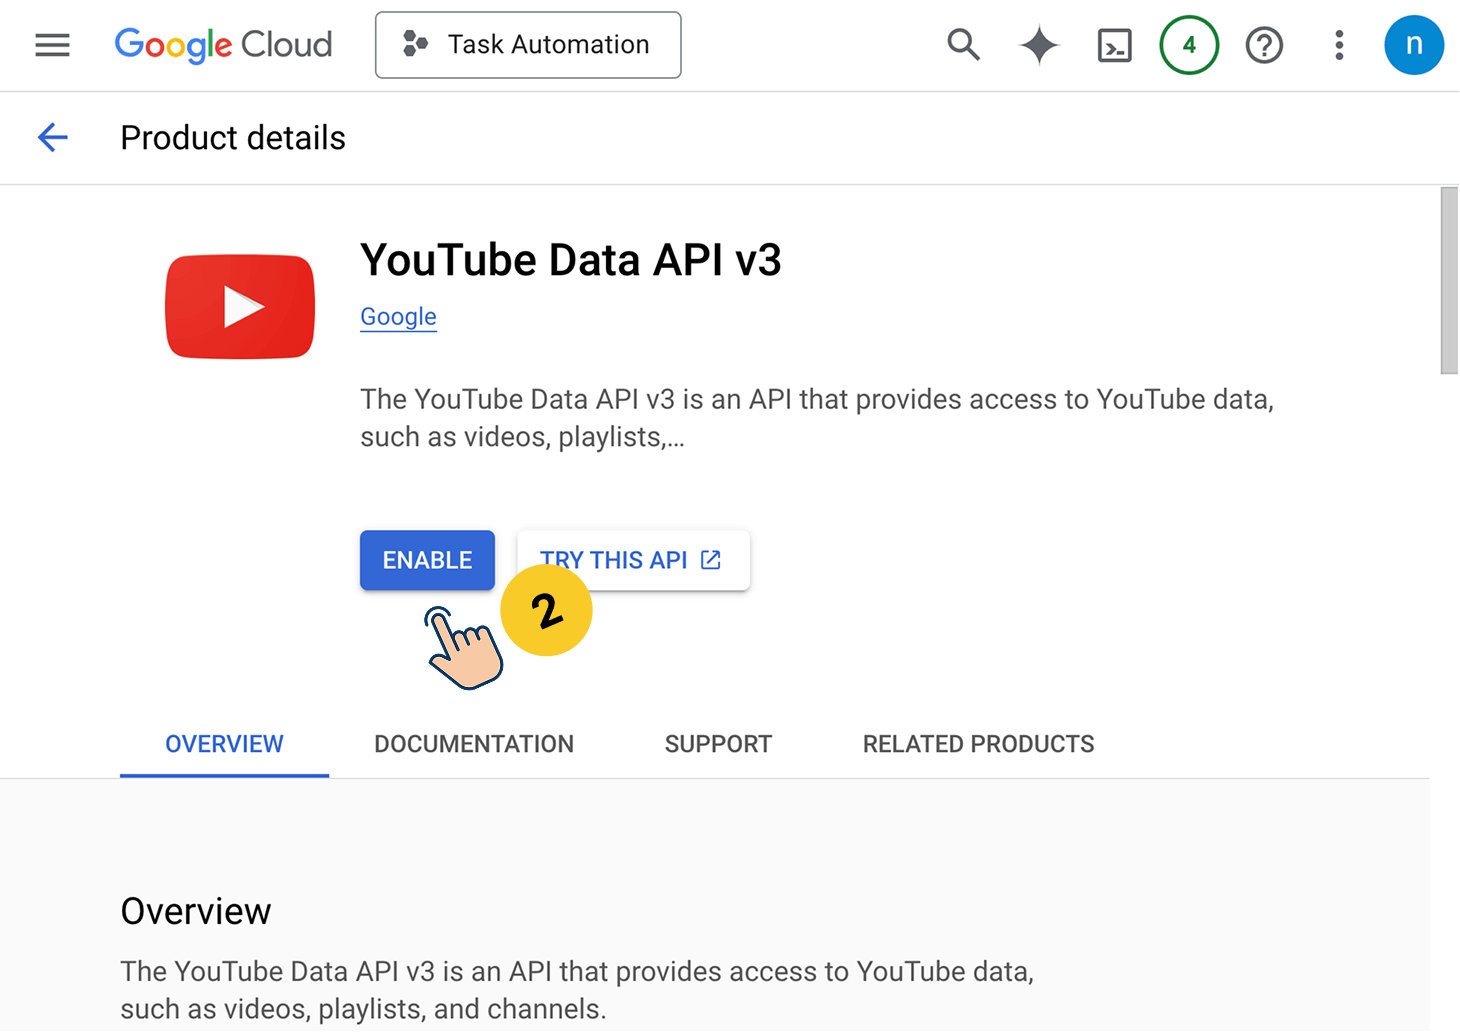
For the purposes of this lesson, I am enabling Google Page Speed Insights and Youtube API:
Next, using the main navigation on the left, go to:
APIs & Services → Credentials
Next, click on the "Create credentials" button.
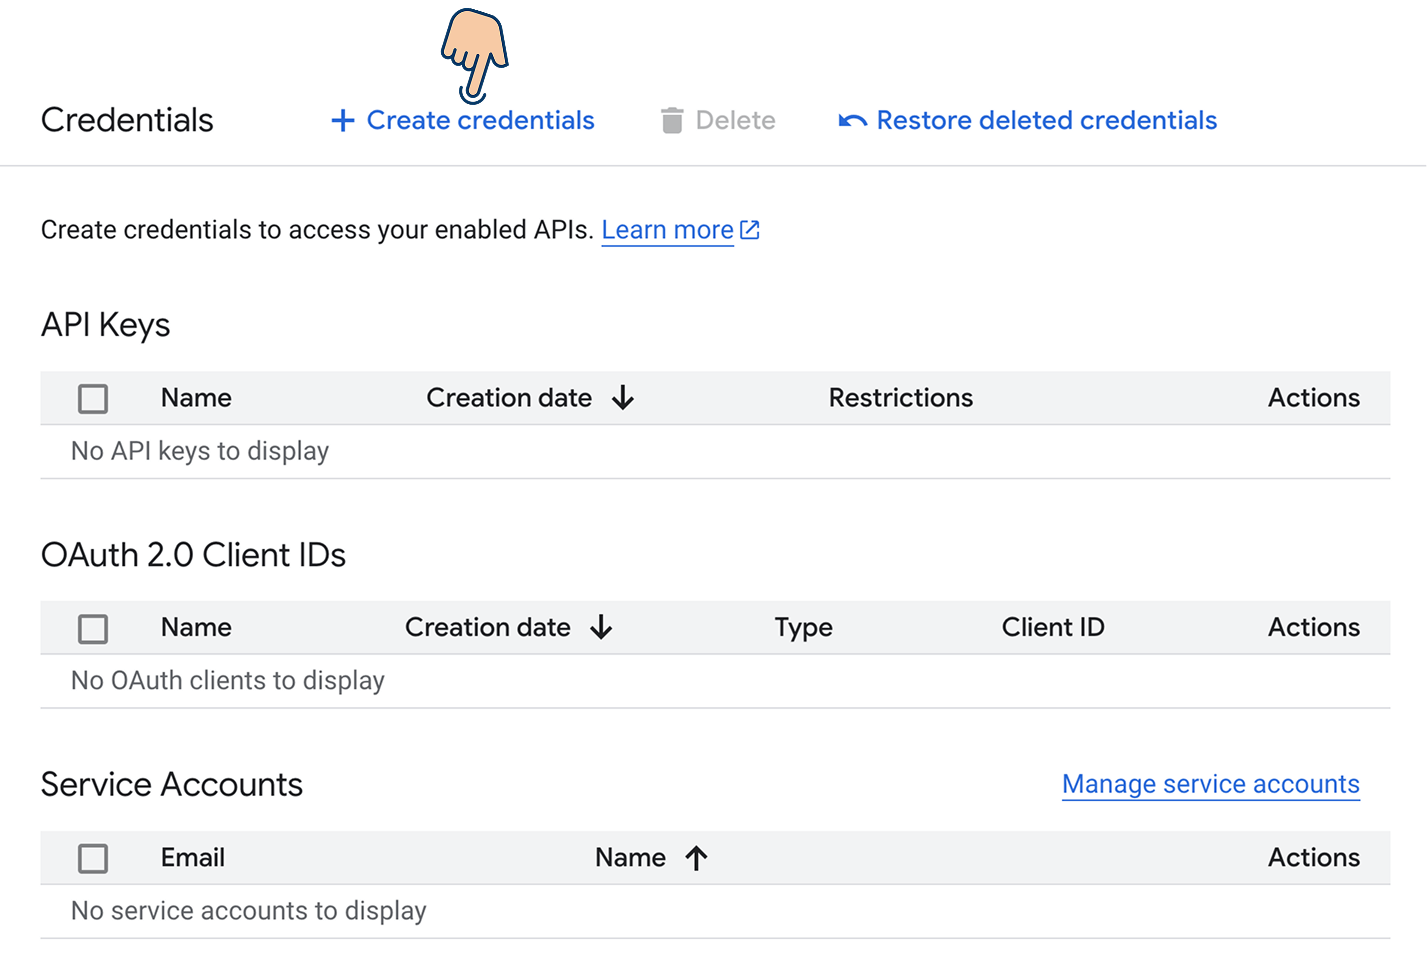
This will bring up a pop-up where you can select one of three credential types:
- API Key
- OAuth Client ID
- Service Account
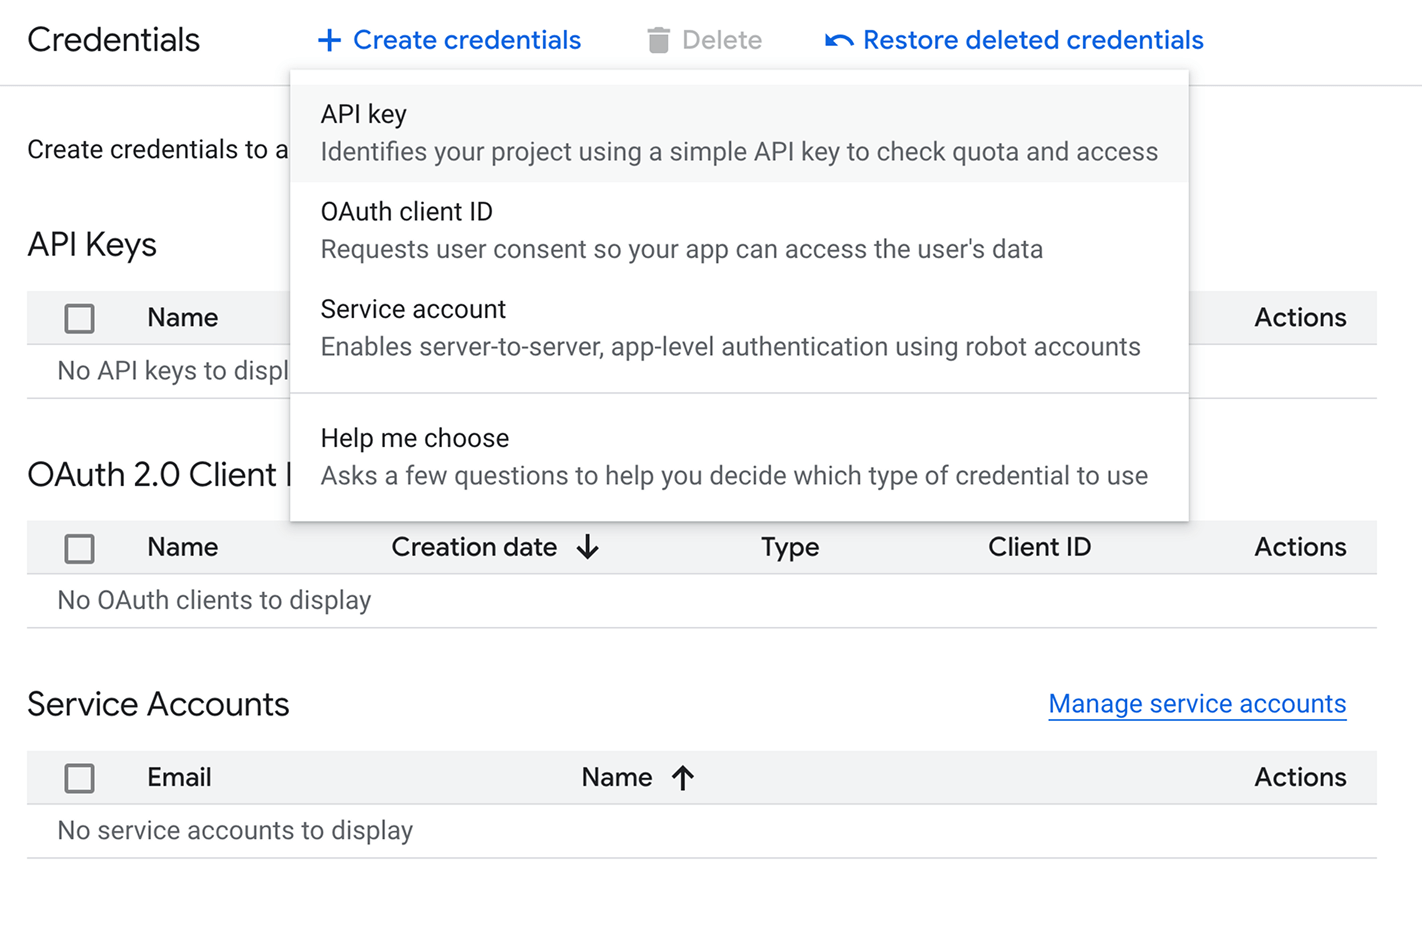
This time, click the "API key" button.
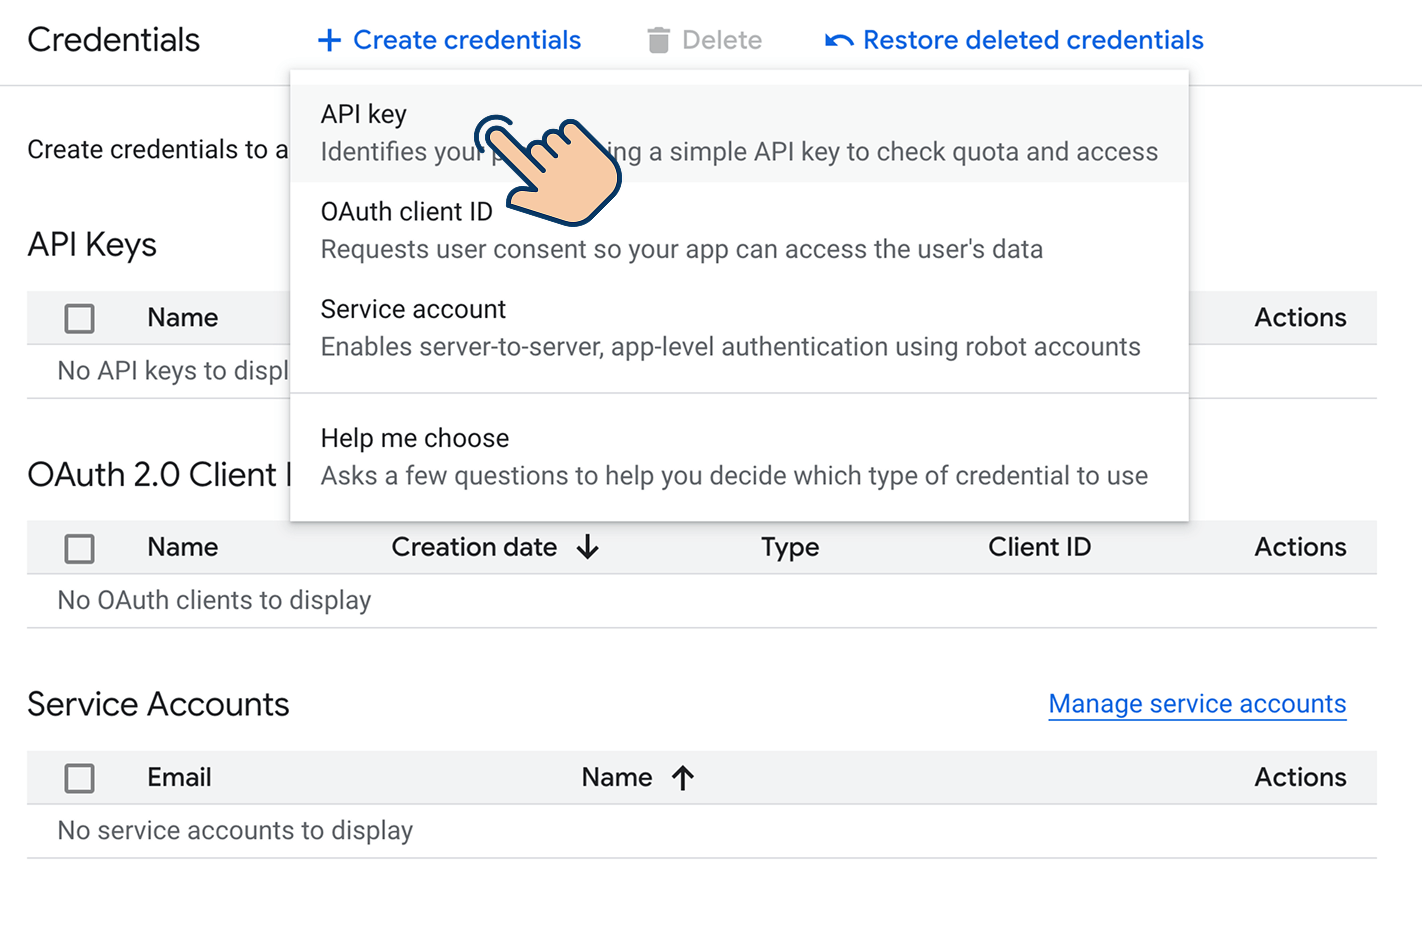
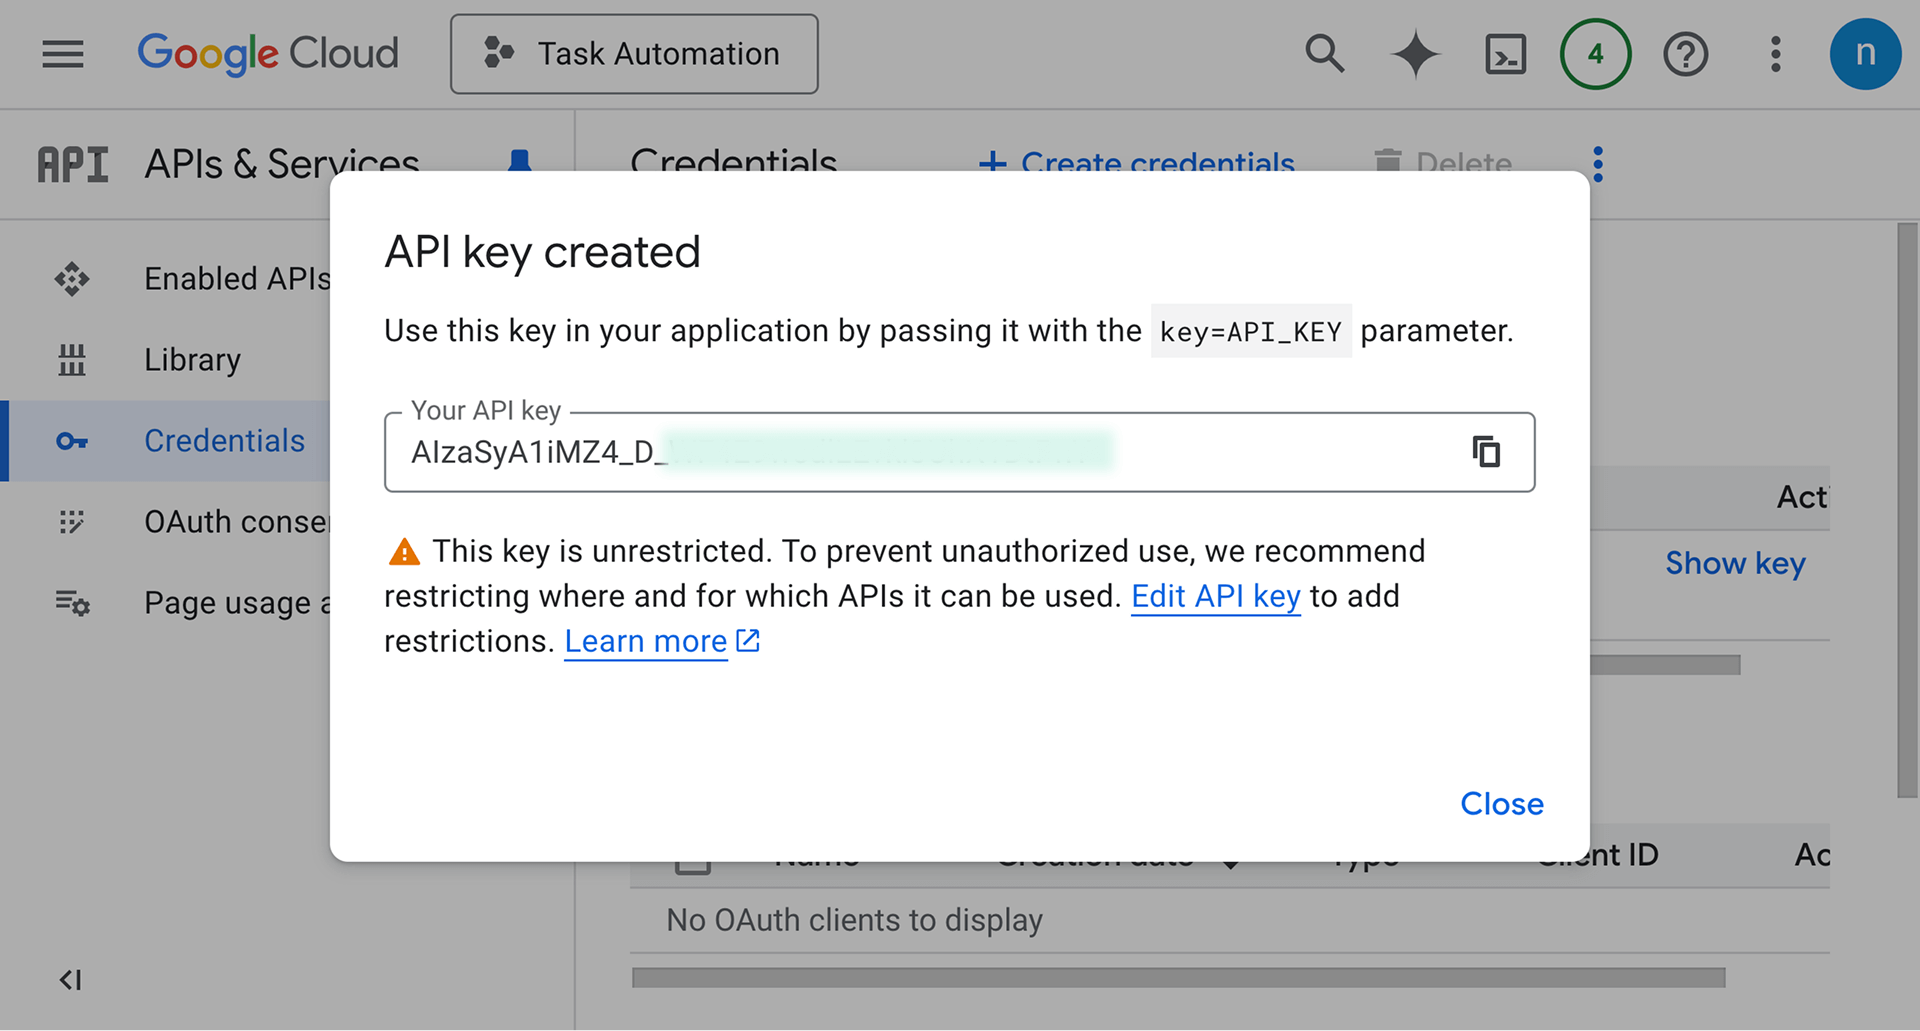
This will create a new API key:
Haha, that's all? Creating an API key is much easier when compared to the OAuth method.
Yeah, but consider the security too. Please remember that OAuth credentials are more secure when compared to API keys.
Yeah! Yeah! But is there anything we could do for enhancing the security of the API keys?
Yeah, good question.
We can.
Currently, the newly created API key is unrestricted.
It means it can be used for accessing the API of any enabled Google service from the API Library.
This is not secure because it could result in unauthorized use.
So, we can and need to restrict the newly created API key to be used with only a few selected services.
Applying restrictions to the API key
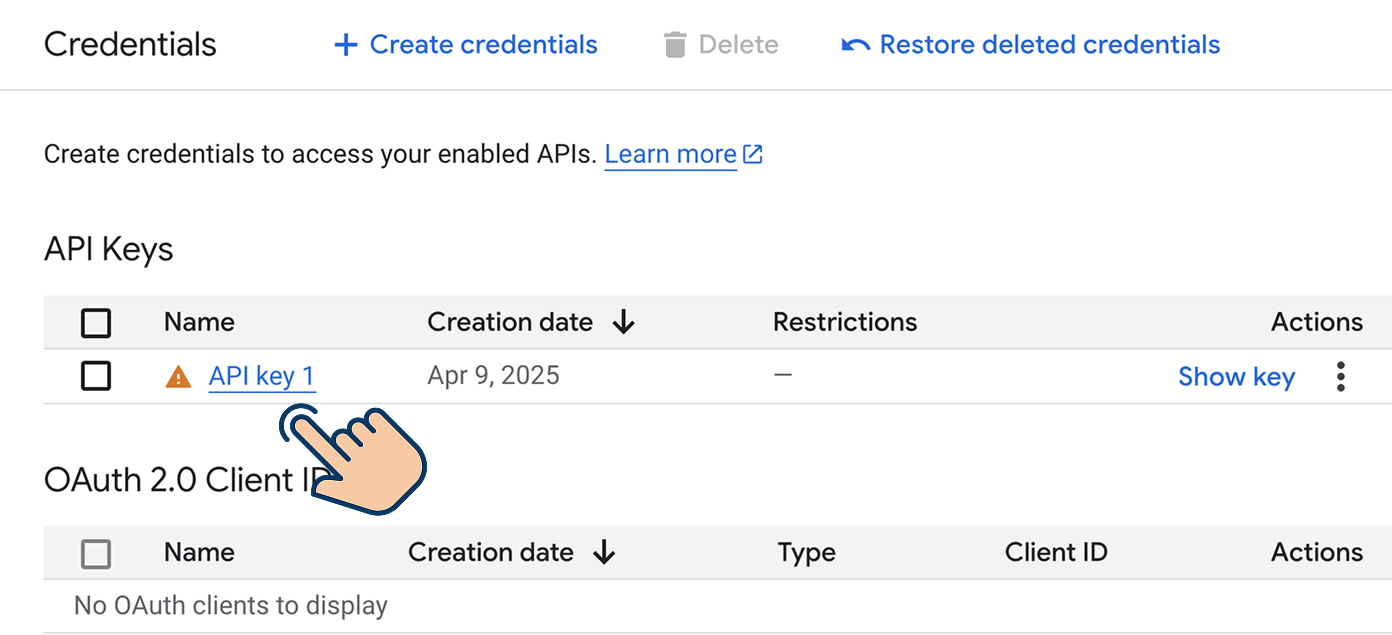
To do this, first close the “API key created” dialog box.
Next, click on the newly created “API key 1” to access its “Edit API” screen:
Next, under the “API restrictions” section, choose “Restrict key”:
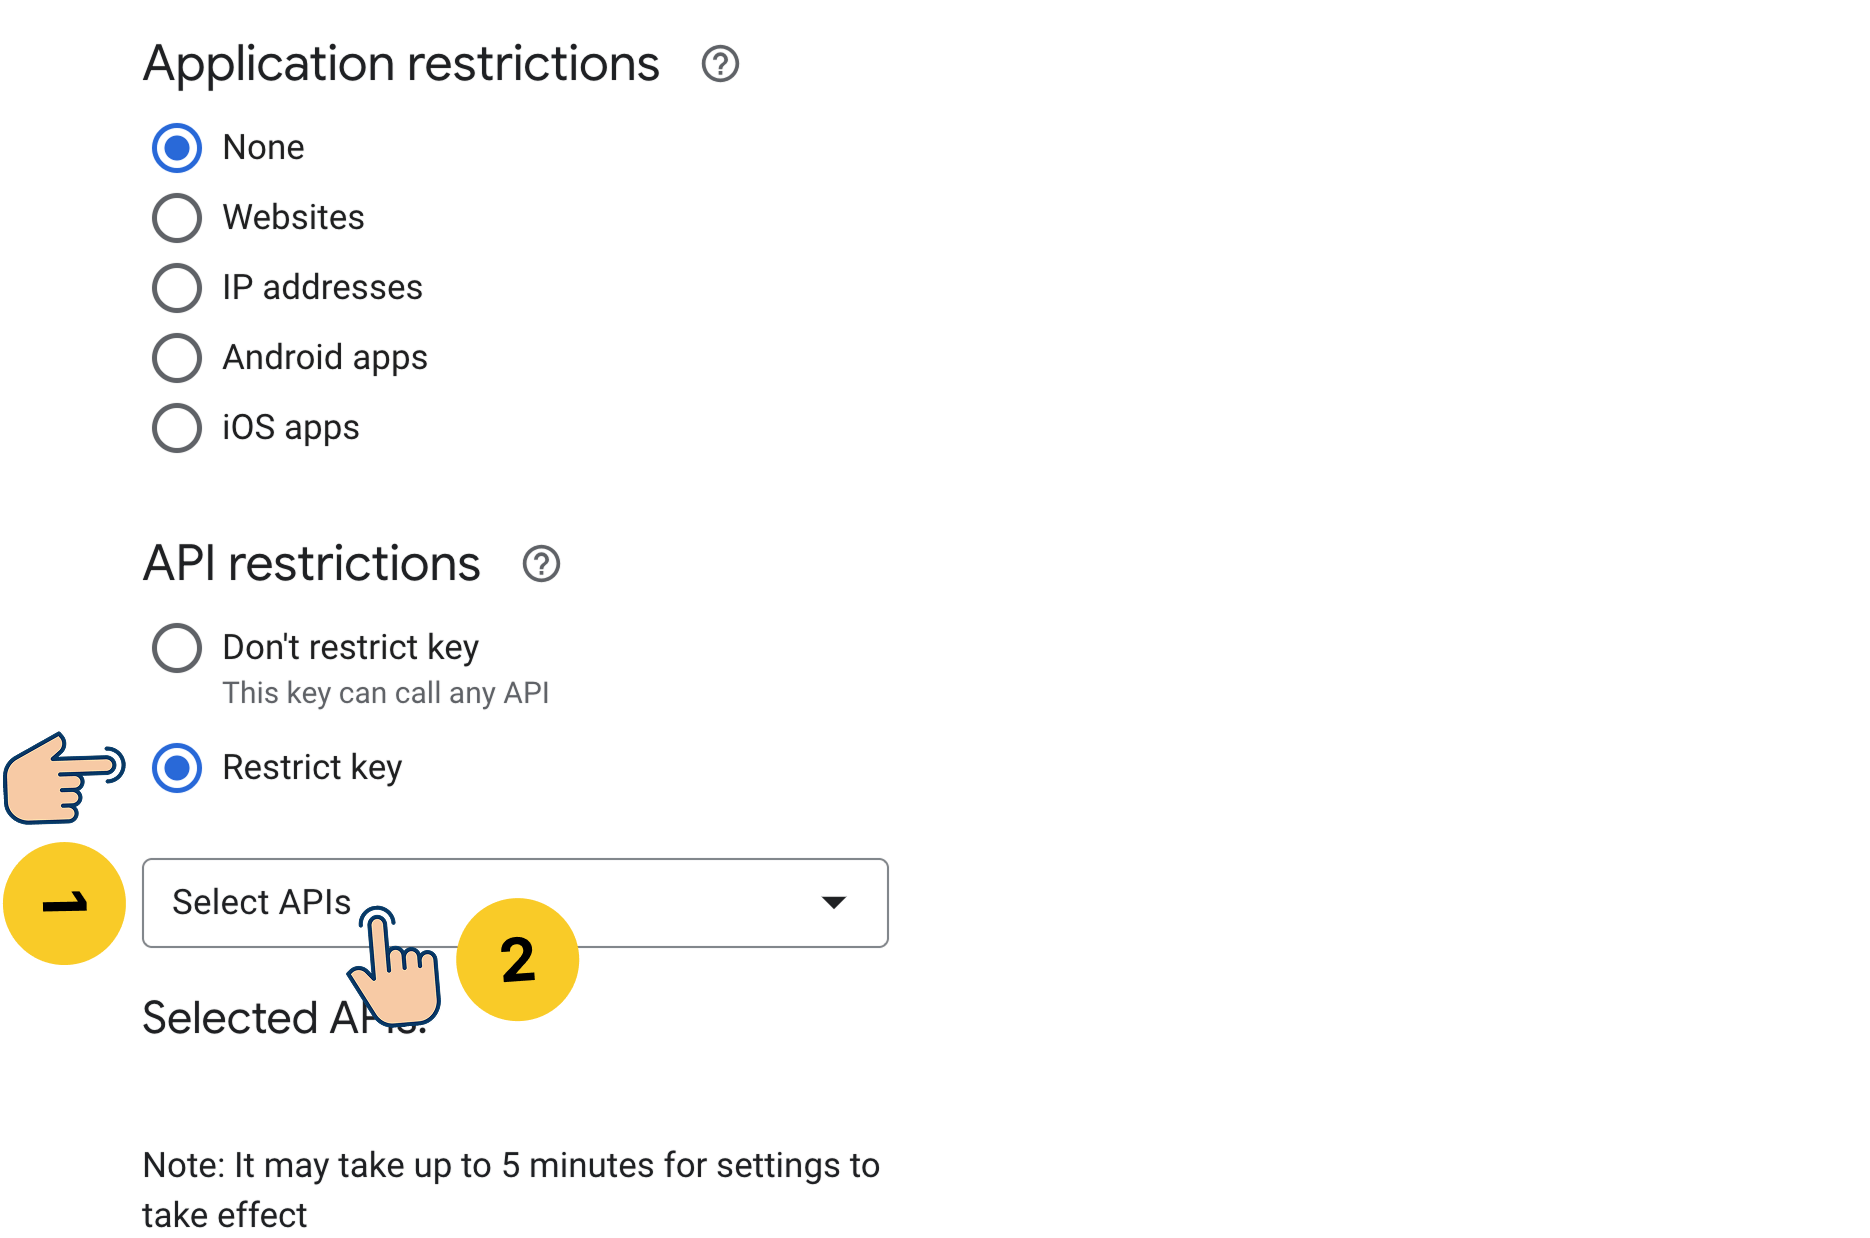
And then select the APIs that you want to access using this API key:
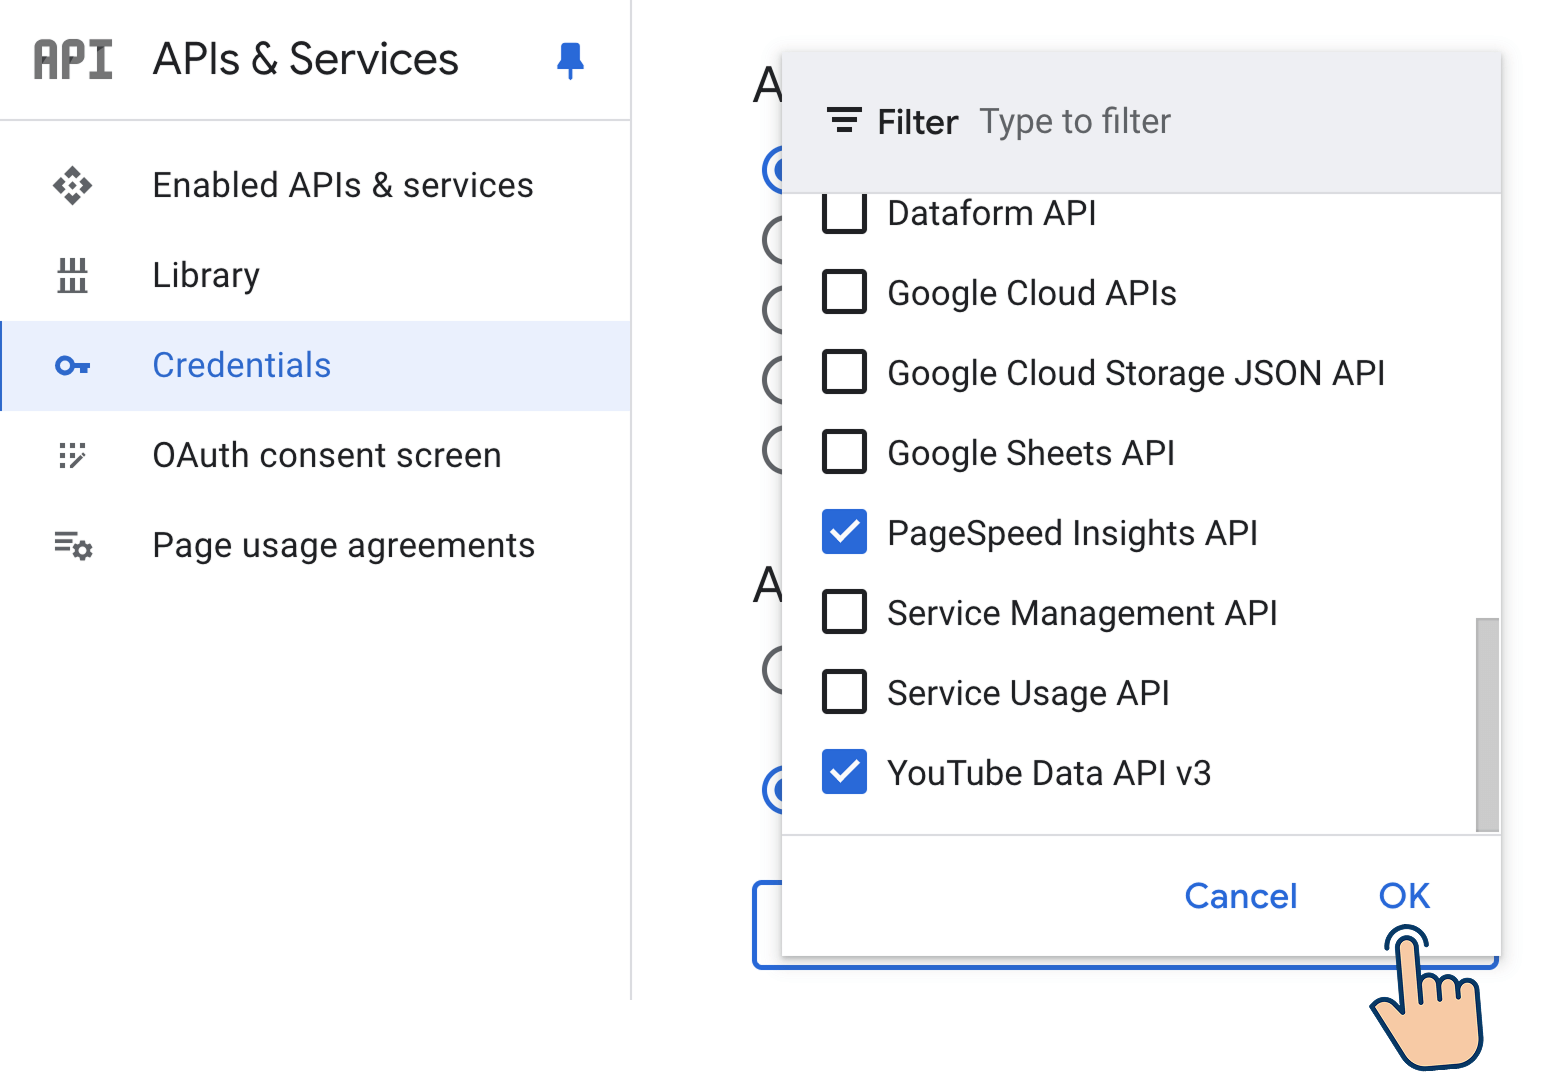
Once you select them, click the “OK” button and then click on the “Save” button:
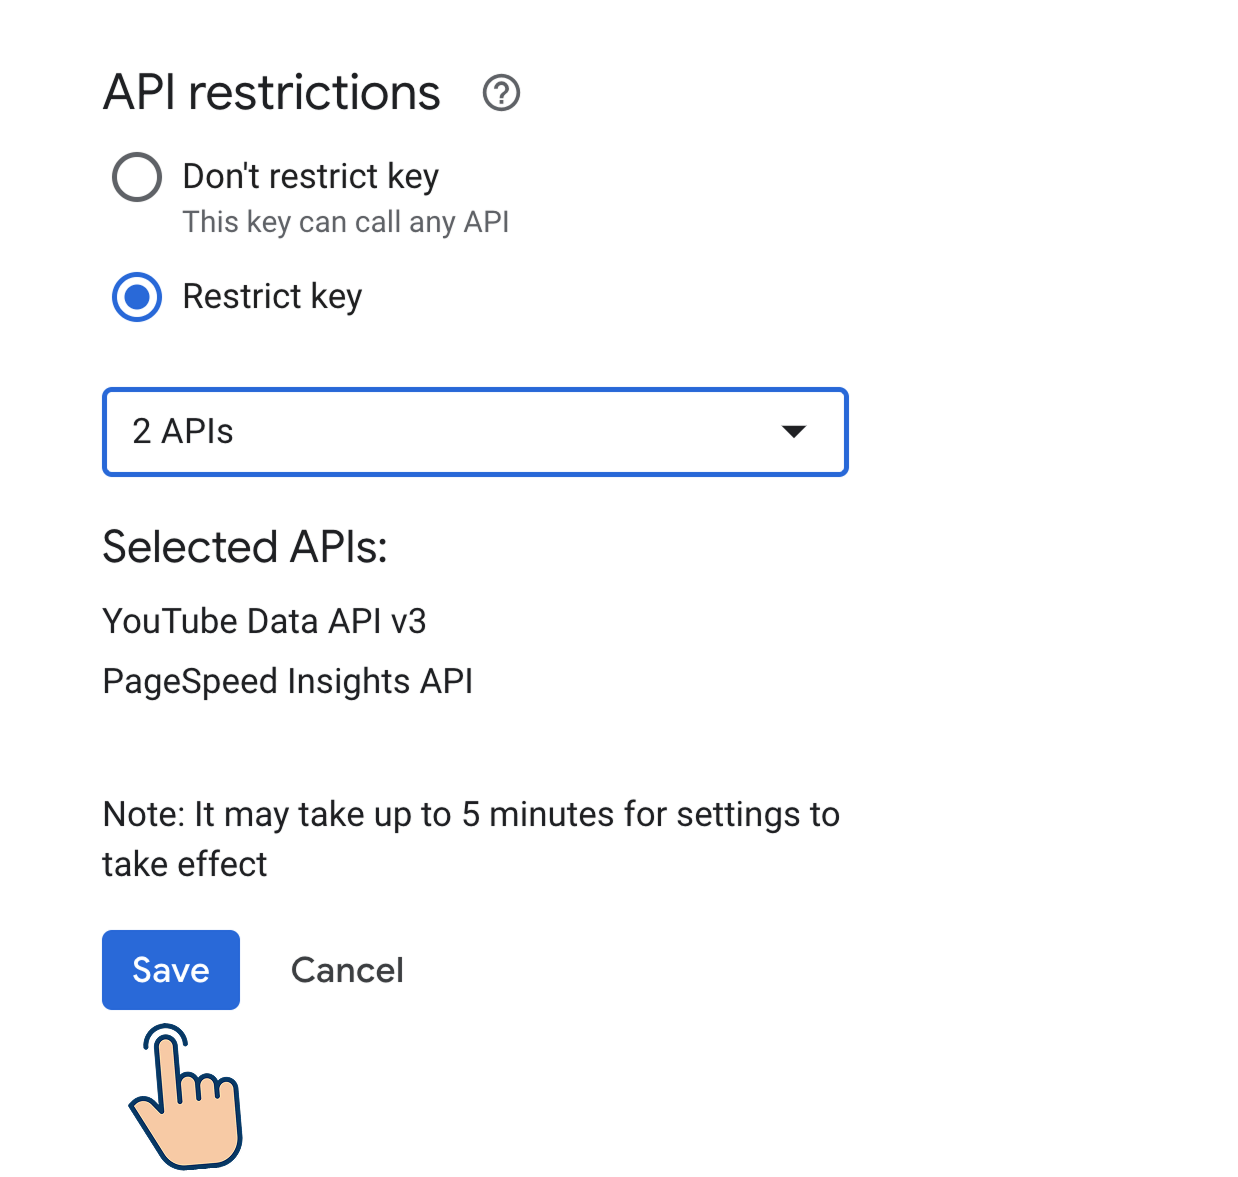
That's all.
If you now attempt to use the API key for non-selected APIs, the request will be rejected outright.
Nice touch of security, right?
Also, you can access the API key anytime by clicking its “Show key” button:
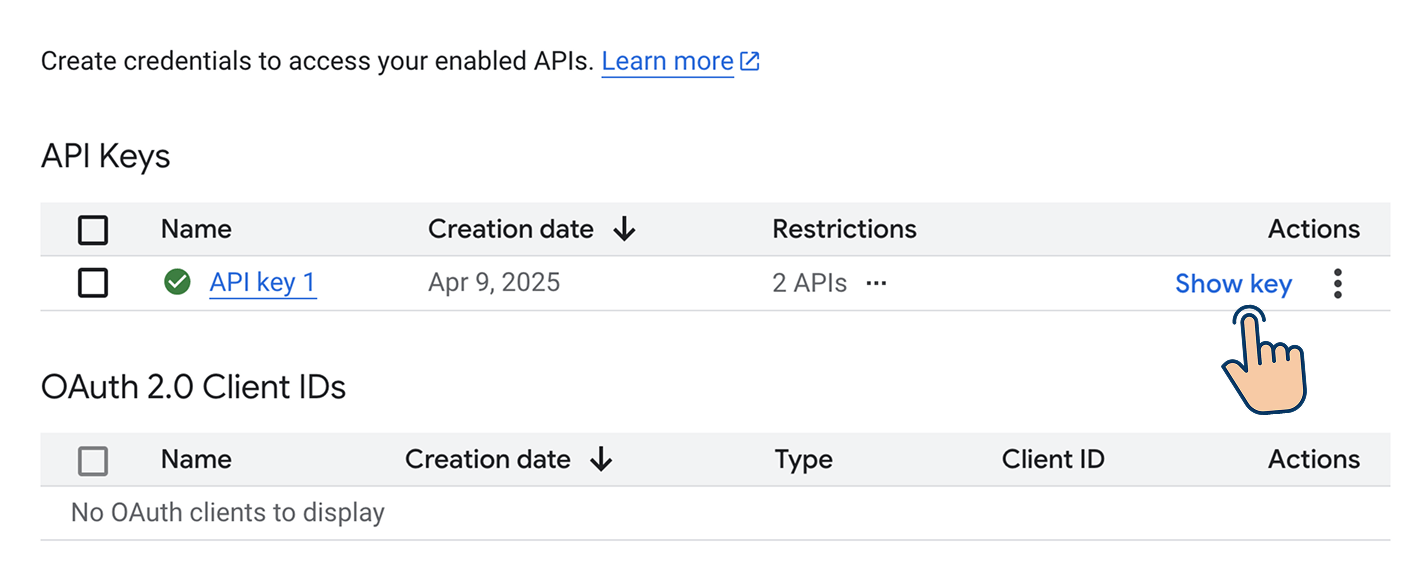
It opens up the dialog box with your API key:

And that's exactly how you create Google Credentials for accessing a particular API.
Now, I may have diverted you here from a different article; if that is the case, please return to it.
We are done here.
I will see you next time!